Let the noob questions begin...

Setup, repair and restoration of Rickenbacker Instruments

Moderator: jingle_jangle

Post Reply
User avatar
basshead
RRF Consultant
Posts: 241
Joined: Sat Aug 25, 2012 9:17 am

Let the noob questions begin...

Post by basshead »

I've wanted a project 4001 for some time (not sure why really, lol) and a few weeks ago I picked up this 4001 "Wreckenbacker" on eBay. I bought it from gibsondependable and while it's pretty much as advertised, I didn't join the forum until after I bought it and only then realised he was so disliked.

Anyway, it's a good project bass. My intention is to ultimately have it finished in Azure with chequerboard binding to the body, and perhaps the headstock.

I've searched and read the forum but haven't found particular answers to my questions, so here goes:
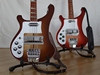
  • There's a few extraneous holes dotted around the body that I will fill with dowel and sand flush. Is there a particular type of wooden dowel I should use to prevent future shrinkage?

    You can see in the photo that someone has gouged out wood in the tailpiece routing to fit (I assume) a different bridge/tailpiece. I plan to route the gouging out neatly then fill it with a piece of maple so that it looks original. What's a good filler that won't shrink? I know it won't really be seen once the tailpiece is fitted, but the front edge of the "gouging" is very close to where the front edge of the tailpiece will sit once it's fitted and no matter how well I make a fill piece, I'd imagine there'll be a join line that the paint will eventually sink into and I'd like to fill it correctly to prevent this.

    How do I remove the body binding. I've read Paul's posts about using an Exacto chisel blade but what's the best way to start lifting it?

    Back to the non-shrinking filler - there's a few dings around the body and headstock that I'd like to fill.

    No offence to the people that like Mapleglo, but to me it looks like Pooglo, lol. I was going to sand the whole thing back with 180 dry and a rubbing block before repainting it Azure. Do I need to go back to bare timber or just key the original finish?

    This thing is almost a fretless now the frets are so low. I want to re-fret it but want to keep it looking "correct" Rickenbacker. I read about slicing down beside the frets before removing them etc but what's the process for finishing the ends. I want to re-bind the neck too, so will be removing the old binding.

    When routing the body for the chequer binding, does it really matter how deep the route is (from front face towards the back) and how much binding is left proud of the body, as I've read about scraping it flush with the body and the replacement white binding will obviously cover it up anyway.

    If I go for the headstock binding, how deep do I make that route? Do I try and leave as little as possible to scrape away? The black/white binding I have is approximately 5.5mm "tall".
Ok, time to get ready for work, so I'll finish with the silly questions for now. I'll add more as I think of them, lol...
Attachments
Wreckenbacker.JPG
E = Fb
Bass player's theory of relativity...
User avatar
Ontario_RIC_fan
Advanced Member
Posts: 2794
Joined: Sat Dec 20, 2008 8:39 pm

Re: Let the noob questions begin...

Post by Ontario_RIC_fan »

I think that one is QB 424. Did you get the jackplate too?

http://www.rickresource.com/register/vi ... 6order%3D7

How will you repair the damage to the neck?
Brian Morton
A Rickenbacker Fan
in Hamilton, Ontario, Canada
=========================
67 FG 625
74 JG 4000
76 JG 430
77 JG 620
77 JG 320
79 JG 4001
80 FG 620/12
81 BG 480
91 JG 610
02 BG 620
78 TR7
83 TR25
User avatar
basshead
RRF Consultant
Posts: 241
Joined: Sat Aug 25, 2012 9:17 am

Re: Let the noob questions begin...

Post by basshead »

Ontario_RIC_fan wrote:I think that one is QB 424. Did you get the jackplate too?

http://www.rickresource.com/register/vi ... 6order%3D7

How will you repair the damage to the neck?
Yes, that's the one and yes, I have the jack plate. The neck has been glued/repaired and seems quite solid at the moment. I've bent and pulled the neck around a bit and there were no groans, creaks or cracking sounds. I'll look at it better once I start on it in earnest.
E = Fb
Bass player's theory of relativity...
User avatar
johnallg
Rick-a-holic
Posts: 17688
Joined: Wed Apr 05, 2006 12:13 pm

Re: Let the noob questions begin...

Post by johnallg »

This is what a Rick tail rout should look like. Looks like yours, except you have extra holes closer to the body edge.
Attachments
2004 4003 tailpiece rout
User avatar
teb
Advanced Member
Posts: 1532
Joined: Sun Jul 17, 2005 7:39 pm

Re: Let the noob questions begin...

Post by teb »

As for filling holes with dowels,the chances that they won't eventually stand out like a sore thumb are pretty poor. The wood grain on the top is running lengthwise (bridge to headstock). The grain on a dowel plug will be running crosswise (front to back). If there ever was a formula for movement and the eventual telegraphing that there is a fill there, that's it.

Kinda looks like somebody did a home-made repair to try to fix some tailpiece lift.
User avatar
basshead
RRF Consultant
Posts: 241
Joined: Sat Aug 25, 2012 9:17 am

Re: Let the noob questions begin...

Post by basshead »

johnallg wrote:This is what a Rick tail rout should look like. Looks like yours, except you have extra holes closer to the body edge.
You can see the gouging at the bottom of the rout. You can also see how close the gouging is to the front edge where the tailpiece will be once attached.

The three "holes" close to the body edge are little spots of damage to the original finish, not actual holes. Caused by the ball ends of the strings?

teb wrote:As for filling holes with dowels,the chances that they won't eventually stand out like a sore thumb are pretty poor. The wood grain on the top is running lengthwise (bridge to headstock). The grain on a dowel plug will be running crosswise (front to back). If there ever was a formula for movement and the eventual telegraphing that there is a fill there, that's it.

Kinda looks like somebody did a home-made repair to try to fix some tailpiece lift.
What's a better idea for filling holes then?
Attachments
IMG_0829.jpg
E = Fb
Bass player's theory of relativity...
User avatar
johnallg
Rick-a-holic
Posts: 17688
Joined: Wed Apr 05, 2006 12:13 pm

Re: Let the noob questions begin...

Post by johnallg »

Now I see what you meant, Wayne. Pretty deep gouging...
User avatar
Wiker
Member
Posts: 407
Joined: Sat May 16, 2009 7:08 pm

Re: Let the noob questions begin...

Post by Wiker »

basshead wrote:I was going to sand the whole thing back with 180 dry and a rubbing block before repainting it Azure. Do I need to go back to bare timber or just key the original finish?
Never done it myself so I have no idea if you need to sand back to bare maple, but why not. Shouldn't take that much more time. Myself I think I would feel better about it if I stared clean from bare maple.
basshead wrote:This thing is almost a fretless now the frets are so low. I want to re-fret it but want to keep it looking "correct" Rickenbacker. I read about slicing down beside the frets before removing them etc but what's the process for finishing the ends. I want to re-bind the neck too, so will be removing the old binding.
Don't know what you are referring to here. Are you thinking about refretting while preserving the original finish on the fretboard? If so then you don't have to refinish the fretboard, which can be a bit of a challenge. On the other hand, you got it as a project :wink: so.. why not do it properly. And, you are going to refinish the whole bass, so then you can clear coat the fretboard at the same time as the rest of the bass. Also, if you strip the finish of the fretboard you'll be able to level the fretboard properly.
And, a freshly finished fretboard look really lovely. :)


Having done several re-frets before you probably know this already, but just in case... a few tips I pickup here and there:
Removing the old frets, heat them up properly with a solder iron and pull them up slowly to minimize chipping.
The wood may be compressed a little by the old frets so that some places the slot might not get a good enough grip on the new fret. One tip I found useful is to run a little denatured alcohol in the fret slots. It will expand the wood so the slots get a better grip of the new frets. I wet a q-tip and run it over the slots. Have to run the sanding block over the board a couple of times afterwards to level any slightly raised edges.
Also, sharp edges of the slots can prevent the new frets from seating down properly. Run a triangular or square file lightly over each slot to take off the sharp edges.


You probably already found a few of these, but here are some links I collected myself when doing research on re-finishing the fretboard. Most of these are Paul W. sharing his knowledge.
viewtopic.php?p=528941#p528941
viewtopic.php?p=625821#p625821
viewtopic.php?f=2&t=394519&start=60
viewtopic.php?f=13&t=400651
viewtopic.php?p=379133#p379133
viewtopic.php?f=2&t=398420
viewtopic.php?p=641768#p641768
http://www.rickenbacker.com/forum/viewt ... 18#p100818
viewtopic.php?p=615905#p615905
viewtopic.php?p=699252#p699252
User avatar
basshead
RRF Consultant
Posts: 241
Joined: Sat Aug 25, 2012 9:17 am

Re: Let the noob questions begin...

Post by basshead »

johnallg wrote:This is what a Rick tail rout should look like. Looks like yours, except you have extra holes closer to the body edge.
Can you give me the dimensions for the cavity please? Especially the depth at the front where mine's been gouged.
E = Fb
Bass player's theory of relativity...
User avatar
basshead
RRF Consultant
Posts: 241
Joined: Sat Aug 25, 2012 9:17 am

Re: Let the noob questions begin...

Post by basshead »

Hi guys. What's the best filler to use on scratches and gouges etc on my project 4001? I'll be painting it a solid colour but I don't want anything that will shrink and eventually leave ghost marks.

I'm going home to Australia on vacation this Wednesday and want to bring some filler back so can any of the forum's Aussie members recommend a particular brand?
E = Fb
Bass player's theory of relativity...
User avatar
aceonbass
Veteran RRF member
Posts: 6650
Joined: Tue Jul 09, 2002 5:00 am
Contact:

Re: Let the noob questions begin...

Post by aceonbass »

While you're filling holes Wayne, start with the mounting holes for the tailpiece. It's off center to the treble side by quite a bit. The skunk stripe makes it real easy to see where the tailpiece should be. New saddles will be required, but now the strings will be centered between the "teeth" in the tailpiece. That routing in the mute area may have been done because someone replaced the mute at one time with a newer one. Older ones seem to be offset to the rear in the cavity, while newer ones are centered.
User avatar
basshead
RRF Consultant
Posts: 241
Joined: Sat Aug 25, 2012 9:17 am

Re: Let the noob questions begin...

Post by basshead »

Got another nooby question. I appologise in advance if this has already been discussed but I couldn't find anything through searches. Perhaps my choice of words was wrong.

Anyway, what's the best way to repair damage around a screw hole? I've got at least 17 extra holes to fill in this thing and most of them are all chipped and raggedy around the hole itself. I have a plug cutter but once I fill the holes, the damage will still be apparent in a ring around the new plug.
E = Fb
Bass player's theory of relativity...
User avatar
johnallg
Rick-a-holic
Posts: 17688
Joined: Wed Apr 05, 2006 12:13 pm

Re: Let the noob questions begin...

Post by johnallg »

basshead wrote:Got another nooby question. I appologise in advance if this has already been discussed but I couldn't find anything through searches. Perhaps my choice of words was wrong.

Anyway, what's the best way to repair damage around a screw hole? I've got at least 17 extra holes to fill in this thing and most of them are all chipped and raggedy around the hole itself. I have a plug cutter but once I fill the holes, the damage will still be apparent in a ring around the new plug.
Cut a bigger plug? :twisted: :)
User avatar
basshead
RRF Consultant
Posts: 241
Joined: Sat Aug 25, 2012 9:17 am

Re: Let the noob questions begin...

Post by basshead »

johnallg wrote:Cut a bigger plug? :twisted: :)
I'd rather not have to go to bigger plugs if I can avoid it.

You can see what I mean by the extra damage around the hole in the pic.
IMG_0987.JPG
Out of curiosity, anyone know what might have been screwed to the back of the guitar? You can make out by the shadow that's been left, that it was something T shaped. I'll be digging out the plastic wood and filling the holes properly, I just wondered what might have been screwed there once?
IMG_0989.JPG
IMG_0990.JPG
E = Fb
Bass player's theory of relativity...
User avatar
basshead
RRF Consultant
Posts: 241
Joined: Sat Aug 25, 2012 9:17 am

Re: Let the noob questions begin...

Post by basshead »

basshead wrote:...what's the best way to repair damage around a screw hole? I've got at least 17 extra holes to fill in this thing and most of them are all chipped and raggedy around the hole itself...
I've used glue with sawdust before to patch small holes etc, but does this method shrink?
E = Fb
Bass player's theory of relativity...
Post Reply

Return to “"Vibrola" Rickenbacker Technical Forum: By Paul Wilczynski”