

I've been reading through the forum and think I'm about ready to start on my Wreckenbacker resto. Please jump in and correct me if I've got something wrong.
I am going to rub back the original finish with 220 dry and a rubbing block. It's straight forward enough to go with the grain on the front, back, neck and headstock, but what about the edge of the body? Using a rubbing block and sanding the edge around the body will be going against the grain. Is this a problem?
I want to re-bind the body in chequerboard so I guess I'll be routing the edge again anyway but I was going to leave the original binding on whilst sanding the body so that I don't inadvertently round off the body edge.
Does anyone have the dimensions of the bridge route as I want to repair the damage to mine. Lol, I could pull the bridge off my 4003 but it'd be a bit easier if someone already had the dimensions!
Paul, would you mind shooting that Azure colour patch please so I can get it matched out here? Also, what is a good filler to use in any dings or scratches once I've sanded the body back. I don't think there'll be any major marks left once it's sanded but they'll still need filling. Is superglue ok for this?
Ready to start on the Wreckenbacker
Moderator: jingle_jangle
Ready to start on the Wreckenbacker
E = Fb
Bass player's theory of relativity...
Bass player's theory of relativity...

Re: Ready to start on the Wreckenbacker
For stripping I would suggest you start with a coarser grit than 220, say 80 or 100 for quicker removal of the finish. Then use 150 to remove the 80 grit scratches, and remove the rest of the scratches with a pass with 220. Use a hard block, and don't wet the paper. No filling should be necessary unless there are deep dings and gouges already on the body. You shouldn't get into trouble with just a hard block. Don't worry about the grain on the sides; maple is tight grained and easy in that regard. You'll have the sand the inside curves with a cylindrical block or fingers. Don't remove the binding until you are ready for routing. I wish you success! 
All I wanna do is rock!
Re: Ready to start on the Wreckenbacker
For small dents in the wood you can try fixing those with water and steam (wetted cloth and hot iron) to swell the wood back in place.
Just curious – what finish are you going to use?
I’m sort of in the same boat. I recently refinished the fretboard after leveling and refretting, but I don’t think I will be satisfied with the obvious witness line on the side of the neck between the old and new clear coat. So now I’m looking into doing a complete refinish.
For the fretboard, after trying a couple of different 2-component clears, I ended up with Glasurit clear. It sprayed nicely when I got the hang on it. Levels out nicely, easy to sand, ends up glass hard and scratch resistant when cured, and easy to polish up to high gloss. Also, even though there probably isn’t any real burn-in between coats, the Glasurit clear doesn’t seem to leave any witness lines when/if sanded through coats.
My biggest problem with Glasurit is that I don’t have anywhere else to spray than in the basement of my house. For all the spraying involved in a complete refinish I’m a bit reluctant to use Glasurit. I have some Behlen waterborne urethane and Mohawk waterborne conversion varnish coming, which I will try out before I decide what to do.
Re: Ready to start on the Wreckenbacker
I wouldn't have thought to start out with 80 grit but I've got 80, 180 and 220 grit dry rubbing paper and a got set of Durablock rubbing blocks. I haven't actually started it yet as I've been pretty busy with gigs but our band is finished now, so I'll have the time to start it. Probably this weekend actually. I'll post some progress pics.kiramdear wrote:For stripping I would suggest you start with a coarser grit than 220, say 80 or 100 for quicker removal of the finish. Then use 150 to remove the 80 grit scratches, and remove the rest of the scratches with a pass with 220. Use a hard block, and don't wet the paper. No filling should be necessary unless there are deep dings and gouges already on the body. You shouldn't get into trouble with just a hard block. Don't worry about the grain on the sides; maple is tight grained and easy in that regard. You'll have the sand the inside curves with a cylindrical block or fingers. Don't remove the binding until you are ready for routing. I wish you success!
I'll try the steaming. As for finish, the only decent stuff I'm aware of out here is PPG products. I'm not aware of anything else and have never seen any of the brands or products mentioned on the forum, available in Saudi. I even had to get the sand paper and Durablock set sent out from the US!Wiker wrote:For small dents in the wood you can try fixing those with water and steam (wetted cloth and hot iron) to swell the wood back in place.
Just curious – what finish are you going to use?
E = Fb
Bass player's theory of relativity...
Bass player's theory of relativity...
Re: Ready to start on the Wreckenbacker
How are the Durablocks – are they hard enough? I’m looking for some good sanding blocks myself.
I know exactly what you mean not finding much stuff locally. The only stuff I buy locally is dustmasks, gasmasks, and glows. I live fare out on the country side and have to buy everything online. Not much to find online in Norway, so I get everything from the UK and US.
PPG is what Paul W. is using if I remember correctly. Very similar to Glasurit I believe.
I’ve been trying out the Mohawk waterborne CV, which I got from behlen.co.uk
After experimenting and getting used to it I like this stuff. I have to let it sit for a week before wet sanding to see how it turns out when polished and buffed.
I know Paul W. has been skeptical to waterborne products not being as durable in the long run. But the only way I can see myself going through with a complete refinish is using waterborne.
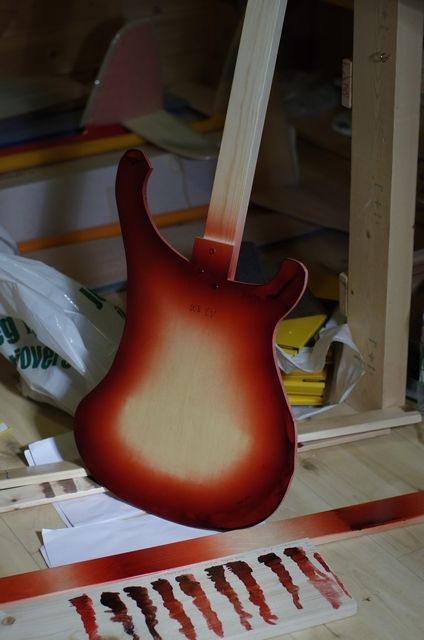
Here’s a progress photo from me. Maybe I overdid the sanding.
My first trail spraying a fireglo didn’t leave much optimism. This second trail is starting to look like something.
I know exactly what you mean not finding much stuff locally. The only stuff I buy locally is dustmasks, gasmasks, and glows. I live fare out on the country side and have to buy everything online. Not much to find online in Norway, so I get everything from the UK and US.
PPG is what Paul W. is using if I remember correctly. Very similar to Glasurit I believe.
I’ve been trying out the Mohawk waterborne CV, which I got from behlen.co.uk
After experimenting and getting used to it I like this stuff. I have to let it sit for a week before wet sanding to see how it turns out when polished and buffed.
I know Paul W. has been skeptical to waterborne products not being as durable in the long run. But the only way I can see myself going through with a complete refinish is using waterborne.
Here’s a progress photo from me. Maybe I overdid the sanding.
My first trail spraying a fireglo didn’t leave much optimism. This second trail is starting to look like something.
Re: Ready to start on the Wreckenbacker
The Durablock sets are great. They are quite hard and come in a great variety if shapes. I used them when doing the bodywork on my Corvette.
I admire your bravery with the finish, there's no way I'd have a go at a Glo finish! I'm pretty handy with a spray gun and have no qualms about spraying a guitar, but solid colour only, lol
Another difficulty with doing this sort of work out here is actually getting stuff shipped. Quite a few of the paints/dyes/fillers etc I've read about on the forum are available online, but surface delivery only.
E = Fb
Bass player's theory of relativity...
Bass player's theory of relativity...

Re: Ready to start on the Wreckenbacker
P.W. obviously knows what he's talking about, but for backyard builders (or in my case, driveway builders) a good waterborne finish may be adequate. I suppose it depends on what sort of "durability" you need. I don't bang my guitars around, and my 2030's finish is probably around five years old without any problems so far. Toxic, 2-part finishing just isn't possible in my situation, so I've tried several water-based types. My favorite is "Enduro Pre-Cat Urethane" from General Finishes. I haven't tried it on a fingerboard and can't say how it would hold up, but so far I'm certainly not having any problems on bodies and necks with it. Time will tell, I guess. I don't own any sort of buffer and probably sand to a finer grit than a pro would (12,000) so that I can buff them by hand with a diaper, but it still makes for a pretty decent finish.
- Attachments
-
-
-
-
-
Re: Ready to start on the Wreckenbacker
If you’re already handy with a spray gun you might do a glo finish better than you thinkbasshead wrote:I admire your bravery with the finish, there's no way I'd have a go at a Glo finish! I'm pretty handy with a spray gun and have no qualms about spraying a guitar, but solid colour only, lol
After reading Mark Arnquist’s descriptions and watching Paul W.’s videos I felt confident I knew, theoretically, how to do it. More practice though.
And I have to work on the mixing ratios (thinning, clear vs. dye), nozzle size etc., to get a finer color coat.
So far I’ve found I get the best result doing it the way Mark A. has described. Starting by spraying from the centre of the body, outwards over the edge, letting the spray just touch the edge of the body - LOTS of overspray. Gradually letting more and more of the spray hit the rim of the body while also moving the gun from the centre toward the edge. Finally ending up with the gun pointed perpendicular to the body, aimed directly at the edge.
Myself, I’m just now starting to feel a little bit handy with a spray gun
Re: Ready to start on the Wreckenbacker
teb wrote:P.W. obviously knows what he's talking about, but for backyard builders (or in my case, driveway builders) a good waterborne finish may be adequate. I suppose it depends on what sort of "durability" you need. I don't bang my guitars around, and my 2030's finish is probably around five years old without any problems so far. Toxic, 2-part finishing just isn't possible in my situation, so I've tried several water-based types. My favorite is "Enduro Pre-Cat Urethane" from General Finishes. I haven't tried it on a fingerboard and can't say how it would hold up, but so far I'm certainly not having any problems on bodies and necks with it. Time will tell, I guess.
After spraying the 2K Glasurit a few times, what a relief to work with waterborne. So much less hassle it’s almost fun doing some spraying now and then.
And I finally invested in 3M PPS for my gun, reducing hassle even more – and with 3M PPS my gun actually seems to perform better for some reason.
I looked at the products from General Finishes. They seem to have several good options. Found no one shipping to my destination though.
That’s way I plan to do it, and have done it in the past. On previous projects I’ve stopped at 2000 grit. You go all the way to 12000 – your finishes look real good. I have to order finer paper.teb wrote:I don't own any sort of buffer and probably sand to a finer grit than a pro would (12,000) so that I can buff them by hand with a diaper, but it still makes for a pretty decent finish.
-
8mileshigher

- Senior Member
- Posts: 4871
- Joined: Tue May 23, 2006 12:34 pm
Ready to start on the Wreckenbacker
Real nice work on those several finishes you did, TEB !
Re: Ready to start on the Wreckenbacker
If you can get them over there, I've been using Micromesh 5" disks, by hand - wet and wrapped around a block of wood for the sanding. They're made to stick on a random orbit sander, but I use them for hand sanding because they're tough and the 5" disk seems to yield the most surface area for the money. Excellent stuff.
http://www.woodcraft.com/product/200523 ... -pack.aspx
After that, Finesse-it or 3M Hand Glaze compound on a diaper. I would love to be able to buff them on a power buffer, as it seems to give the finish that final "zing" that I can't get by hand, but I can't really justify the cost of a buffer for so few projects. The idea of burning holes in the finish by using a cheap or cobbled-together buffer seems like a bad idea just waiting to happen.
Re: Ready to start on the Wreckenbacker
Just received a set of Durablocks. Great blocks, except the two blocks (a long and a shorter block with good hand grip) I was seeing myself using on the bass body are not completely flat, but slightly curved. They are probably meant for curved panels, like on Corvettes.basshead wrote:The Durablock sets are great. They are quite hard and come in a great variety if shapes. I used them when doing the bodywork on my Corvette.
Re: Ready to start on the Wreckenbacker
Oh, they should be flat. Pretty sure mine are. Did you get them new or second hand?
E = Fb
Bass player's theory of relativity...
Bass player's theory of relativity...
Re: Ready to start on the Wreckenbacker
There were so many different Durablocks. I bought a package with several blocks. I probably ordered the wrong package.basshead wrote:Oh, they should be flat. Pretty sure mine are. Did you get them new or second hand?
I’ve my own wood blocks now, sanded on a completely level thick glass plate, and clear coated to make them waterproof.
Re: Ready to start on the Wreckenbacker
I spent a couple of hours today rubbing back the Wreckenbacker. The only 150 grit paper I could find was Ace Hardware brand and it says for bare wood. As soon as I tried on the clear coat, it blocked the paper up. I ended up using my 180 dry rubbing paper and my Durablocks.
The body's come up a lot nice than I thought it would, given all the damage and scratches that were present. The buckle rash is nearly entirely rubbed out, although what's left looks to be staining in the grain as opposed to scratches I haven't rubbed out yet. I'll drill the plastic wood out of the patched holes during the week and make some plugs. I think the neck repair came up pretty good too.
The body's come up a lot nice than I thought it would, given all the damage and scratches that were present. The buckle rash is nearly entirely rubbed out, although what's left looks to be staining in the grain as opposed to scratches I haven't rubbed out yet. I'll drill the plastic wood out of the patched holes during the week and make some plugs. I think the neck repair came up pretty good too.
E = Fb
Bass player's theory of relativity...
Bass player's theory of relativity...