And so it begins ....
Moderators: rickenbrother, ajish4
And so it begins ....
Last year I booked my April-73, Fireglo 4001 Fretless (the one in the middle sandwiched between my V-63 and original March-73 4001) in with Larry Davis for a rework, and finally last week the 4001 was shipped to Larry to undertake the work.
The Fireglo on this one was particularly nice, but as can be seen from the picture, someone in the past thought a Bad-*** bridge would be just the thing, personally it's a desecration, and an abomination, so that 's coming off right quick, that and some other work that Larry will be doing, more to come on that.
In addition to this insult, a previous owner decided to replace the original Wavy Grovers with Schaller's, leaving the original holes for the Grovers bare.
This particular 4001 has had a busy life, and it showed on the body, assorted strange holes had been drilled in various parts
Finally the finish had been subject to both some bad checking And it has its fair share share of scrapes and scratches. (I'm not able to load those pictures)
For some reason I'm only able to attache 6 pictures, all are under regulation size, and I've no feedback from the upload, other than it doesn't load the file.
I'm not sure what's going on, any advise will be very welcome.
I'm planning to share the whole restoration (something not seen in a while) from this, to something that will be very personal to me.
"It's Red Jim, but not as we know it...."
Re: And so it begins ....
I believe that is the limit per post.thx1955 wrote:For some reason I'm only able to attache 6 pictures, all are under regulation size, and I've no feedback from the upload, other than it doesn't load the file.
I'm not sure what's going on, any advise will be very welcome.
Re: And so it begins ....
Thank you Sir,jps wrote:I believe that is the limit per post.thx1955 wrote:For some reason I'm only able to attache 6 pictures, all are under regulation size, and I've no feedback from the upload, other than it doesn't load the file.
I'm not sure what's going on, any advise will be very welcome.
Yeah, seems to be, I was looking through some other areas of the Forum and 6 seems to be the limit .... oh well, multiple parts to each stage
"It's Red Jim, but not as we know it...."
Re: And so it begins ....
Looking forward to seeing the progress!
Re: And so it begins ....
The basics:
All the hardware has been removed, and the scar from the Badass bridge clearly visible Closeup of the main body, showing the additional route, looks like it was done in the dark, and, the enthusiastic abundance of drilling all through the body, it is as I said before a nice Fireglo rendition.
The neck may need to be reset, we'll know a little more in a few days, Truss rods are in very good condition Closer look at the additional routing, and the slight mistake, no worries, no one will ever know. Here Larry is trial fitting a Rickenbacker bridge to see if the footprint will cover all the extraneous routing, I'm going to use the new V2 style Bridge for the final edition Here you can see the other scuffs and dings, as well as the finish checking, still, a nice Fireglo Part of the rework will include adding Wings, here Larry is trial fitting for width and location, they're going to be Ebony, as will be the fretboard. Next up, stripping away the old in preparation for the new ....
"It's Red Jim, but not as we know it...."
Re: And so it begins ....
What exactly are you doing to this thing? Doesn't sound like restoration to me. Wings? Ebony fretboard?
It is your bass, of course.
Re: And so it begins ....
Restoration with a personal touch.
I like it. I'm sure it will be beautiful when its done. Looking forward to the progress.
"Knowledge is Power"
Re: And so it begins ....
I love it when people take instruments they cherish and make them their own.
Life, as with music, often requires one to let go of the melody and listen to the rhythm
Please join the Official RickResource Forum Facebook Page https://www.facebook.com/groups/379271585440277
Re: And so it begins ....
Cool! I have my popcorn and am watching this adventure!! Please post as you go!
The only thing we can perceive are our perceptions - George Berkeley
Re: And so it begins ....
Sweet!they're going to be Ebony, as will be the fretboard.
Re: And so it begins ....
Well, it is a restoration (correction of evils) in several areas:Benjamin wrote:What exactly are you doing to this thing? Doesn't sound like restoration to me. Wings? Ebony fretboard?
It is your bass, of course.
The removal of the Badass bridge, and replacement with a Rickenbacker V2 Bridge
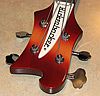
The removal of the non-standard tuners and replacement with Rickenbacker C64 style ones
The removal of the rear pickup and replacement with a Rickenbacker Magnetic Horseshoe, rebuilt and remagetised.
The wiring harness is being upgraded using one of Dane Wilder's, built period correct.
Filling in multiple holes drilled all over the body by various other owners over the years.
The Checkered binding is being removed, cleaned up and put back on.
As for the rest, you're correct, technically it's an augment, the colour will be a non-factory one, (Minky) and an ebony fretboard has been used on at least one other Rickenbacker bass, this one will have crushed Mother of Pearl full width inlays, as for the wings, Walnut has been the wood of choice for both the modern and older basses, I went with Ebony to match the Fretboard.
I've owned and played Rickenbacker's since 1973, this one is one month younger than my March 73, it started life as a Fretless, it's moving to Fretted, when it's finished it'll be unique, a combination of the best that Rickenbacker has with a little more on top, it will still be a April 73 Rickenbacker 4001.
"It's Red Jim, but not as we know it...."
Re: And so it begins ....
In today's episode we get to see the 4001 stripped:
All the stripping was done without using any chemicals to prevent the original Fireglo stain from seeping into the Maple
Just sanding and scraping
Overall view of the front Our behind is bare Front of the body showing the various extraneous holes drilled all over Rear view, showing the nice grain patterns The neck on this particular 4001 has always been really nice to play Close up of the headstock showing similar Maple used to extend the headstock Next, the removal of the fretless Fingerboard
"It's Red Jim, but not as we know it...."
Re: And so it begins ....
So now we move on to the removal of the fretboard
Part-1
The objective as Larry started in on this task was to (if at all possible) preserve the original. After considerable effort, and a lot of patience and care, the Fretboard came away in one piece.
Part-1
The objective as Larry started in on this task was to (if at all possible) preserve the original. After considerable effort, and a lot of patience and care, the Fretboard came away in one piece.
"It's Red Jim, but not as we know it...."
Re: And so it begins ....
Fretboard Removal ...
Part-2 The Cleanup
As mentioned, the fretboard came off in one piece, but, it's covered in a lot of gunk and old glue, this all needs to be removed with a minimal of sanding or material removal from the neck. Here's the rear of the Fretboard after a lot of scrubbing, but very little to no wood removal And a close up of the headstock showing how clean the removal process was. Next....."Got Wings"
"It's Red Jim, but not as we know it...."
Re: And so it begins ....
Looking good, so far.
Interesting trio of holes on the E string side for the TRC.