Anatomy Of A Rickenbacker Bass Part 3

Vintage, Modern, V & C series, Fretless, Signature & Special Editions

Moderators: rickenbrother, ajish4

rickfan60
Senior Member
Posts: 5395
Joined: Sun Apr 11, 2004 5:00 am

Anatomy Of A Rickenbacker Bass Part 3

Post by rickfan60 »

Anatomy of a Rickenbacker Bass Week 3: Truss Rods

If you have been following this series you know that at this point we have progressed to a completed but bare wood bass body and neck. The routes are cut, it has holes for jacks. It is fretted and has a set of truss rods.

The neck is the most important part of most stringed instruments. Year after year, season after season the neck is expected to maintain its shape and hold to an impossibly narrow specification despite temperature and humidity changes. It is also expected to cope with different string sets and even different playing styles without so much as a wimper. Too much deflection back or forward can make the instrument difficult if not impossible to play. The way your bass neck can handle all of these potential changes is the adjustable truss rod. The earliest mentions of adjustable truss rods in patents date back to around the turn of the twentieth century. According to Wikipedia the first truss rod patent belonged to Gibson and dates from 1921. Of course the article goes on to say things about Rickenbacker truss rods that are not exactly right so I have to wonder. Anyway, the basic idea of a truss rod is to add a counter force to the pull of the strings. This is usually done by lengthening or shortening a slightly curved steel rod that is anchored inside the neck.

Here, shamelessly stolen from Wikipedia, is the side view of a typical truss rod assembly. Notice the front to back curve of the rod channel.
pic-1-.png
pic-1-.png (4.16 KiB) Viewed 11170 times
Truss Rod Basics
I am amazed by how many players are afraid to do their own truss adjustments. This is just plain silly. The fact is, it is one of the things you can do yourself that you probably pay to have done. There is no shortage of horror stories about neck adjustments gone. Well, I say pay no attention to any of them. Follow along here and you will be able to do all of your own neck work when ever you want and save yourself some money at the same time. That way you will be able to buy me a beer at the next confluence. :)

In a relaxed state (no tension applied) , the rod lies in the channel and exerts no force on the neck. The wood alone carries the load. When the nut is tightened, the rod is effectively shortened and wants to straighten out. It pushes against the center of the curve and levers the neck backwards away from the pull of the strings. The opposite happens when the nut is loosened. That's it. It is really that simple. It ain't rocket science. This is how nearly all truss rods work including those made after August of 1984. If your bass was made prior to that time, the rods are of an entirely different type.

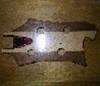
The old style rods are made of about 4 feet of steel flat-wire that is folded nearly in half with one end being about an inch longer than the other. A thin piece of electrical tape lines the inner faces of either side to minimize rattles and vibration. The long end is threaded to 10-32 and uses a 1/4” hex standoff as an adjuster nut. The assembly works like this. The long end of the rod passes through a thick aluminum bearing plate and the short end stops up against the bottom of the plate. As the nut is tightened the halves of the rod are forced apart. The bow in the middle becomes an increasingly stronger spring. In a relaxed state, these rods are flat and more or less loose in the neck. The amount of spring tension applied to by the rods determines how much back bow is induced on the neck. This one is a little more complicated but still does not require an advanced degree to understand.


The upper rod is of the new type and lower is the old type.
pic-2-.jpg
Contrary to popular belief, the older necks and rods are NOT weaker than the newer ones they are just different. Here are the basic facts. The new style rods support the neck and can move it into place as the nuts are adjusted. The old style rods ONLY support the neck and should NEVER be used to move it. More on this later.


Tools
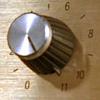
The tool you use to adjust your neck is just as important as the method. The official Rickenbacker tool is the best choice. Mine is always within reach. They cost less than $20 and are available from any Rickenbacker dealer. You might even find the same or very similar tool in you local hardware store. It is an Xcelite L8 ¼ inch nut driver that looks like this.
pic-3-.jpg
The socket part has a fairly thin wall and will fit easily onto most Rickenbacker adjuster nuts. There are times when the tool won't fit. I will discuss that later. All Rickenbacker owners should have this tool and know how to use it! I will describe the technique here but you can also check Joey's Bass Notes or your Rickenbacker manual for tips. Rickenbacker also has a online version of the manual if you don't have one handy.


New Style Rods.
The current Rickenbacker truss rods are made of 5/32” round steel rod stock that are cut just a little longer than the fingerboard. One end is the fixed anchor which is a star washer on a nut and acorn nut locked together. The other end is the adjustable anchor which is a 1/4” hex standoff with 8-32 threading that sits over a thin steel thrust plate. The rod itself is wrapped in 1 inch wide masking tape to prevent rattles inside the neck. On basses made after 1985 the fixed anchor is at the body end just north of the neck pickup. You can see the domes of the acorn nuts sitting just inside the end of the fingerboard under the guard.

The E side rod has been removed in this picture. The G side rod shows the typical depth of the acorn.
pic-4-.jpg
rickfan60
Senior Member
Posts: 5395
Joined: Sun Apr 11, 2004 5:00 am

Re: Anatomy Of A Rickenbacker Bass Part 3

Post by rickfan60 »

Anchor assembly
pic-5-.jpg

The anchors press against the flat bottoms of holes bored into the end of the neck. The rods pass through smaller holes in the centers of the anchor holes on their way up to the headstock. A thin strip of wood , sometimes called packing, is fitted into the truss channel The center of the curve (focus) is usually between the 6th and 7th frets. This placement provides the mechanical advantage necessary to easily adjust the neck. The adjusters press against a narrow metal plate placed just north of the nut.

4004C fingerboard with the packing attached.
pic-6-.jpg
This is a typical view of the new style rod adjusters. The 1/4” adjusting nuts sit on washers and the thrust plate.
pic-7-.jpg

Old Style Rods
As I stated earlier, the old style rods are essentially variable springs that hold the neck in place against the pull of the strings. When the nut is tightened, the long side is pulled through the bearing plate but short side is stopped against it causing a difference in the lengths of the sides. The folded section of the rod will start to bow open (expand) increasing the effective spring constant. The flat sides of the rods press against the bottom of the truss channel and against the back of the fingerboard. This is where the trouble starts. Because the rods change shape as they are adjusted, they can bind against the wood and exert lots of pressure where it should not be exerted. Improper use can result in damage like this.

Bad technique.
pic-8-.jpg

Proper Technique For Both Styles.
The idea here is to take the load off of the rods BEFORE turning the nuts. There are two basic ways to do this. If your bass has the old style rods and your tech does not do what I am about to describe to you. Grab your bass and RUN don't walk to the nearest exit and never go back. The factory suggests placing the instrument on its back on a bench and securing the tail end. With the end secured, press down on the headstock to flex the neck backwards. Push until the strings lie flat on the frets. Don't be shy, you won't break it. You can actually feel and hear when the rods are loose inside the neck. While the neck is flexed, give each rod 1/8 of a turn clockwise to add back bow and counter clockwise to remove back bow and release. Check the tuning then the relief and repeat if necessary. Go slowly. Sometimes it takes a day or two for the adjustment to fully set in. On healthy necks the rods should be more or less equal in tension.

I do it a slightly different way. I sit in a chair and place the back of bass against my left knee with the end button on the floor. Then I secure the tail end of the bass between my feet (shoes off thank you) and pull the neck back with my left hand placed near the nut (I am right handed so you lefties feel free to adjust accordingly). While it is flexed, I give each rod the customary 1/8 turn, release then check the tuning and relief. This method does not require any clamps or a flat surface.

Either way works just fine but I find that it is better to measure relief with the neck in playing position than flat on its back. My method does not work as well when the adjusters are under the pickguard. That setup is just plain awkward IMHO. Note that it is not necessary to flex the neck if you are loosening the rods but it can't hurt. In fact it is probably a good idea from a procedural standpoint to ingrain the practice of setting the neck before making any adjustments. While on that subject, here is another suggestion. Even though the new style rods can move the neck is it a really good practice to relieve the load before adjusting them too. The rod anchorages rely on the strength of a very small patch of wood. Most if the time this is perfectly fine but removing the load first makes compressing the wood under the acorn nuts far less likely. It is a simple thing you can do to ensure the health of your bass neck. This method is also a good strategy for adjusting stubborn necks.


Checking the relief.
Tune to pitch and press a string down at the first fret and 20th fret at the same time. I usually check them all. The string should be very close to the fret tops from the second to the nineteenth frets. If there is a large gap there, (the thickness of a business card) tighten the adjusters another 1/8th turn and check again.
rickfan60
Senior Member
Posts: 5395
Joined: Sun Apr 11, 2004 5:00 am

Re: Anatomy Of A Rickenbacker Bass Part 3

Post by rickfan60 »

Advanced tips.

Twists
The dual rod system allows for some measure of twist correction. A roll to the G side can be countered to some degree by tightening the E side rod only. Do this a little at a time – perhaps a quarter turn. The total amount of correction will not be immediately apparent as it will take a while for the wood to respond to the new load. Give it a few days and try again if needed. Stop if at any time the nut becomes difficult to turn.

Dead Spots
This is not an exact science but if you introduce a small imbalance in the rod loads it is possible to reduce a dead spot. The idea is to start with balanced loads by de-tuning and loosening both nuts completely. Then turn each nut finger-tight and then go about a half turn past that point. Retune and adjust the nuts using the above procedure until the relief is flat. At this point the nuts should be exerting fairly equal loads. Check and see if your dead spot is still there. If so, try taking about 1/8 of a turn off of one rod and check again. If there is no change, put the 1/8 back on the rod and take it off of the other and check again. If there is an improvement try adding a bit more tension to the tighter nut and test again. If no improvement is noticed, start from a balanced load and take a little off of one side instead. This does not always work but is worth a try in extreme cases.


Servicing the truss rods.
Rickenbacker is probably the only company to offer field serviceable truss rods. Rod removal is a very easy operation except on one model. You won't be able to easily remove the rods of 4004Ciis where the neck pickup is not right against the end of the fingerboard. There is no way to get them out at the body end without doing a bit mod'ing.

Start by removing the strings. There should be no string load on the neck when the rods are out. Remove the truss rod cover (or pickguard) and the adjuster nuts. These instructions are for rods adjusted from the headstock end of the neck. The body end adjuster rods require similar steps but are removed from the opposite ends.

Removing the old style rods.
Lay the bass on its back on a clean and soft surface. Keep screws, nuts, and any other debris clear of the area while you are doing this. Find a thick, soft cloth like a diaper and lay it over the headstock just above the truss rod pocket. Now, use a small flat screwdriver to pry the bearing plate up and over the ends of the truss rods. The rods may move freely as you move the bearing plate. This is a good thing as you will find out later. Take note of how the bearing plate was oriented before you put it down. Grab one of the truss rod ends with your fingers and give it a pull. It should move fairly easily. If it does, pull it out taking care to bend it slightly upward and on to the diaper so it does not gouge your headstock. With a little effort you should be able to pull it free. Do the same with the other. If rods don't move easily you will have to help them out by pushing them up from the bottom. I use a piece of steel rod inserted in the body end of the truss channel (remove the guard). Tap gently on the steel rod with a hammer and the truss rod should start to move. Alternate between pulling it out with your
fingers and tapping the bottom with the steel rod. At some point it will become easy to extract it.

Here is a tip for old style rods. They do some times break but it is not the end of the world. The rods are actually longer than they need to be. Breaks usually occur on the threaded part of the rod. Just re-trim the rods so that one side is about an inch longer than the other and cut some threads on the long end using a 10-32 thread die.

Reinstalling the old style rods.
While they are out, clean them up with a little fine steel wool. Use a wire brush on the threads and clean up any gunk or rust. If the threaded part is bent, straighten it up in a vise and clean up the threads with a 10-32 die. Most hardware stores have them. They cost about $8. Make sure the strips of electrical tape are still intact and you are ready to reinstall. I like to lube them up with a little Xymol before sliding them back in. Liberally wipe some Xymol on the rod and slide it back in while the Xymol is still wet. It should slip right in. Make sure the short side is up! It should be facing the fingerboard. Do the same to the other and reinstall the bearing plate. Thread the nuts on by and then give them about a half turn each with the neck flexed per the instructions above.


Removing the new style rods.
The new style rods are removed from the body end of the neck. Remove the guard and put the diaper on the body just below the neck pickup route. With the bass on its back, loosely install an adjuster nut on one rod and use your adjuster wrench to push it in toward the body end. The anchor end of the rod should appear in the neck pickup route. Grab it and try to pull it out taking care to bend the rod upward away from the body as you pull. It should slide out fairly easily. If the rod is broken, you may have to remove one end then push the other end out using a piece of steel rod.

Reinstalling the new style rods.
Once the rods are out, you can perform what ever service needs to be done. If one is broken you can easily make a replacement if you have some 5/32 steel rod stock from your local hardware and an 8-32 thread die. For normal maintenance, check the threads and clean them up with the 8-32 die if necessary otherwise wire brush them a little to clean any **** out of the threads. Check the tape for rips or thick spots. If the tape is not properly applied the rod will not work correctly. If it is damaged, remove it and apply a new layer of 1” masking tape starting from the adjuster end such that it overlaps very little. It is important not to make it too thick! Lube the rods with some Xymol and slide them back in. Put the nuts and washers back on finger tight and then go about a half turn with the wrench.


What to do if you can't get the tool to fit on the nuts.
This first thing to do is inspect the adjuster nut. They sometimes flatten out a bit on the bottom causing the flats to distort. If the nut is put on upside down, the flattened end will usually not fit into the tool. Take it off an flip it over and try again.

If you have the old style rods, bad tool fit is most likely because the rod ends are bent back into the wood. Bad adjustment technique can cause this and most techs just dig out some wood and force the issue. Don't do that. A better way is to bend the rod ends back into position then proceeding normally. Here is how to bend the end back into place.
pic-9-.jpg
The soft clamp is essential here. If you pry without it you will probably pop your fingerboard off or worse!
Last edited by rickfan60 on Mon Mar 23, 2009 2:11 am, edited 1 time in total.
User avatar
weemac
Veteran RRF member
Posts: 2735
Joined: Tue Mar 26, 2002 1:28 am

Re: Anatomy Of A Rickenbacker Bass Part 3

Post by weemac »

Great stuff once again Ted!
Eden.
User avatar
antipodean
Senior Member
Posts: 3182
Joined: Wed Jan 09, 2008 1:27 am

Re: Anatomy Of A Rickenbacker Bass Part 3

Post by antipodean »

Thanks Ted! Informative as always! ...now to find that soft clamp....
"I don't want to sound incredulous but I can't believe it" Rex Mossop
User avatar
stevebasshead
Member
Posts: 233
Joined: Mon Mar 12, 2007 4:34 am

Re: Anatomy Of A Rickenbacker Bass Part 3

Post by stevebasshead »

Excellent stuff Ted, I've been enjoying reading your postings.

One small note on the use of tape on the truss rods, I've just spotted by sheer coincidence that JH mentions the tape in a thread on the Ric site (link below) and that they no longer use tape but rather heatshrink tubing:

"If you have rods with tape on them, hope that it doesn't snag and remain in the truss rod slots. This is a mess and requires great care and a special technique to take care of. That's one reason we switched to heat shrink tubing. "

http://www.rickenbacker.com/forum_view_ ... ing%20Nuts

Regards,
Steve.
rickfan60
Senior Member
Posts: 5395
Joined: Sun Apr 11, 2004 5:00 am

Re: Anatomy Of A Rickenbacker Bass Part 3

Post by rickfan60 »

antipodean wrote:Thanks Ted! Informative as always! ...now to find that soft clamp....
Give the clamp a firm squeeze. You should protect the finish with a little masking tape first. My picture does not show that part.
rickfan60
Senior Member
Posts: 5395
Joined: Sun Apr 11, 2004 5:00 am

Re: Anatomy Of A Rickenbacker Bass Part 3

Post by rickfan60 »

stevebasshead wrote:Excellent stuff Ted, I've been enjoying reading your postings.

One small note on the use of tape on the truss rods, I've just spotted by sheer coincidence that JH mentions the tape in a thread on the Ric site (link below) and that they no longer use tape but rather heatshrink tubing:

"If you have rods with tape on them, hope that it doesn't snag and remain in the truss rod slots. This is a mess and requires great care and a special technique to take care of. That's one reason we switched to heat shrink tubing. "

http://www.rickenbacker.com/forum_view_ ... ing%20Nuts

Regards,
Steve.
That is good to know. Shrink tubing makes a LOT of sense. I have worked on basses where the tape had bunched up and caused a rod not work. In one case the owner actually broke a rod trying to get it to work. In this case the nut was tightened all the way down to the bottom of the thread. The wood at the body end was compressed so much the rod could not do its job then SNAP, the end came off.
good-n-bad-sm.jpg
RobRick
Member
Posts: 325
Joined: Sun Jan 25, 2009 7:14 pm

Re: Anatomy Of A Rickenbacker Bass Part 3

Post by RobRick »

Keep this series coming! I am not a tech head at all when it comes ot my Ricks, so these are VERY informative! :D
User avatar
badeggs
Intermediate Member
Posts: 865
Joined: Tue Jul 24, 2007 5:04 am

Re: Anatomy Of A Rickenbacker Bass Part 3

Post by badeggs »

Love these threads! Though I will continue to NOT go near the truss rods in my basses...
rickfan60
Senior Member
Posts: 5395
Joined: Sun Apr 11, 2004 5:00 am

Re: Anatomy Of A Rickenbacker Bass Part 3

Post by rickfan60 »

It is really nothing to be afraid of! The whole process is easier than changing strings.
User avatar
falconfixer
New member
Posts: 50
Joined: Mon Feb 09, 2009 3:34 pm

Re: Anatomy Of A Rickenbacker Bass Part 3

Post by falconfixer »

Excellent article!
Perfect timing as i dismantle and re-furbish the Beast.

It gives me confidence to check and adjust...
My Gear:
1982 MapleGlo Now JetGlo 4003
2004 Martin BC-15E Accoustic Electric Bass
2002 Peavey G Bass with Carbon Fiber neck
Peavey 300 Combo practice amp
User avatar
cassius987
Senior Member
Posts: 4708
Joined: Mon Aug 04, 2008 2:11 pm

Re: Anatomy Of A Rickenbacker Bass Part 3

Post by cassius987 »

Bravo to this thread--we need GOOD info like this circulating on the net, not the mish-mash stuff that gets spread around most of the time. Thanks for the time and the effort!
rickfan60
Senior Member
Posts: 5395
Joined: Sun Apr 11, 2004 5:00 am

Re: Anatomy Of A Rickenbacker Bass Part 3

Post by rickfan60 »

I have not been corrected on it yet but I think I may have transposed the terms thrust plate and bearing plate. Now that I think about it, the aluminum block used on the old rods is a thrust plate and the steel piece on the new rods is the bearing plate. Trivial maybe but this info will likely be here a long time so it really should be correct. Rick players yet to be born will want to know these things. :)
User avatar
weemac
Veteran RRF member
Posts: 2735
Joined: Tue Mar 26, 2002 1:28 am

Re: Anatomy Of A Rickenbacker Bass Part 3

Post by weemac »

It might be worth noting that If your aluminum rod plate (older models) looks like the dog has chewed it, it might be time to fabricate a new one out of brass..
Eden.
Post Reply

Return to “Rickenbacker Basses: by Joey Vasco & Tony Cabibe”