Cleaning and polishing: step-by-step pictorial

Exceptional restoration is in the details

Moderator: jingle_jangle

Dave Scantland
New member
Posts: 36
Joined: Wed Jan 20, 2010 9:43 pm

Re: Cleaning and polishing: step-by-step pictorial

Post by Dave Scantland »

winston wrote:What is the Windex for?
According to Paul (emphasis mine):
Best time to clean the fretboards is during string changes, when the old strings have been removed. Cut a cotton diaper into four squarish pieces and dampen one with either naphtha or my old fave Dr. Stringfellow's Lem-Oil. Scrub near the frets to remove the grunge. I keep an old clean toothbrush for this purpose, then wipe clean with the diaper scrap.

I prefer Lem-Oil because it coats the frets and fretboard with a very thin and hard protective layer of aromatic citrus oils. So, when you're done getting the grunge off, wipe with a clean scrap of diaper and Lem-Oil.

Sometimes the grunge comes off easier with a water-based cleaning agent; in these cases I use a light spritz of Windex and the toothbrush. Don't soak the fretboard with any water-based product--it will seep into the wood around the frets and cause the fretboard to swell temporarily. Finish off with Lem-Oil in any case.
Topic here: http://www.rickresource.com/phpBB3/view ... 4&t=255794

Just trying to be prepared!
User avatar
winston
Membership Admin
Posts: 11010
Joined: Mon Jul 11, 2005 5:00 am

Re: Cleaning and polishing: step-by-step pictorial

Post by winston »

Ah! Thanks for the explanation. I never use Windex on my instruments so I was wondering what it might be used for.
“We can't solve problems by using the same kind of thinking we used when we created them.” - Albert Einstein

"You do not really understand something unless you can explain it to your grandmother" - Albert Einstein
Dave Scantland
New member
Posts: 36
Joined: Wed Jan 20, 2010 9:43 pm

Re: Cleaning and polishing: step-by-step pictorial

Post by Dave Scantland »

I would never have thought it was a good idea, but Paul seems to know what he's doing. :wink:
User avatar
winston
Membership Admin
Posts: 11010
Joined: Mon Jul 11, 2005 5:00 am

Re: Cleaning and polishing: step-by-step pictorial

Post by winston »

Oh Paul knows what he is doing alright. You can take that to the bank. :D
“We can't solve problems by using the same kind of thinking we used when we created them.” - Albert Einstein

"You do not really understand something unless you can explain it to your grandmother" - Albert Einstein
User avatar
rickenbrother
RRF Moderator
Posts: 13099
Joined: Sun May 26, 2002 5:00 am

Re: Cleaning and polishing: step-by-step pictorial

Post by rickenbrother »

winston wrote:Oh Paul knows what he is doing alright. You can take that to the bank. :D
+1! :)
The JETGLO finish name should be officially changed to JETGLO ROCKS! :-)
User avatar
johnallg
Rick-a-holic
Posts: 17688
Joined: Wed Apr 05, 2006 12:13 pm

Re: Cleaning and polishing: step-by-step pictorial

Post by johnallg »

Dave Scantland wrote:Question for the group: should I try to repair the tail lift? I'm of the "if it ain't broke, don't fix it" school, but happy to hear opinions.
Dave, I would fix the lift. Here is the info you really want. I did this to my '91 BT tailpiece that lifted, but didn't use the heat.

Gary found the threads of his and listed them in this post:

http://www.rickresource.com/phpBB3/view ... ce#p385402
Dave Scantland
New member
Posts: 36
Joined: Wed Jan 20, 2010 9:43 pm

Re: Cleaning and polishing: step-by-step pictorial

Post by Dave Scantland »

I apologize for the unintended break. Life intruded.

John, I think I will fix the lift -- in for a penny, etc. Thanks for doing the legwork for me!

Let's strip this baby down. First thing off is the strap:

Image

I'd venture to say that the strap hasn't been off in 30 years. My locking "system" is a conical washer at each bolt. It means that you can't take the strap off easily, but at least it never failed. The reason for my paranoia -- which I'd forgotten about -- will be revealed shortly.

Next off were the strings, which haven't been changed in at least ten years:

Image

And that's when I remembered why I'd gone to an extreme with my straplocks: an enthusiastic Townshend leap had freed the bass from the strap and sent it headstock-down to the ground, with the D key taking the brunt of the impact. The cover popped off and the key bent. I "repaired" it with epoxy and a week's worth of clamping which, believe me, made rehearsals awkward and tiring, since the only pressure I could come up with was an iron c-clamp that weighed about two pounds (hey, I was young and stupid). You can see the jaw marks from where I clenched the key itself in a vise to straighten it. The thing is, since the key fell apart when I removed the string, 1) the epoxy gave up the ghost some time ago; and 2) string tension alone must have been holding it together. Odd.

Image

Somewhere around here I've seen tips on making a proper repair of this type. One more thing for the list.

I stripped off the hardware about two weeks ago, so I don't remember what possessed me to flip the bass over, but I did. I also don't know why it didn't occur to me that the bridge would fall out, but it did.

Image

At that point, it occurred to me that maybe not everyone has seen a 4001 bridge out in the wild, so I caught a couple of pics. Rear view, with adjustment screws totally exposed:

Image

What it looks like inside, simple and clever:

Image

Oh wait. Now I remember why I flipped it over -- to remove the rest of the keywinds. Four little screws hold them on.

Image

That's not errant epoxy in the cavity of the broken key, it's grease. (Am I the only one who finds the look of the unstrung, de-keyed flanges slightly comical? Maybe it's just the angle, but Cookie Monster popped into my head.) Here's a question for the group: how do I get those flanges out? It's not apparent how they're being held in, and I expected them just to slide out. I can't think of a way to remove them that I'm not certain won't damage the finish. Tips?

On to the tailpiece. It's held by five screws of two different types; the pair to the rear create the fulcrum across which tail lift develops.

Image

It seemed prudent to free the mute pad first (I'm sure it's noted elsewhere, but it's worth pointing out that the mute bolts are the same as the ones for the strap). A little mindless screwing (pardon the expression), during which I pondered the next, more complicated, steps, and the tail was free:

Image

The springs provide tension for the mute pad.

Up to this point, things have been straightforward: oh look, this screw holds that on; tab A comes out through slot B. But when you get to the pickguard and all it encloses, things get more complicated. Easy enough to get started, though. Setscrews secure the tone and volume knobs, and a threaded ring retains the switch:

Image

Thin nuts and washers (similar, but not identical, to those on 1/4" phone jacks) hold the pots to the pickguard. The little screws come from the guard itself:

Image

Here's where it got tricky. Maybe there's a very thin-walled socket that can glom onto those jack nuts, but I don't have one, and in any case, the ex got the tool kit in the settlement. I thought maybe if I released the plate, I could get behind it and twist (gently!) the jacks themselves, but they're packed in tight. Then I remembered a tool kit I do have: my culinary batterie (one of several things I do to make a living is teach cooking classes). Depending on context, these are hemostats, a roach clip or tweezers for removing pinbones from fish. And now they have another skill for their resumé -- tight-clearance pliers.

Image

Getting those off let me uncover the electronics.

Image

Here's a close-up for pot heads:

Image

For some reason, I didn't record removal of the bridge pup (the toaster is still attached to the pickguard), but all that's required is unscrewing the four screws at the top and bottom of the surround (not the large ones flanking the pickup). With all the cavities depopulated, you can see some historical inscriptions. Tailpiece:

Image

I can make out the names Maria and Ortiz, but they don't appear to be in the same handwriting.

Neck -- proof that I've been here before: that blurred writing upper right is my social security number. Good thing the bass never got stolen, because I'd completely forgotten that I'd done this. Still, it demonstrates that I wasn't consistently young and stupid.

Image

Bridge pickup. Its destiny is cast in . . . red china marker.

Image

Unless, of course, that doesn't mean "natural" but Nathaniel.

Electronics cavity.

Image

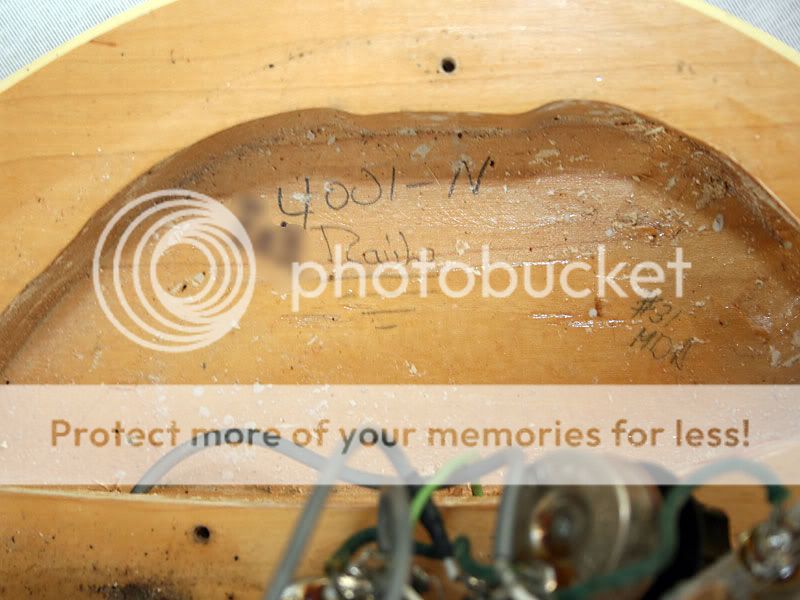
Another SS number, as well as model designation ("N" for natural?), and another name: Raul. Anyone know what "#31 MDN" might mean?

Comments, tips and tricks are welcome -- as are requests for anything I haven't photographed or explained, or not photographed or explained clearly enough. I'm off to learn how to solder before the next step!
User avatar
gibsonlp
Technical Admin
Posts: 1725
Joined: Mon Sep 05, 2005 10:40 pm
Contact:

Re: Cleaning and polishing: step-by-step pictorial

Post by gibsonlp »

Hey David,
Great read! thanks!
So long and thanks for all the fish!
Dave Scantland
New member
Posts: 36
Joined: Wed Jan 20, 2010 9:43 pm

Re: Cleaning and polishing: step-by-step pictorial

Post by Dave Scantland »

Thanks, Gil! I'm finding this a very interesting project. At first I thought it would be as much a chore as anything, but it's turned out to be very satisfying to get to know my instrument in this way. By the time I get done, I suspect I'll feel like I had almost as much a hand in its construction as Maria, Raul and Mr./Ms Ortiz (to whom I extend many thanks).
User avatar
johnallg
Rick-a-holic
Posts: 17688
Joined: Wed Apr 05, 2006 12:13 pm

Re: Cleaning and polishing: step-by-step pictorial

Post by johnallg »

Dave, very nice pictures. Great bass too - from my favorite years. Waiting for pics of the cleanup. Oh, remember to wear sunglasses. :lol: Wait till you see the fretboard all Zymoled up. 3D

I need to find a new 2010 to try.....
User avatar
doctorwho
Veteran RRF member
Posts: 12524
Joined: Tue Jun 11, 2002 3:28 pm

Re: Cleaning and polishing: step-by-step pictorial

Post by doctorwho »

Cool thread, David! :D 8)
It is better, of course, to know useless things than to know nothing. - Seneca
rogerf
New member
Posts: 33
Joined: Wed Nov 05, 2003 5:58 am

Re: Cleaning and polishing: step-by-step pictorial

Post by rogerf »

If those three initials are MDA vrs MDN, it might indicate that the bass was worked on by Mark Arnquist. Mark worked at Rickenbacker around that time. He used to frequent this board and some others.
User avatar
T.A.R.
Intermediate Member
Posts: 1412
Joined: Sat Feb 20, 2010 9:39 am

Re: Cleaning and polishing: step-by-step pictorial

Post by T.A.R. »

Cool thread! Maria worked on my '74 4001 MG I think I put a picture up some place here.
User avatar
gibsonlp
Technical Admin
Posts: 1725
Joined: Mon Sep 05, 2005 10:40 pm
Contact:

Re: Cleaning and polishing: step-by-step pictorial

Post by gibsonlp »

Hi David,
Your post gave me sudden urge to do the same with my 4001!
How did you take out the bridge pickup? did you use a welder to take it out?
So long and thanks for all the fish!
User avatar
badeggs
Intermediate Member
Posts: 865
Joined: Tue Jul 24, 2007 5:04 am

Re: Cleaning and polishing: step-by-step pictorial

Post by badeggs »

Dave Scantland wrote:...Here's the headstock. Anyone know the meaning of the number inscribed there?
I think I read somewhere that some RIC employees used to number the instruments worked on during the day...my '73 4001 has a "12" written on the nut (it's Jetglo so any writing in the pocket would've be covered up).
Post Reply

Return to “Reflections of a Curmudgeon: by Paul Wilczynski”