
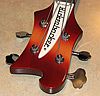
Oh for sure, they're only a few of the "random" holiness in multiple areas .....jps wrote:Looking good, so far.
Interesting trio of holes on the E string side for the TRC.
And so it begins ....
Moderators: rickenbrother, ajish4
Re: And so it begins ....
"It's Red Jim, but not as we know it...."
Re: And so it begins ....
Got Wings ... Part-1
In order to construct the Ebony wings I had sourced a piece of Ebony from a local hardwood supplier and shipped that to Larry.
Larry dressed that out to produce a finished blank in order to build the wings.
Despite being sourced from different places the Ebony for the neck (which has a lovely grain structure) and the Ebony for the wings turned out to be a great match
In order to construct the Ebony wings I had sourced a piece of Ebony from a local hardwood supplier and shipped that to Larry.
Larry dressed that out to produce a finished blank in order to build the wings.
- Ebony Blanks for the Fretboard and Wings
- Nicely figured Grain
"It's Red Jim, but not as we know it...."
Re: And so it begins ....
Got Wings .... Part-2
Warning, some of the following images may cause Rickenbacker owners distress
Time to make big changes to the Headstock
Removing the old wings, you can see where the previous holes for the Tuners was filled in prior to cutting
Here both new wings have been securely glued and clamped
After allowing a suitable time to fully dry the new Headstock profile is laid out across the new Ebony Wings
Here is a nice view of the whole body with her new Wings ready to begin shaping
Warning, some of the following images may cause Rickenbacker owners distress
Time to make big changes to the Headstock
Removing the old wings, you can see where the previous holes for the Tuners was filled in prior to cutting
- First cut is always the hardest !
- On with the new ....
- New Headstock Profile
- Attachments
-
- Full length view
"It's Red Jim, but not as we know it...."

Re: And so it begins ....
Jim: Thanks very much for these continued updates. Larry's work is amazing. It will be great to see the finished instrument. Don't try this at home! 
Life, as with music, often requires one to let go of the melody and listen to the rhythm
Please join the Official RickResource Forum Facebook Page https://www.facebook.com/groups/379271585440277
Please join the Official RickResource Forum Facebook Page https://www.facebook.com/groups/379271585440277
Re: And so it begins ....
Your advise is well taken, I cringe seeing the shots of the headstock being cut, even though Larry had advised me in advance it was happening, it still felt like nails on a chalkboard looking at the pictures of the wings being cut offadmin wrote:Jim: Thanks very much for these continued updates. Larry's work is amazing. It will be great to see the finished instrument. Don't try this at home!
"It's Red Jim, but not as we know it...."

Re: And so it begins ....
Cool to see the process happening!
Re: And so it begins ....
Last update saw the Eboony wings being attached to the rimmed down Headstock.
Now the Headstock has been shaped, using a period correct template:
With the Headstock cut to its initial dimensions, next comes the addition of the location holes for what will be C-64 style Machine Heads
Now it's starting to look like an actual Headstock
Next up is slotting the Fingerboard, all done by hand.
Now the Headstock has been shaped, using a period correct template:
- Fitting template
- Excess Ebony to allow for final finishing
- Holes for Machine Heads marked and centre punched
- New holes drilled
"It's Red Jim, but not as we know it...."

Re: And so it begins ....
Loving those ebony wings... 
2004 4003 JetGlo
Epiphone Jack Casady
Ovation Magnum 1
Mania VTB-4BS
Dean Stylist w/ John Birch Magnum II pups
Yamaha BB414
Trace Elliot VA350/GP11 Mk1
Peavey TB-Raxx
2 BFM Omni 10.5 crossfire cabs
Roland Bass Cube 100
Epiphone Jack Casady
Ovation Magnum 1
Mania VTB-4BS
Dean Stylist w/ John Birch Magnum II pups
Yamaha BB414
Trace Elliot VA350/GP11 Mk1
Peavey TB-Raxx
2 BFM Omni 10.5 crossfire cabs
Roland Bass Cube 100
Re: And so it begins ....
I'm hoping they're going to sound as good as they'll lookespidog wrote:Loving those ebony wings...
"It's Red Jim, but not as we know it...."
Re: And so it begins ....
Now we have the Wings on and their basic shape and Machine head holes drilled we move on the the Ebony neck blank
These were the two Ebony blanks selected for the Wings and Fretboard
Having trimmed the fretboard blank to a working size the next step is to cut (by hand) the slots for the frets
Slot cutting made "easy", this is a new meaning of the word easy I was not previously aware of
When I first saw this picture my immediate reaction was OMG, Larry's cut too many slots WTF !!!!
That thought was, I'm very happy to say in grave error on my part as will be revealed
Lights going on for everyone, it took me a fractious few minutes to realise what was being done
Having recovered from my near heart attack, "I can see clearly now the slots are cut"
These were the two Ebony blanks selected for the Wings and Fretboard
- Ebony Blanks
- Simple but effective jig
- Slot cutting made "easy"
- Fret slots laid in, wait, there's too many
That thought was, I'm very happy to say in grave error on my part as will be revealed
- It's all starting to make sense
- What are those triangles for !
"It's Red Jim, but not as we know it...."
Re: And so it begins ....
loving the pics.
Thank you very much for letting us experience this with you.
Thank you very much for letting us experience this with you.
"Knowledge is Power"
Re: And so it begins ....
Fretboard ...... Continued
As I had said, the lights began to click on and I could see what Larry was doing :
He was prepping the slots for the Mother of Pearl Inlays
This is very precise work, you don't get a do-over if you remove too much wood.
Next up will be laying out and cutting the Mother of Pearl for the inlays
As I had said, the lights began to click on and I could see what Larry was doing :
He was prepping the slots for the Mother of Pearl Inlays
- Routing for Inlays
- 3rd & 5th Fret Inlay Slots
- 7th - 9th and 12th Fret Inlay Slots
- 15th 17th and 19th Fret inlay Slots
- The whole fretboard slotted for inlays
Next up will be laying out and cutting the Mother of Pearl for the inlays
"It's Red Jim, but not as we know it...."
Re: And so it begins ....
Mother of pearl for the Fretboard inlays
Now we have the inlays in place the Fretboard can go back on the neck .....
- Marking out the Shark's teeth
- Roughed out, already looking really good
- Take your places please
- Initial fitting, still need to be trimmed for an exact fit
- Cut and fitted to size
- Mother of Pearl against the Ebony looks really good
"It's Red Jim, but not as we know it...."

Re: And so it begins ....
That's looking real fine, Jim!