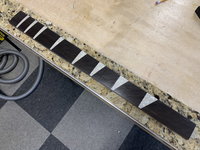
And so it begins ....

Vintage, Modern, V & C series, Fretless, Signature & Special Editions

Moderators: rickenbrother, ajish4

User avatar
thx1955
Veteran RRF member
Posts: 2823
Joined: Thu Nov 14, 2002 6:00 am
Contact:

Re: And so it begins ....

Post by thx1955 »

jps wrote:That's looking real fine, Jim! 8)
Thanks Jeffrey, Larry does great work

Here are the follow on shots showing a close up of the inlays correctly sized, and the fretboard re-fitted to the body
Fully fitted to the Fretboard
This closeup also shows the relief set into the fretboard to accommodate the Neck Binding
Precision fit to the routed Fretboard

As I had mentioned in earlier pictures, there are a lot of holes drilled into the body
Fretboard looking great with the Ebony wings

Nice couple of shots showing how well the Wings and fretboard match
Hmmmmm Ebony
Hmmmmm Ebony
IMG_2456.JPG
IMG_2457.JPG
"It's Red Jim, but not as we know it...."
User avatar
jps
RRF Consultant
Posts: 37139
Joined: Wed Feb 12, 2003 6:00 am

Re: And so it begins ....

Post by jps »

This is going to be painted Jetglo, right? :twisted: :mrgreen:
User avatar
Dirk
Member
Posts: 339
Joined: Sun Apr 29, 2012 6:06 pm

Re: And so it begins ....

Post by Dirk »

Great documentation on the progress, and I will say the Ebony looks dark and amazing.
What a daring move, but I think it really pays off.
Dirk
User avatar
thx1955
Veteran RRF member
Posts: 2823
Joined: Thu Nov 14, 2002 6:00 am
Contact:

Re: And so it begins ....

Post by thx1955 »

jps wrote:This is going to be painted Jetglo, right? :twisted: :mrgreen:
Ummm ..... No; I've already got a Jetglo V-63 and, I have a Jetglo 4005 XC inbound, that's enough Jetglo for anyone

And, before anyone else asks, no, it's NOT going to be Fireglo either

First time I saw this colour on one of Paul Boyer's 4001's a decided then that if there ever came a time I'd get to do a custom refresh and refinish I'd go with "Minky"
The really dark edges are (I hope) going to help hide almost all the extraneous holes drilled into the 4001 over the years.
Hmmm Blood Soaked Fireglo
The next shots are some of Larry's other projects, and, these are the shots that made me think seriously about having a Ebony fretboard coupled with the "Blood Soaked FIreglo" (my new name for the colour) finish
Looking at the top picture with a standard Rickenbacker fretboard, comparing that to the lower two, the Ebony works a lot better with this darker "BSFGlo"
I also reached out to Paul prior to going with this colour to make sure he was ok with me using it.
Ebony looking good with the BSF
More Ebony, but, what a lovely Flamed Maple Body
"It's Red Jim, but not as we know it...."
User avatar
bassduke49
Senior Member
Posts: 6553
Joined: Wed May 14, 2003 5:00 am

Re: And so it begins ....

Post by bassduke49 »

Or how about: "ChestnutsroastingonanopenFireglo" ? :shock: :lol:
Author: "The Rickenbacker Electric Bass - 50 Years As Rock's Bottom"
User avatar
thx1955
Veteran RRF member
Posts: 2823
Joined: Thu Nov 14, 2002 6:00 am
Contact:

Re: And so it begins ....

Post by thx1955 »

With Fretboard slotting is now complete for both the Frets and the inlays.
It's time get the Fretboard Radiused, and also to decide on Fret sizes

But, before we come to that, Larry uncovered an issue with the original routing for the truss rods
It would seem that when the original slots were being cut, either the clamping didn't hold, or, the straight edge used to guide the cutting tool wasn't straight, or moved.
As you can see the lower slot (the E string side) is significantly larger than the upper one. So in this case there was little support for the truss rod in the channel and the only thing holding the truss rod in place was the Truss Rod Nut
Different slot widths
To address this, a new insert was glued in place
Lots of Tightbond
Lots of Tightbond
New filler
New filler
After drying
After drying
And then the slot re-routed
New straight edge
New straight edge
Not perfect but a whole lot better
With this error addressed it's now time to get on with Radius and Fretting
"It's Red Jim, but not as we know it...."
User avatar
thx1955
Veteran RRF member
Posts: 2823
Joined: Thu Nov 14, 2002 6:00 am
Contact:

Re: And so it begins ....

Post by thx1955 »

With the Truss rod Slot fixed, it's now time to get back to sanding in the Radius for the Fretboard, in this case 10"
Interestingly enough, the Fretboard that came off was a much tighter 7.25"
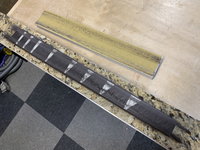
Rough sanding to 10" Radius
Finished to 10" Radius
That Ebony is looking even better now it's been finished
IMG_2550-03-Forum.jpg
With the Fretboard finished out, it was time to finalise the choice of frets.
Originally I had asked to have 'Banjo Frets" installed, I have these on my Dingwall and like the feel
Larry supplied detailed pictures of three fret sizes from left to right
Banjo - Guitar - Rickenbacker Standard
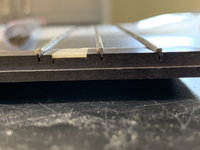
IMG_2551-04-Forum.jpg
Side Elevation showing the relative heights
After a long discussion and comparing the frets on:
  • 73-4001
    85-V63
    91- Chris Squire
    98-V63
    2001-V63
    2001- 4003S
    2012 4004
    2021 - 4005CX
    1973 - Fender Jazz
    2010 - Dingwall Afterburner
It would appear that even between Rickenbacker Models and years fret dimensions vary
In the end the final comparison was done between my Dingwall Afterburner (Dingwall use Banjo Frets) and my new 4005-CX which appears to have Guitar frets fitted
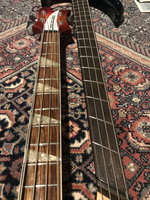
4005 - AB1
4005 - AB1
Final choice was to go with Guitar Frets
Larry's reasoning was that although Banjo frets would work, they would not leave a lot of (if any ) room for future fret dressing, so Guitar frets it is.
Next up ... the finished fretted Fretboard and re-instalation on the neck
"It's Red Jim, but not as we know it...."
User avatar
jps
RRF Consultant
Posts: 37139
Joined: Wed Feb 12, 2003 6:00 am

Re: And so it begins ....

Post by jps »

thx1955 wrote:Final choice was to go with Guitar Frets
You do realize the bass will be playing an octave higher with those frets, right? :wink:

When I had to make a similar decision for my fretted Martin Keith bass I went with pretty small frets, somewhere between mandolin and "guitar" size (I don't recall the exact dimensions). The bass is like the fretless wonder of 5-string basses. :D
User avatar
doctorwho
Veteran RRF member
Posts: 12522
Joined: Tue Jun 11, 2002 3:28 pm

Re: And so it begins ....

Post by doctorwho »

Great thread! 8)
It is better, of course, to know useless things than to know nothing. - Seneca
User avatar
Dirk
Member
Posts: 339
Joined: Sun Apr 29, 2012 6:06 pm

Re: And so it begins ....

Post by Dirk »

Wow that truss channel route is scary, but consider when it was done, and of course not usually visible to the end user.

Thanks for the continued documentation.
Dirk
User avatar
cjj
RRF Moderator
Posts: 10901
Joined: Tue Jul 22, 2008 6:17 pm
Contact:

Re: And so it begins ....

Post by cjj »

jps wrote:
thx1955 wrote:Final choice was to go with Guitar Frets
You do realize the bass will be playing an octave higher with those frets, right? :wink:
Yeah, but at least he'll be able to play something other than bluegrass...
:roll: :lol:
I have NO idea what to do with those skinny stringed things... I'm just a bass player...
User avatar
thx1955
Veteran RRF member
Posts: 2823
Joined: Thu Nov 14, 2002 6:00 am
Contact:

Re: And so it begins ....

Post by thx1955 »

With the Fretboard now finished to the 10" Radius and fretted it is ready to be reattached to the newly repaired neck.
Almost all the frets have been fitted to the Fretboard off the neck, this makes the operation a lot easier overall,
at this point the 3rd and 20th Frets are left off to allow for Locating pins to be fitted under the fretboard for aligning with the neck.

Each time I see this Ebony it just keeps looking better and better.
Finished fretboard, with Dressed Guitar Frets onboard
Now the Fretboard can be relocated onto the neck.
You can never have too many clamps
IMG_2579.JPG
After allowing suitable time for the glue to dry the new Fretboard is finally on the neck with the 3rd and 20th Frets installed
Together at Last
Together at Last
The fretboard and wings turned out a really great match
Full Frontal
Full Frontal
IMG_2583.JPG
Next up .... Neck Binding
"It's Red Jim, but not as we know it...."
User avatar
bassduke49
Senior Member
Posts: 6553
Joined: Wed May 14, 2003 5:00 am

Re: And so it begins ....

Post by bassduke49 »

That is soooo beautiful! What will the final finish be? Not kidding. Fireglo?
Author: "The Rickenbacker Electric Bass - 50 Years As Rock's Bottom"
User avatar
thx1955
Veteran RRF member
Posts: 2823
Joined: Thu Nov 14, 2002 6:00 am
Contact:

Re: And so it begins ....

Post by thx1955 »

bassduke49 wrote:That is soooo beautiful! What will the final finish be? Not kidding. Fireglo?
Not kidding, it'll be as I said earlier, Minky, like yours was, or as I call it "FireBlood-glo"
Not Fireglo
Not Fireglo
WIth the Ebony Fretboard it'll be lovely
As I've got older I've eased up on my Fireglo obsession, well not really, but I am slightly more open to non-Fireglo colours now.
I've even got 4 non-Rickenbacker basses as well, and, none of the are Fireglo either.

First time I saw your 4001 tricked out in that lovely colour I decided to one day have a 4001 with a similar finish.
"It's Red Jim, but not as we know it...."
User avatar
Dirk
Member
Posts: 339
Joined: Sun Apr 29, 2012 6:06 pm

Re: And so it begins ....

Post by Dirk »

Yeah the Ebony head wings and fingerboard pop now, that is just plain hot!!!

Nice,
Dirk
Post Reply

Return to “Rickenbacker Basses: by Joey Vasco & Tony Cabibe”