Cleaning and polishing: step-by-step pictorial

Exceptional restoration is in the details

Moderator: jingle_jangle

Dave Scantland
New member
Posts: 36
Joined: Wed Jan 20, 2010 9:43 pm

Cleaning and polishing: step-by-step pictorial

Post by Dave Scantland »

Here's our subject, a mid-1973 mapleglo 4001:

Image

I pity all you folks waiting on backorders these days; I purchased this beauty new about three months after its manufacture -- just walked into the store where it was hanging on the wall. I gave the guy a fake EB-something and $200. He threw in a perfect setup, too -- so good that until about eight weeks ago, I hadn't touched it.

From late '73 to about 1994, this instrument saw steady gigs with a pop-rock cover band. It was my only bass. Since 1995 or so, it's been in its case for the most part. Recently I got the urge to play again, so I pulled it out. Then I found Rickresource and, thanks to this particular forum, started looking at my instrument in ways that had nothing to do with how it sounded. Please keep that in mind when you check out these warts-and-all photos. I deliberately didn't do any preliminary clean-up. I'm not proud of the shape it's in -- but then, that's why I'm doing this in the first place: penitence of a sort.

I have four objectives for this project:
  • Thorough cleaning and polishing, including temporary protection of damaged areas.
  • Investigation and repair of bridge pickup output.
  • Remove a bit of relief in the neck.
  • Document cleaning and polishing for the benefit of the membership.
Okay, now I'm done talking and I'll let you see some pictures (I know that's why all of you are here in the first place!)

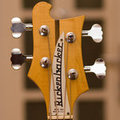
Let's start at the top. Here's the headstock. Anyone know the meaning of the number inscribed there?

Image

Don't worry, I'd already removed the TRC; it's safe and sound. Speaking of truss rods, here's a further close-up:

Image

That gouging at the back of the cavity is under the finish, in case it's not clear. Everyone, including Ric factory folks apparently, finds it a tight space.

Here's a shot at the octave. Some fret wear, especially under the D and G strings, but nothing I can't live with.

Image

The lighter grain in the fretboard might appear to be cracking, but it's not. The board, except for dirt and such jammed up against the frets (why is it green?), is in good shape -- and beautifully variegated.

Extreme Close-up! Here's the relief I'll be taking out. It's actually a little greater than this because the bass is on its back.

Image

This is where I really started to feel bad. I had figured that I'd just pull all the hardware off, figure out the pup problem, clean and polish, then put it all back together. But check out the condition of the screws.

Image

All of them, as well as the rest of the screws except for the strap and mute buttons, need to be replaced. I'd never noticed.

I hang my head.

But the toaster looks good, and the plating is intact.

Here's the bridge pup. Lots of dust (hey, is that what the guard is for?) and some contact wear on the poletops. Again, though, the plating -- underneath the fingerprints -- looks great.

Image

I've got four shots of the tailpiece, if only to demonstrate how the a**hole owner neglected this lovely instrument.

Ignore the dust and grime. Just admire the architecture of this casting.

Image

Intonation on this bass has been rock solid. I changed strings every couple of months during its active life, and never had to adjust the saddles. It's had RotoSounds on it for all but the first few months that I've owned it.

Here's more dust and grime, plus a shot of the mute pad, which is dessicated and misshapen; you can't really see it here, but it's arched a bit in the middle, so raising the mute would engage the A and D before the E and G. I never used it much because I palmed or used picking technique to attenuate sustain. Still, it's a matter of pride now to restore it.

Image

This shows something your can't see in the other tailpiece photos: the adjustment screw on the right (the E-side screw) seems to be rusty. I've put it on the parts list.

Image

Last tailpiece shot. Is this what you guys mean when you talk about tail-lift?

Image

It's been there for as long as I can remember, and it's never bothered me. In fact, it's a great place to stash an extra pick, as you can see in the very first photo. Should I do anything about it?

The pickguard is in good shape. The treble volume label flaked off and disappeared sometime in the first year of ownership. Note to self: replace more screws; see if the boutique has knobs in stock.

Image

Last shot for now:

Image

This is the lower bout on the bass side, maybe two and a half inches from the lower strap button. It took me a while to figure out what caused the wear-through in the finish and the odd stain on the binding. I think I've figured it out, but it might be fun to entertain guesses. What do you think caused it?

Coming up next: toolkit and teardown!
User avatar
jps
RRF Consultant
Posts: 37496
Joined: Wed Feb 12, 2003 6:00 am

Re: Cleaning and polishing: step-by-step pictorial

Post by jps »

That is more late '73 as mid '73 4001s still had checker binding.
Dave Scantland
New member
Posts: 36
Joined: Wed Jan 20, 2010 9:43 pm

Re: Cleaning and polishing: step-by-step pictorial

Post by Dave Scantland »

Depends on your definition of "mid," I guess. Here's the evidence (bad photo, but autofocus isn't what it used to be :roll: ):

Image

Run the decoder, if you like. I make it out to be July of 1973. I bought it in September or maybe October of that year, and it's never been out of my possession.

Do we really want to arbitrate provenance in this topic? I'd be happy to document anything about this instrument in an appropriate place, as I know it was made in a transitional period at the Rickenbacker factory. But here, I'd like to focus on the aesthetics of a wonderful piece of craftsmanship and my best attempts to preserve it.
User avatar
gibsonlp
Technical Admin
Posts: 1734
Joined: Mon Sep 05, 2005 10:40 pm
Contact:

Re: Cleaning and polishing: step-by-step pictorial

Post by gibsonlp »

July/Aug was the transition month for toasters and checkerboard bindings, up until now I thought these two disappeared together but after looking at the register (http://www.rickresource.com/register/ga ... images=0.1) I can see some Aug 4001 with toasters and without checkerboard so I guess it started at around July.
Dave - once you are done detailing your instrument we would be very thankful if you could register it in the register and upload high resolution photos, thanks!
So long and thanks for all the fish!
Dave Scantland
New member
Posts: 36
Joined: Wed Jan 20, 2010 9:43 pm

Re: Cleaning and polishing: step-by-step pictorial

Post by Dave Scantland »

Registered last month, Gil: http://www.rickresource.com/register/vi ... rt%3D10600.

Pics to come when it's in better shape than it is now!
User avatar
markbass99
Intermediate Member
Posts: 1267
Joined: Sun Mar 14, 2004 7:23 am

Re: Cleaning and polishing: step-by-step pictorial

Post by markbass99 »

Most Julys that I've seen (and own) have checkered binding, most Augusts don't. Exceptions- Dave Scantland's July doesn't and Joey Vasco's August does. Just one of those peculiar things about the transition period. Tail lift on any 4001 after April is common and can be quite bad sometimes.
73 Feb 4001, 73 March 4001, 73 April 4001, 73 May 4001, 73 June 4001, 73 July 4001
04 MM Bongo 5HSp, 07 MM Bongo 5HS, 09 MM Bongo 5HS, 09 MM Bongo 5Hp, 11 MM Bongo 5H
clementc3
Member
Posts: 287
Joined: Tue Jan 27, 2009 3:22 pm

Re: Cleaning and polishing: step-by-step pictorial

Post by clementc3 »

Thanks for posting the great photos and even better commentary! Looking forward to the next installment in the saga! :D
User avatar
libratune
Veteran RRF member
Posts: 4255
Joined: Mon Jul 29, 2002 9:06 am
Contact:

Re: Cleaning and polishing: step-by-step pictorial

Post by libratune »

"This is the lower bout on the bass side, maybe two and a half inches from the lower strap button. It took me a while to figure out what caused the wear-through in the finish and the odd stain on the binding. I think I've figured it out, but it might be fun to entertain guesses. What do you think caused it?"

Strap wear and sweat.
User avatar
jingle_jangle
RRF Moderator
Posts: 22679
Joined: Wed Dec 22, 2004 6:00 am
Contact:

Re: Cleaning and polishing: step-by-step pictorial

Post by jingle_jangle »

Tree-mendous, Dave. You are a most welcome contributor to this topic area.
User avatar
libratune
Veteran RRF member
Posts: 4255
Joined: Mon Jul 29, 2002 9:06 am
Contact:

Re: Cleaning and polishing: step-by-step pictorial

Post by libratune »

Now, Dave, here's a question for you in reaction to your statement: "But check out the screws. All of them, as well as the rest of the screws except for the strap and mute buttons, need to be replaced. I'd never noticed. I hang my head."

You've owned this bass since it was 3 months old and you never noticed that the screw heads had been stripped. That's okay. The stripping didn't happen while you owned it, so it must have happened between the time it left the factory and when you got it.

I wonder what all that screwing around was about in those 3 months? Have you ever looked under the 'guard, or is that to come?

Keep up the good work, this is a great show-and-tell. :D
User avatar
jps
RRF Consultant
Posts: 37496
Joined: Wed Feb 12, 2003 6:00 am

Re: Cleaning and polishing: step-by-step pictorial

Post by jps »

Dave Scantland wrote:Depends on your definition of "mid," I guess. Here's the evidence (bad photo, but autofocus isn't what it used to be :roll: ):

Image

Run the decoder, if you like. I make it out to be July of 1973. I bought it in September or maybe October of that year, and it's never been out of my possession.

Do we really want to arbitrate provenance in this topic? I'd be happy to document anything about this instrument in an appropriate place, as I know it was made in a transitional period at the Rickenbacker factory. But here, I'd like to focus on the aesthetics of a wonderful piece of craftsmanship and my best attempts to preserve it.
Hmm. Definitely a transitional time. Here is my former July '73 4001 S/N MG 2884 (with RI horseshoe pickup):
User avatar
jps
RRF Consultant
Posts: 37496
Joined: Wed Feb 12, 2003 6:00 am

Re: Cleaning and polishing: step-by-step pictorial

Post by jps »

markbass99 wrote:Most Julys that I've seen (and own) have checkered binding, most Augusts don't. Exceptions- Dave Scantland's July doesn't and Joey Vasco's August does. Just one of those peculiar things about the transition period. Tail lift on any 4001 after April is common and can be quite bad sometimes.
David, your 4001 is the first I recall with no CB from July '73, interesting times, indeed, back then.
User avatar
johnallg
Rick-a-holic
Posts: 17688
Joined: Wed Apr 05, 2006 12:13 pm

Re: Cleaning and polishing: step-by-step pictorial

Post by johnallg »

This is shaping up to be a great thread. Love the pics and love the 70s skunk stripe 4001 basses.

End of the bass wear - case bouncing?
Dave Scantland
New member
Posts: 36
Joined: Wed Jan 20, 2010 9:43 pm

Re: Cleaning and polishing: step-by-step pictorial

Post by Dave Scantland »

I'm agnostic on CB. I appreciate its vintage value, I'm a hug fan of the craft required to do it properly, and I think it looks good on FG and great on JG. But I prefer the plain on MapleGlo. I'm sort of glad that's the way the luck of the draw played out for me.
libratune wrote:Now, Dave, here's a question for you in reaction to your statement: "But check out the screws. All of them, as well as the rest of the screws except for the strap and mute buttons, need to be replaced. I'd never noticed. I hang my head."

You've owned this bass since it was 3 months old and you never noticed that the screw heads had been stripped. That's okay. The stripping didn't happen while you owned it, so it must have happened between the time it left the factory and when you got it.

I wonder what all that screwing around was about in those 3 months? Have you ever looked under the 'guard, or is that to come?

Keep up the good work, this is a great show-and-tell. :D
Thanks for trying to let me off the hook, Ron, but I suspect I chewed up those screws myself. I've been inside a time or two, though it's been a while. It's not just the stripping that bothers me; they're also corroded. I've ordered shiny replacements for all screws except the strap and mute buttons and saddle adjustments. Also: a mute pad and a new set of knobs. As for pulling the pickguard, yeah, I'll be doing that. As I understand this procedure, everything comes off if you want to do a proper job of it. Also, I've got no output from the bridge pickup, so that needs investigating.
libratune wrote:"This is the lower bout on the bass side, maybe two and a half inches from the lower strap button. It took me a while to figure out what caused the wear-through in the finish and the odd stain on the binding. I think I've figured it out, but it might be fun to entertain guesses. What do you think caused it?"

Strap wear and sweat.
johnallg wrote:This is shaping up to be a great thread. Love the pics and love the 70s skunk stripe 4001 basses.

End of the bass wear - case bouncing?
Excellent guesses. I checked for strap wear by just putting it on and seeing where the strap crossed the binding. No go. I wear the bass fairly high (guess who I was imitating!), and the angle is lower than the damaged area. Sweat as a contaminant, of course, is a definite possibility!

John might be right, but why would bounce cause a rust-colored stain? Here's a possible explanation: the bass came with a Ric case in the standard dark blue. But a couple of years into my life with it, the truck carrying our equipment to a high-school prom in Oak Ridge, Tennessee crashed while trying to enter a rest stop, and ended up on its side. The full story is hilarious (now), and is probably worth posting in another forum, but for our purposes, it's enough to say that the only casualties of the wreck were one microphone stand, the dignity of the driver -- and my 4001 case. The guitar was fine -- that's why we have hard-shell cases -- but the spine of the case was broken. I couldn't find a RIc case, so I made do with a Fender Precision case that I modified with a bit of 2 x 4 and a blanket. And guess what? It's orange inside.

But I think -- and we can debate this -- that the wear is from the stand I used for years. I recall now that I had a habit of checking the stability of my placement by snugging the cord (most of the time a mono cable) against one arm of the stand. That's why only one side is worn. The stoan might be a reaction of the CV from exposure to an unfriendly polymer coating the stand's arm. Possible?

Back to the project proper. Here's my supply/tool kit (sorry for the harsh late-day shadows):

Image

Left to right: one dozen all-cotton diapers (source: Babies R Us), 00 steel wool (Ace Hardware), medium toothbrush (CVS) a set of small screwdrivers (from a client), clear varnish (Ace), Stringfellow Lem-oil (GC -- yeah, I know), Windex, Xylol (Ace), Zymol (Amazon) and Scratch Doctor (also Amazon).

Not shown: 1/4" nut driver, wire snips, new set of RotoSounds.

Fixing the pup problem might require a soldering iron, in which case I'll have to buy and learn how to use one.

Question for the group: should I try to repair the tail lift? I'm of the "if it ain't broke, don't fix it" school, but happy to hear opinions.

Thanks, everyone, for your interest and encouragement. Next up: disassembly!
User avatar
winston
Membership Admin
Posts: 11010
Joined: Mon Jul 11, 2005 5:00 am

Re: Cleaning and polishing: step-by-step pictorial

Post by winston »

What is the Windex for?
“We can't solve problems by using the same kind of thinking we used when we created them.” - Albert Einstein

"You do not really understand something unless you can explain it to your grandmother" - Albert Einstein
Post Reply

Return to “Reflections of a Curmudgeon: by Paul Wilczynski”