
I've posted some questions relating to a trashed 4005 I'm attempting to rebuild/restore... its a late 60's I believe.
The bass has been through various horrendous abuses and refins, defrets, immersions, etc etc ..
I am stripping it down to bare wood, as carefully as possible .. removing the checkerboard binding and back pieces for re-use.
However, the two items I'm sorta unclear on how to redo are the soundhole/cat-eye binding and the neck binding.
The neck has been defretted and glopped over with some sorta space-age plastic material .. I plan on using radius blocks to get down to the rosewood and crushed pearl, and then start the refretting.
here is the problem:
the neck binding is an "L-profile" thin white plastic layer on the edges of the fretboard, overlaying the rosewood and crushed pearl inlays. Some of the binding is already worn through at the edges, and I am quite certain more of it will be as I level the fretboard off.
So how was the neck binding done ? what kind of plastic ? was it a vacuformed piece of styrene glued on ? was it two thin pieces butted together at a right angle and glued ?
I have posted pics of the bass in a yahoo briefcase:
http://briefcase.yahoo.com/valakrishna
The cat-eye binding seems to be of a similar style, an L-shaped binding but placed ONTOP of the basses finish .. is this true ?? I'd love to know how it WAS done and also how it IS done now on 360's ...
Thanks !!
krishna jain
Redoing catseye and neck binding on 60's 4005 bass
Moderators: rickenbrother, ajish4
Why are you removing the binding?
There is NO reason to do this ,unless you need to reset the neck or make a new back .It will NEVER go back on without a gap .
THe binding was glued onto a ledge cut into the side of the fretboard .Many of the older guitars/basses have a ledge that wavwers in thickness down it's length.
I use a file with an edge that has NO teeth on it to clean up the ledge.
The binding of course must be removed to do this .I also remove the dots .This can be done with a razor blade ,utility knife blade ,or an 'Exacto' knife ...I prefer the utility knife .
The shell /inlay tends to be brittle with age ,take it easy with it .
I use a 2foot long 10" radius 'shoe' to clean up fretboards .This is a one inch thick slab of aluminum that is radiused .It works extremely well .
I suggest usinng some heavy grit sandpaper to true up the radius .You will find it inconsistant down the length of the neck .This is standard for that era .
The neck binding was most likely a celluloid material ....that is no longer available so I use ABS .It works just great and you would never know it to be different.
The body is two layers ,one the checked binding and the outside is the white .
There is NO "L" shaped plastic at all ,ever on any stock Ricks that I have seen unless it was made since 1985.That "new" era I can not speak for .
We used acetone to 'melt' the plastic to ahere it and then wrapped the body in Upholstery tape to hold it in place .This took several days to flash off the solvents and harden back up .
I now use PVC clear pipe glue with acetone .This works extremely well ,but the fumes are horrid.I wear a fresh air mask and specialty glove when I do this.
Glass packing tape works okay to hold it down ,but good old masking tape ,in doubled up thickness works better.
At the factory the Simitar/catseyed sounf hole is done before the back goes on...it is hard to do after .There is a seam at the extreme point .This is a two piece process and melting the plastic together is critical to make it look correct .
I use a tray of hot water to sften the ABS and a MDF form that I trace off the sound hole and pre bend the plastic ....it makes it easier .
So you too want yours "ALAPWOB"?!?!
-
krishna
Mark actually replied to me directly after I sent him an email, and below are the points he made in answering my question. Mark suggested that this type of info is what people in the Rick forum need to have access to, so here it is, in response to me asking about the correct neck radius is for my 4005 and clarification on the neck binding:
The radius was (on the blueprints) 10" ...this is never the case as the
method of making the radius iwas this ;
The woodshop foreman felt the radius jig was a pain to use ,so he himself did
ALL of the arching of fretboards from 1962 to 1979 when the jig was rebuilt
and made easy to operate .
This job was something that everyone in the plant knew ,that if Dick burke
was doing this job....don't interupt him .
He held the neck blanks in his hands and used his arms the swing the necks
against the 8foot long belt sander .This was on every instrument.
Because of this ...you get incredible variances .I just rebuilt a bass and a
12 string for 2 customers and both needed refretting .
The 12 string at the nut was a 7&1/4" radius between the 2 and 4 dtrings then
the edges fell off.This was true up to the 12th fret where it began to turn
into a 10" radius .
I evened it out to 10" and it plays great .
I did the same on the bass but it was 10" at the nut and about 5" radius at
the end of the neck .....Screwy!!!!
I would just even the radius out to what ever you want ...Fender-7&1/4" is
fine .
BEWARE!!!!! the sparkle inlay material get brittle with age and is paper thin
on the edges .
Peal the binding away with any kind of tool and run a file with a 'safe' edge
on the ledge to clean it up and widden the ledge slightly.I use ABS plastic
or vinyl to make Rick binding.
PVC pipe glue works fine ...thin with acetone to keep it from kicking off too
-
krishna
I did some more work cleaning up the 4005, it turned out that what I thought was "raised" cateye hole binding was actually umpteen coats of pearl pain some one had applied a long time ago, masked to look like binding !! I scraped and sanded it off and viola .. there was the original binding underneath, in fine shape !!
I have added a picture to my yahoo folder called Rick4005 project, of this: http://briefcase.yahoo.com/valakrishna
I also started cleaning off the epoxy that was layered on the fretbaord .. and as I got down to bare wood and pearl, i realized a similar thing had been done with the neck binding ... that is it was painted over so that it was visible from the top of the fretboard .. I started scraping that finish off too and there is a picture of what the binding looks like at this point .. notice it is a thin band set into a slot on the edge of the fretboard. The dark areas are simply places where some of the original lacquer still remains in the rosewood.
Next project is getting the back off and neck out ...

Krishna: Great photos of the project. I really appreciate the artistic flair as well. I hope you don't mind me including one of them here. 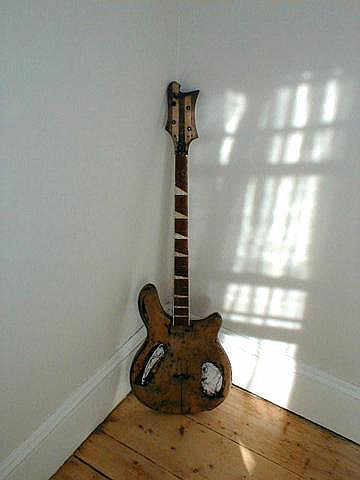
Life, as with music, often requires one to let go of the melody and listen to the rhythm
Please join the Official RickResource Forum Facebook Page https://www.facebook.com/groups/379271585440277
Please join the Official RickResource Forum Facebook Page https://www.facebook.com/groups/379271585440277
-
krishna
Back is now off the 4005:
I have added pics to my folder - same one as before: http://briefcase.yahoo.com/valakrishna
I was able to work the rest of the binding off the back in two pieces with minimal damage, so I think I will be able to salvage all or most of it.
I then chiseled and pried the back pieces off .. there was some chipping of the back slabs near the two horns of the body, but I think they may be salvageable .. i will see how easy it is to find the proper thickness and grain of maple .. maybe making two new backs would be better from a structural point of view, since I'm sure there are some cracks in the maple after all the stress I put em through getting em off.
So any advice on getting the neck out of the pocket now with busting up the maple top pieces ? The sides are sorta a loose fit and I think I can actually cut through the glue that is there .. and then maybe a large heated palette knife or scraper can be worked between the neck and the top.
Notice the funky pseudo X-bracing glued in ...
I will take more pics and measurements of the body when its all apart.
I use an espresso maker and utilize the steamer .This will need some modifications ...I change out the head on it to brass fittings for air tools and use a length of airhose for this .
I also have a brass fitting that uses a basketball needle to shoot the steam .You must wear protective gear when doing this however.I wear a leather jacket and leather apron and leather gloves .
My hose has an insulated grip so that I can hold it and it also has a 'Stand' that I made for it ...I use this with a propane torch and several spatulas.I heat them after ....AFTER I use the steam.They need to be slid in from the end of the neck toward the edge of the body .
I see room for improvement on the bracing....take it out and make new braces so that they are really an X ...also don't segment them ,notch them to fit over ,this will retain strength.
So you too want yours "ALAPWOB"?!?!
-
krishna
I am familiar with a similar rig, I think i saw Dan Erlewine describe it once. I'll see if I can rig one up .. and I'll even wear SAFETY GOGGLES !!
The majority of the "hold" between the neck and the body seems to be at the top of the neck butt .. it looks to me like the neck was actually a bit too narrow for the neck pocket . though I'll try some steam there unless I can slide a palette knife clear through on each side.
The top of the neck butt looks like a good contact and I think the steam will help there quite a bit.
I'll redo the bracing per your suggestion .. what do you think of using deeper bracing so that the BACK is glued to the bracing as well ? I realize this changes the "tone" of the body .. because the back is essentially an edge supported sound board in the orginal design .. maybe it would make the body too bright (too stiff equals less bottom end sometimes).
Also .. what about doweling the two halves of the BACK together on edge, so that they dont try to split apart again .. anything wrong with that (assuming the doweling is done correctly) ??

Mark wrote:
I wear a leather jacket and leather apron and leather gloves..
What? No pants?
He writes again:
My hose has an insulated grip so I can hold it and it also has a Stand that I made for it. I use this with a propane torch and several spatulas.
This is getting creepy!
Just kidding. I've never seen the insides of a '60's 4005. Thanks for posting the pics Krishna. This is very informative.
Krishna: What a great look inside the 4005. I find the neck joint most interesting.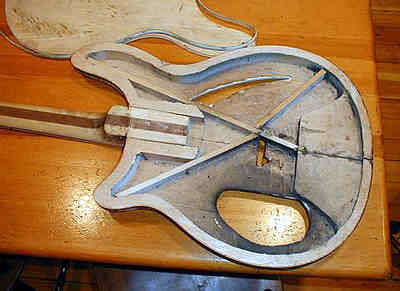
Life, as with music, often requires one to let go of the melody and listen to the rhythm
Please join the Official RickResource Forum Facebook Page https://www.facebook.com/groups/379271585440277
Please join the Official RickResource Forum Facebook Page https://www.facebook.com/groups/379271585440277
THe area that needs to be 'X' braced is if you follow the lines from the tailpiece cutout are and extend them toward the horns.
The bridge needs some kind of support .You could use any number of soft woods to do this .Linden/basswood or anything like that would lend support and not add a lot of weight .Think of it as a bridge plate in an acoustic guitar.
I would add a block of maple to the neck joint area and recut the pocket to fit the neck exactly.
The braces should be done similar to how an archtop brace gets put together .
You could (and this could be overboard) laminate some graphite into the maple frame of the X and this would keep it really solid.
Dowel the back? forget it ....get a cabinet shop to thickness some new maple for you ....it will not have the warpage and will allow you to cut it to size with out any realignment problems .The DNA guitar police will not care nor will they notice .
I would sand the inside before you glue anything to clean it all up and then after re-building ...write a note about your efforts inside .I do this to every guitar that gets this type of treatment by me .
So you too want yours "ALAPWOB"?!?!
Welcome to the Don & Mark show !
Yes I agree that would be even better .Of course coming up with the cutter to recut the binding ledge would be an additional expense and of course the router ....but if there is a will there is a way .
The plywood would have to be high grade /no void type .Spend the money and get the 'good'.
Yes I agree that would be even better .Of course coming up with the cutter to recut the binding ledge would be an additional expense and of course the router ....but if there is a will there is a way .
The plywood would have to be high grade /no void type .Spend the money and get the 'good'.
So you too want yours "ALAPWOB"?!?!
-
krishna
Well, the backs may be usable .. they arent warped at all .. I was just suggesting some way of attaching the two pieces as opposed to simply gluing them on edge.
Cutting new backs is easy, it is the stepped edge routing that is a little tricky, though I have a few routers (i have way too many power tools since I'm also rebuilding my 108 year old house in Boston)and I'm sure I can "finagle" something by using two different diameter square cut bits and two different routing depths.
The X-braces were made out of maple I think .. they were pretty hard to get out !!! .. but I'll probably replace em with maple to keep the stiffness, but make a true X brace as you suggested Mark. Is my idea of having the X-braces ALSO touch the back a bad idea ? could it be a source of rattle in future years ?
I like the idea of gluing in a block of new maple for the neck pocket and then routing it to fit tighter .. it really was a loose fit side to side before !!
So I did make further progress last night .. the bass is now apart. I took a short cut and since it didn't result in disaster I'll tell you about it.
I put a tea kettle on the stove .. boiled water .. as it shot steam out, I held the 4005 over the steam so that the neck joint was sprayed .. for a few minutes .. then I scraped some of the excess glue away (it had softened) and steamed it some more .. then worked a 1 inch wide steel paint scraper in under the edge of the neck and the body, after heating the edge of the scraper over the stove flame. I repeated this steaming and heated scraped thing a few times and was able to work a small gap at the joint. Then I took a 1 inche wide sharp wood chisel, put it under the edge of the joint (after another steaming)and wacked it a few times with a hammer .. nothing cracked and this started opening up the joint. I steamed the whole thing again and then used the steel paint scraper like a chisel .. banging it in under the neck .. wiggling it side to side too and gently prying with it. This suddenly worked the neck quite loose, but not completely, so one more steaming and then prying with the paint scraper and wiggling the lower body half .. the lower body half pulled away from the neck cleanly. I then used the scraper to pry the neck from the other body half.
Theres yet another pic of it all apart in my briefcase folder.
Also, I scraped the black overspray from the lower half back .. which would be under the pickguard .. and found scrawled in red marker "4005-J" .. does that mean this was a "jetglo" finish originally ? Only other markings I have found was what looked like a "10" in pencil on the upper surface of the neck joint.
I also think I will do the "note inside the guitar".
Next step is getting everything clean of black paint and glue.
Krishna
Jet glo and a J have nothing in common .
The J was a coding for a batch of guitars/basses.Nothing more .Dick Burkes method of tracking instruments from the wood shop to the finishing building .
What you did is not unlike anything that gets done in a guitar shop .Ingenuity is the key to success.
The extra tall braces are not necessary ,The sagging is from several things ,but having a crossing piece that is not solid will cause that and if you make them like an archtop ...that will work just fine .A trangular block of basswood will work as a bridge plate /sound post and do the thing you are wanting to do .Look at acoustic bracing and think in terms of the bridge plate .Then make that the thickness of the body so that it touches the back .That will take care of the sagging .
The backs on any guitar are edge jointed -no dowels .This goes for any guitar .I must assume you are a cabinet maker in backround .For that yes ! but they need to take a lot more weight .
The 10 in pencil is just a number like the J that is written on a batch ....it could have been 25 .
If you could X-ray old Ricks you would find lots of writting on all joints ....sometimes drawings .
But that is another story and a thing of the past .
So you too want yours "ALAPWOB"?!?!