Page 2 of 8

Re: Ric Rescue a Moron did this to a 60's Rickenbacker 345T

Posted: Tue Aug 21, 2012 12:20 am
by paologregorio
So, did you find screw holes and a wiring rout for a 3rd, middle p/up under the metallic blue rattle can goo?

Re: Ric Rescue a Moron did this to a 60's Rickenbacker 345T

Posted: Tue Aug 21, 2012 10:39 am
by Rickissippi
What's really weird about it to me is that "bracing" looking stuff beneath the bridge p'up cavity? Surely, that's not original......is it?

Re: Ric Rescue a Moron did this to a 60's Rickenbacker 345T

Posted: Tue Aug 21, 2012 10:57 am
by stsang
Rickissippi wrote:What's really weird about it to me is that "bracing" looking stuff beneath the bridge p'up cavity? Surely, that's not original......is it?
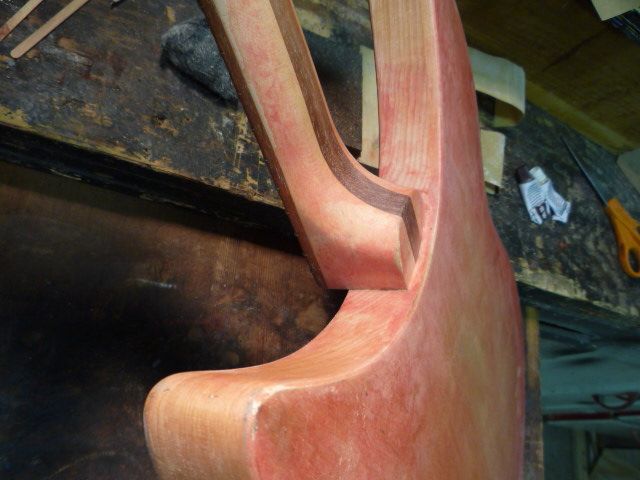
It is most likely original. 60s semi-hollow guitars were built with the X-brace. It's not as strong as the current construction method, but it gives them a great 'ring' and resonance... 8)

Re: Ric Rescue a Moron did this to a 60's Rickenbacker 345T

Posted: Tue Aug 21, 2012 11:33 am
by collin
Yes, it's the original x-bracing and it's one of the best things about your guitar (trust me there!)

Re: Ric Rescue a Moron did this to a 60's Rickenbacker 345T

Posted: Tue Aug 21, 2012 12:01 pm
by rcboals
paologregorio wrote:So, did you find screw holes and a wiring rout for a 3rd, middle p/up under the metallic blue rattle can goo?
No third pickup but it will have one when I'm through. Also the X bracing is stock pretty cool looking bracing.
I have filled in the holes and will route for pups. I used in the neck cavity a combination of several wood dowels placed in each drill hole and JB Weld for Wood epoxy. (awesome product) You will not break this neck now at the joint. Yes, the moron that did this cut into the tenon of the neck. Thanks to high school wood shop and lots of trial and error over the years I have the skill to do this. Wasn't concerned about matching the wood on the top as it will be painted gloss black so it will never been seen. Here are a few more pics.
Image
Image
Image
Image
Image
Image

Re: Ric Rescue a Moron did this to a 60's Rickenbacker 345T

Posted: Tue Aug 21, 2012 12:38 pm
by Rickissippi
I appreciate the love for 340s and 370s, but man, I hate to see that original beautiful maple (now that you've stripped it) routed out for a p'up that was never there to begin with. But maybe it's just me - I'll always pick a 330/360 over a 3-p'up model. Also, John Hall's words about the three-pickup models (and how standard RIC wiring doesn't give you strat-type options with the third pickup) give me pause about owning a 3-pup model. That having been said - the '66 from the video you posted sounds incredible.

Re: Ric Rescue a Moron did this to a 60's Rickenbacker 345T

Posted: Tue Aug 21, 2012 1:16 pm
by collin
Rickissippi wrote:I appreciate the love for 340s and 370s, but man, I hate to see that original beautiful maple (now that you've stripped it) routed out for a p'up that was never there to begin with. But maybe it's just me - I'll always pick a 330/360 over a 3-p'up model. Also, John Hall's words about the three-pickup models (and how standard RIC wiring doesn't give you strat-type options with the third pickup) give me pause about owning a 3-pup model. That having been said - the '66 from the video you posted sounds incredible.

Meh...

Judging by the massive, cavernous humbucker route in the top, I'd say it's fair game. :lol:

There's a lot of people that don't dig on the three pickup models, but it's never bothered me for playing, and looks cool. I almost exclusively play in the bridge position, so sound doesn't really bother me either. 8)

Re: Ric Rescue a Moron did this to a 60's Rickenbacker 345T

Posted: Tue Aug 21, 2012 1:33 pm
by stsang
I'm still a little confused - if the guitar is supposed to be a 345 as scrawled in the control cavity, shouldn't it already have the pickup cavity and route for the middle pickup? Not a huge issue, but confusing nonetheless. Anyway it's great to see that it is now being taken care of. :)

Re: Ric Rescue a Moron did this to a 60's Rickenbacker 345T

Posted: Tue Aug 21, 2012 1:50 pm
by jingle_jangle
What's written in the cavity has little to do with final configuration in some examples of these mid-'60s models. I've restored 3 360s that had "365" scrawled inside the control cavity.

Nice work, but personally I do shy away from epoxy fills as they expand and contract at a different rate than the original maple. This leads to witness lines or even cracks eventually, especially under dark solid finishes like Jetglo and Azureglo. Filling the areas with tightly-fitted grain-matched maple will leave light witness lines, eventually.

Here's a badly-butchered (yup, Dremel tool with sanding drum!) humbuckered '69 OS that I redid back in '06. I clamped it up and precisely milled out each butchered pickup hole, oversized and absolutely square.

Image

I then made tight-fitting, grain-matched maple blocks and glued them into the new recesses:

Image

These were carefully milled and sanded perfectly flush before being sealed. It was at this point that I talked the customer into going with Azureglo instead of Jetglo. I then milled in the proper cutout configuration for the long-pole toasters and this year of Rick:

Image

Image

A few coats of sealer, then color coats:

Image
Image

Finally, conversion varnish, hand-sand, then buff:

Image
Image

The completed instrument, which still looks every bit as good as it did over 6 years ago:

Image
Image

I did a similar resto to a Gretsch Pro-Jet that had been badly fitted with new Filtertrons. Again, the "luthier" had hacked away the original Dumbucker routs to make room for the Filtertrons. The implements used were a Dremel with a sanding drum, and once the drum burned up from too high RPM, he used a pocket knife:

Image
Image

This time, since I was dealing with both maple and mahogany, I milled the recesses and filled them with high-density urethane tooling plank ("Ren-Shape") which is dimensionally stable in all directions. Same flattening procedure, and then machined out the pickup openings to exact Filtertron size:

Image

Since the finished guitar was going to be a solid two-tone color combination, the carcass received a double coat of urethane catalyzing primer, which was sanded with #600, wet, to provide an absolutely smooth base for the color coats and conversion varnish:

Image

The finished instrument with Bamboo Yellow/Copper Anniversary color scheme, next to a double-cut Black Jet that was fitted with Filtertrons, but left otherwise stock, for comparison:

Image
Image

To this day, no witness lines on this one:

Image

...then there was the Pro Jet that I thinned by 1/2" , hollowed out completely (except for center block) and double-bound to make a DeVille Jet for Aitch in Oz. This thing got deluxe everything before it left my shop, and only weighed around 6 1/2 pounds--two pounds lighter than stock!

Image

Image

Image

Image
Image
Image
Image

Cadillac, anyone?

Re: Ric Rescue a Moron did this to a 60's Rickenbacker 345T

Posted: Tue Aug 21, 2012 4:04 pm
by ken_j
jingle_jangle wrote:...Nice work, but personally I do shy away from epoxy fills as they expand and contract at a different rate than the original maple. This leads to witness lines or even cracks eventually, especially under dark solid finishes like Jetglo and Azureglo. Filling the areas with tightly-fitted grain-matched maple will leave light witness lines, eventually. ...
Two very good points Paul. The grain matching is extremely important. Running cross grain on the patch can lead to an easily seen line but more importantly can crack the top if allowed to expand in the opposite direction. I would use aged maple with proper grain direction.
jingle_jangle wrote:Cadillac, anyone?
1931 V16 Phaeton
1931 V16 Phaeton

Re: Ric Rescue a Moron did this to a 60's Rickenbacker 345T

Posted: Tue Aug 21, 2012 4:46 pm
by rcboals
jingle_jangle wrote:What's written in the cavity has little to do with final configuration in some examples of these mid-'60s models. I've restored 3 360s that had "365" scrawled inside the control cavity.

Nice work, but personally I do shy away from epoxy fills as they expand and contract at a different rate than the original maple. This leads to witness lines or even cracks eventually, especially under dark solid finishes like Jetglo and Azureglo. Filling the areas with tightly-fitted grain-matched maple will leave light witness lines, eventually.

Here's a badly-butchered (yup, Dremel tool with sanding drum!) humbuckered '69 OS that I redid back in '06. I clamped it up and precisely milled out each butchered pickup hole, oversized and absolutely square.

Image

I then made tight-fitting, grain-matched maple blocks and glued them into the new recesses:

Image

These were carefully milled and sanded perfectly flush before being sealed. It was at this point that I talked the customer into going with Azureglo instead of Jetglo. I then milled in the proper cutout configuration for the long-pole toasters and this year of Rick:

Image

Image

A few coats of sealer, then color coats:

Image
Image

Finally, conversion varnish, hand-sand, then buff:

Image
Image

The completed instrument, which still looks every bit as good as it did over 6 years ago:

Image
Image

I did a similar resto to a Gretsch Pro-Jet that had been badly fitted with new Filtertrons. Again, the "luthier" had hacked away the original Dumbucker routs to make room for the Filtertrons. The implements used were a Dremel with a sanding drum, and once the drum burned up from too high RPM, he used a pocket knife:

Image
Image

This time, since I was dealing with both maple and mahogany, I milled the recesses and filled them with high-density urethane tooling plank ("Ren-Shape") which is dimensionally stable in all directions. Same flattening procedure, and then machined out the pickup openings to exact Filtertron size:

Image

Since the finished guitar was going to be a solid two-tone color combination, the carcass received a double coat of urethane catalyzing primer, which was sanded with #600, wet, to provide an absolutely smooth base for the color coats and conversion varnish:

Image

The finished instrument with Bamboo Yellow/Copper Anniversary color scheme, next to a double-cut Black Jet that was fitted with Filtertrons, but left otherwise stock, for comparison:

Image
Image

To this day, no witness lines on this one:

Image

...then there was the Pro Jet that I thinned by 1/2" , hollowed out completely (except for center block) and double-bound to make a DeVille Jet for Aitch in Oz. This thing got deluxe everything before it left my shop, and only weighed around 6 1/2 pounds--two pounds lighter than stock!

Image

Image

Image

Image
Image
Image
Image

Cadillac, anyone?
WOW!!!!! You sir are my new hero. Me do also luvs' me some Gretsch's. If mine turns out like yours did I will be very happy. As far as the epoxy shrinking JB Wood Weld says, "it will not shrink or foam, superior adhesion bonds stronger than wood, if that isn't enough it even boasts it has new cross-linked technology." :lol: :roll:

Re: Ric Rescue a Moron did this to a 60's Rickenbacker 345T

Posted: Tue Aug 21, 2012 6:02 pm
by collin
Yep, gotta be stronger that wood. The packaging even says so. :lol:

Re: Ric Rescue a Moron did this to a 60's Rickenbacker 345T

Posted: Tue Aug 21, 2012 7:25 pm
by jingle_jangle
rcboals wrote: As far as the epoxy shrinking JB Wood Weld says, "it will not shrink or foam, superior adhesion bonds stronger than wood, if that isn't enough it even boasts it has new cross-linked technology."
If it does not shrink and the maple guitar body does shrink, that means they shrink at different rates, which is what causes witness lines and cracks.

I should point out here that quite often, good structural and functional solutions simply will not work as aesthetic or appearance solutions. On the other hand, however, it's the cross-pollination between disciplines and technologies that can potentially give us some of our best work-arounds and alternative solutions, or lead to whole new timesaving variations on old methodologies.

Example...on the spot grease removal:

Two weeks ago, I was wearing a pricey pair of new cream-colored, tailored slacks in my office. I walked into the workshop and accidentally brushed against a lathe lead screw, leaving a pattern of lithium grease on the side of the pant leg. The guys watching from the tool crib averted their eyes; they didn't want to see a grown man cry. I asked them for a can of acrylic solvent (methylene chloride) and a clean polishing diaper, soaked the grease stain on the spot with the MC, and used the diaper to soak up as much of the liquid as possible. Then I used an air blow gun to dry what little liquid was left. The stain was gone.

MC and its cousin ethylene dichloride are terrific solvents for all manner of grease and paints and evaporate virtually instantaneously. It's like a spot dry clean. And it's merely a plastic solvent.

Now, can anybody tell me how to get my leg to stop growing blue hair? (Just kidding...)

Re: Ric Rescue a Moron did this to a 60's Rickenbacker 345T

Posted: Tue Aug 21, 2012 7:50 pm
by rcboals
jingle_jangle wrote:
rcboals wrote: As far as the epoxy shrinking JB Wood Weld says, "it will not shrink or foam, superior adhesion bonds stronger than wood, if that isn't enough it even boasts it has new cross-linked technology."
If it does not shrink and the maple guitar body does shrink, that means they shrink at different rates, which is what causes witness lines and cracks.

I should point out here that quite often, good structural and functional solutions simply will not work as aesthetic or appearance solutions. On the other hand, however, it's the cross-pollination between disciplines and technologies that can potentially give us some of our best work-arounds and alternative solutions, or lead to whole new timesaving variations on old methodologies.

Example...on the spot grease removal:

Two weeks ago, I was wearing a pricey pair of new cream-colored, tailored slacks in my office. I walked into the workshop and accidentally brushed against a lathe lead screw, leaving a pattern of lithium grease on the side of the pant leg. The guys watching from the tool crib averted their eyes; they didn't want to see a grown man cry. I asked them for a can of acrylic solvent (methylene chloride) and a clean polishing diaper, soaked the grease stain on the spot with the MC, and used the diaper to soak up as much of the liquid as possible. Then I used an air blow gun to dry what little liquid was left. The stain was gone.

MC and its cousin ethylene dichloride are terrific solvents for all manner of grease and paints and evaporate virtually instantaneously. It's like a spot dry clean. And it's merely a plastic solvent.

Now, can anybody tell me how to get my leg to stop growing blue hair? (Just kidding...)
That is perfect example of JB Wood Welds "new cross-linked technology" :)

Re: Ric Rescue a Moron did this to a 60's Rickenbacker 345T

Posted: Tue Aug 21, 2012 8:23 pm
by jps
jingle_jangle wrote:Now, can anybody tell me how to get my leg to stop growing blue hair? (Just kidding...)
You should be happy some hair is growing! :wink: