Leo Quan Bad A** II Bridge Install

Vintage, Modern, V & C series, Fretless, Signature & Special Editions

Moderators: rickenbrother, ajish4

WillyWonka
Junior Member
Posts: 129
Joined: Thu Jul 01, 2021 1:54 pm

Re: Leo Quan Bad A** II Bridge Install

Post by WillyWonka »

JackTheRipper wrote:I decided against installing the BA II.

I removed the stock bridge to get a look at the route and the work that I thought would be needed to install the BA II. It seems like the route would need to be filled, or partially filled, to get the BA II to have full contact with the body. Either that or install it further back. I don't want to do either of those things.

--jack
20211126_131519_Resized.jpg
20211126_131555_Resized.jpg
20211126_131621_Resized.jpg


It does look like there is plenty of saddle travel on the BA II, how does it look width wise?
User avatar
JackTheRipper
Junior Member
Posts: 154
Joined: Tue Feb 07, 2012 8:05 pm

Re: Leo Quan Bad A** II Bridge Install

Post by JackTheRipper »

WillyWonka wrote:It does look like there is plenty of saddle travel on the BA II, how does it look width wise?
It's just wide enough to cover the width of the route.

--jack
User avatar
jps
RRF Consultant
Posts: 37146
Joined: Wed Feb 12, 2003 6:00 am

Re: Leo Quan Bad A** II Bridge Install

Post by jps »

Dirk wrote:No numbers back then.
badass.jpg
.
Well, at the time, that was the only model Leo Quan made until the newer BA II became available, so, no need for any numbers.
PrairieThunder
New member
Posts: 7
Joined: Mon Jul 19, 2021 6:17 am

Re: Leo Quan Bad A** II Bridge Install

Post by PrairieThunder »

That sounds like a good idea to me. The BA bridges are nice. I have never put one on a ric, but i have swapped two of my stock ric bridges (1976 and 2016) for Schaller rollers (my favourite) and they turned out better than i could have hoped. Instead of covering the hole with a surround, i like to fill the hole with a block of wood from an old cutting board to give the bridge a bit more of a contact surface and skip the surround. It's tue, they look pretty "custom" (visible ground wire, "wood coloured" block sitting in a "not wood coloured" surface, black bridge on instruments with chrome hardware) but i'm not one to mind, especially considering the improvement in function on those two. One had major saddle rattle and burrs in places that would eat my flatwounds. The other had wonky string spacing and too flat a radius. The sound on both those instruments came noticeably more solid/less "hollow" with the replacement, too. I don't think you'd be disappointed, but if you are, it's easy to switch back. Good luck if you decide to do it and make sure to let us know how you like it!
User avatar
cheyenne
Veteran RRF member
Posts: 6231
Joined: Fri Feb 16, 2001 11:39 am

Re: Leo Quan Bad A** II Bridge Install

Post by cheyenne »

I remember those Leo Quan Jeff Berlin adds in Guitar Player magazine.

"The finest crafted Fender bass can be improved by the Hipshot Bad **s bridge" ..or something like that. :D
"Knowledge is Power"
User avatar
JackTheRipper
Junior Member
Posts: 154
Joined: Tue Feb 07, 2012 8:05 pm

Re: Leo Quan Bad A** II Bridge Install

Post by JackTheRipper »

Resurrecting this old thread...

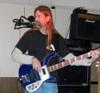
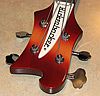
I had some time and took another look at putting the BA II on my JetGlo 4003. I made a small filler block out of a piece of maple, spray painted it black, and installed it using the existing screw holes. Then drilled 5 new holes for the BA II and installed it. I was a *little* hesitant to drill the new holes, but all of them would be covered by the original tailpiece if I decide to go back to that. I have a plastic surround piece, but it doesn't fit well, so I'm having Pickguardian make a new one for me that should arrive soon.

Intonation and setup was easy and no issues with the BA II so far. I don't think it "helps" in any way, although I would say that intonation was easier. And I will need to drill some new holes for the plastic surround. I may just use some double-sided tape for a while to make sure that I want to keep it before drilling the screw holes for that.

Thank to everyone that provided pictures and other helpful information!

--jack
2011_4033_Bad_AssII_01.jpg
2011_4033_Bad_AssII_02.jpg
2011_4033_Bad_AssII_04.jpg
2011_4033_Bad_AssII_12.jpg
2011_4033_Bad_AssII_13.jpg
Post Reply

Return to “Rickenbacker Basses: by Joey Vasco & Tony Cabibe”