
Not to worry, the bass never had checkerboard binding. It's looking great.bartyclue wrote: I really wanted to repace the binding with Checkerboard but it just wasnt possible.
My 1st project Bass NBD
Moderators: rickenbrother, ajish4
Re: My 1st project Bass NBD
Re: My 1st project Bass NBD
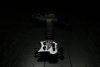
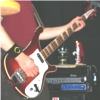
Well its almost done.. After waiting almost 8 months.. I can finally reveal the (almost finished) product. I decided against the gold Pickguard in the end, and it needs nickle strap bolts and a new damper assembly but here she is. I am thrilled with how it turned out.
$750 for the bass and case
$200 for a RIHS
$180 for paint and clear
$100 bottle of scotch for the Luthier and voila!
$750 for the bass and case
$200 for a RIHS
$180 for paint and clear
$100 bottle of scotch for the Luthier and voila!
Re: My 1st project Bass NBD
Mmm-hmm! That is one classy looking 4001!
Have you considered putting in the cap on the bridge pickup with the push/pull switch? I have a RIHS in my '72 with this circuit, and I really like the variety of tones.
Have you considered putting in the cap on the bridge pickup with the push/pull switch? I have a RIHS in my '72 with this circuit, and I really like the variety of tones.
Turn on, tune up, rock out!

Re: My 1st project Bass NBD
Great work, Brian!
So jealous of you luthier types...I can play them but damned if I can build them or fix them!
So jealous of you luthier types...I can play them but damned if I can build them or fix them!
Re: My 1st project Bass NBD
Neither can iI. My friend did all the workbadeggs wrote:Great work, Brian!
So jealous of you luthier types...I can play them but damned if I can build them or fix them!

Re: My 1st project Bass NBD
Very nice work, Brian's friend! While going through and doing all that work why didn't you go ahead and put the HS PU surround on the correct direction?

Re: My 1st project Bass NBD
I like tho color a lot, but did he actually paint over the binding? Also, I'd buy one of the new style pickup surrounds for that ($35) to replace the RIHS surround. They just don't look right screwed on backwards.
Re: My 1st project Bass NBD
@Jeff- Oops..
@Dane.. yes the binding was painted over.
@Dane.. yes the binding was painted over.
-
RickyBubba

- Intermediate Member
- Posts: 657
- Joined: Mon Aug 29, 2011 11:58 am
Re: My 1st project Bass NBD
That thing looks great!

-
jingle_jangle

- RRF Moderator
- Posts: 22679
- Joined: Wed Dec 22, 2004 6:00 am
- Contact:
Re: My 1st project Bass NBD
VERY SWEEEET, Brian!
I like to see the envelope pushed on colors for Ricks. To my eye, Ricks look good in about 80% of the colors that can be dreamed up. This is a prime example of "who'd'a thunk?".
Upon reflection of this Curmudgeon, every single one of Fender's '60s custom colors would look great on a Rickenbacker.
Notice that the 1960s Fender Custom Colors never included a bright blue, yellow, orange or green in solid, opaque tones. It's my belief that this is divinely-ordained...
Re: My 1st project Bass NBD
The Previous owner sanded the **** out of this poor thing, and in the process sanded the binding to be paper thin. This is why it was covered up as it would have been a huge task to route a new channel.. obtain the correct binding blah blah blah...aceonbass wrote:I like tho color a lot, but did he actually paint over the binding? Also, I'd buy one of the new style pickup surrounds for that ($35) to replace the RIHS surround. They just don't look right screwed on backwards.
-
jingle_jangle
- RRF Moderator
- Posts: 22679
- Joined: Wed Dec 22, 2004 6:00 am
- Contact:
Re: My 1st project Bass NBD
Lots of people are gun-shy about binding, but it's actually cheap and very easy to do (or re-do!).
First you need to own or borrow a router. Anything from a laminate trimmer to a big table router would work. I've even routed for binding with a Dremel tool, though it's slow and tricky doing it this way. I do use a Dremel to do the tight areas next to the neck heel, though.
You need a ball bearing bit with a 1/16" step, for Rick binding. Something like the 1/2" bit shown here is good:
http://www.stewmac.com/shop/Tools/Routi ... _Bits.html
This is self-jigging, and you'll need to set the depth a hair shy of 1/4". Rout all the way around each wing, but stop just shy of the center neck block at the taipliece end of the bass. This short length on each side needs to be done by hand with a sharp chisel or #4 X-Acto handle with a square tipped chisel blade, working very carefully. The same with the short lengths adjacent to the neck heel.
Routing done? Glue in the binding. This can be ABS (as sold by Stew-Mac and all the luthiery supply houses) or genuine celluloid (available only from axiominc.net). Glue it in place with Duco tube cement or a glue that you can make by dissolving some 2" strips of extra binding in a partially-filled squeeze bottle of acetone, overnight. This homemade stuff should be just thick enough to not run down a vertical surface. Use squeeze bottle to apply a thin bead (3/32") to the binding channel you just routed. The binding can be cold-bent around all curves except the headstock horns. For the horns you'll need a hair dryer or heat gun to soften the binding slightly so it bends without breaking or kinking. Use tape to hold the binding in place. Pull the tape tight, use 4" strips and wrap them around top to back. Give this 2 days minimum to fully dry. If you put the glue on too thick, it will take weeks for the binding hard enough to scrape and sand.
The binding, which is taller than the channel by a smidge (remember--you routed the channel a bit narrower that 1/4"!) can then be scraped and sanded flush with the top and sides. Then simply mask the side of the binding with 1/4" 3M Fine Line tape and paint over the top 1/16" of the binding. The top is scraped with a single edged razor blade or a Stanley knife blade.
Re: My 1st project Bass NBD
I think it looks fine with the binding painted, but, I would worry that the paint on it would shrink at a different rate that the paint on the wood over time, and show.
Re: My 1st project Bass NBD
Paul, thanks for the instructions. For now I am just going to leave as is. I really do like the way it looks with the no binding. If I ever do decide to redo it, and if this ecomomy ever smartens up , maybe I send it your way for treatment.