
So this guy Alan Zeleznikar (personable Rick-Forum-raconteur-type-guy, you know him...) contacts me and asks if I'm interested in refinning his 4003. It's a project bass, some extra holes, parts missing, you know the drill. He gets the missing parts together, contacts me and shoots the whole shebang over to me in a couple of boxes.
I open it up and find a red with black trim bass in pretty good shape, although it's plainly been experimented with in a past life. Needs a refret, too.
We agree to try something different in finishes, I give him a price quote, and he gives me the go-ahead. Knowing I have at least three more refins to complete before Christmas, I dive right in with my fret removing pliers, my masking tape and paint stripper.
So here are some shots taken last Thursday and Friday. The bass left its case at noon Thursday and by late Friday afternoon, it was as naked as a jaybird and as smooth as a baby's bottom, sanded to #320 and ready for sealer.
You'll see the unique color he and I dreamed up as it develops.
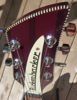
First photo shows the bass with its first carefully-applied coat of stripper. The arrows note that the stripper was brushed within about 5mm of the binding, so as not to dissolve the ABS strip that's used to bind the black-trimmed body. Note also (green arrow) the stack of newly-pulled frets. Nothing like shiny new frets to make a guitar look great and sing like new!
http://img.photobucket.com/albums/v693/jingle_jangle/1985%204003/DSC00414.jpg
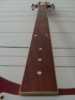
Next shot shows the defretted neck with its beautiful routed inlays, as the varnish (which was quite yellowed!) is begun to be sanded off. This also must be done with a deft touch so as not to modify the neck's radius in any way.
http://img.photobucket.com/albums/v693/jingle_jangle/1985%204003/DSC00415.jpg
This picture is a closeup of the nut area, showing the card stock shim on the "G" side.
http://img.photobucket.com/albums/v693/jingle_jangle/1985%204003/DSC00418.jpg
Here's a shot of the back, showing and area which was worn through to the bare maple. Note the stripper doing its job.
http://img.photobucket.com/albums/v693/jingle_jangle/1985%204003/DSC00419.jpg
Next, another shot of the neck in its entirety, showing the newly-sanded fretboard and the first go-round of the front of the body. Then a closeup of the body as I began stripping the cavities. The control cavity was already copper-foil lined, so I left it alone.
http://img.photobucket.com/albums/v693/jingle_jangle/1985%204003/DSC00420.jpg
http://img.photobucket.com/albums/v693/jingle_jangle/1985%204003/DSC00422.jpg
Arrows in the next photo show that area on the back where the paint had been worn away. Note the amount of dirt absorbed by the unprotected maple. This has to be sanded away, and in more extreme cases, it must be bleached.
More...
Alan Z's 1985 4003
Moderator: jingle_jangle
-
jingle_jangle

- RRF Moderator
- Posts: 22679
- Joined: Wed Dec 22, 2004 6:00 am
- Contact:
Alan Z's 1985 4003
“I say in speeches that a plausible mission of artists is to make people appreciate being alive at least a little bit. I am then asked if I know of any artists who pulled that off. I reply, 'The Beatles did.”
― Kurt Vonnegut
― Kurt Vonnegut
-
jingle_jangle
- RRF Moderator
- Posts: 22679
- Joined: Wed Dec 22, 2004 6:00 am
- Contact:
Next photo is of the guitar standing up to strip the sides. You can see the dirty area once again (green arrow), and the double thickness of good masking tape (red arrows) to protect the binding strip from the stripper.
http://img.photobucket.com/albums/v693/jingle_jangle/1985%204003/DSC00426.jpg
Last, we're getting close to finished... about two hours after this, the entire guitar was clean as a whistle; not a speck of red visible, and the entire body, neck, and fretboard ready for sealer.
http://img.photobucket.com/albums/v693/jingle_jangle/1985%204003/DSC00430.jpg
More later as this one progresses. The finish will be unusual and quite appealing, I promise.
“I say in speeches that a plausible mission of artists is to make people appreciate being alive at least a little bit. I am then asked if I know of any artists who pulled that off. I reply, 'The Beatles did.”
― Kurt Vonnegut
― Kurt Vonnegut
-
jingle_jangle
- RRF Moderator
- Posts: 22679
- Joined: Wed Dec 22, 2004 6:00 am
- Contact:
This was the "Fireglo Rickenbaker" bass I snagged for $164.50 from a local-only San Diego Ebay auction a few months ago. It had Seymour Duncan pickups in it, a mangled pickguard and a thumbrest on the top (at a weird angle).
When Paul's finished it will have a toaster in front and a high gain in back and the black hardware will include a Hipshot bridge.
I think I'm gonnna take some heat for this one.

When Paul's finished it will have a toaster in front and a high gain in back and the black hardware will include a Hipshot bridge.
I think I'm gonnna take some heat for this one.
Listen to that sustain!
Nice job so far Paul. What kind of stripper do you use?
I have a sunburst Japanese made archtop (Stewart) I will experiment with for refins, but I need to get her clean first.
...Dean
I have a sunburst Japanese made archtop (Stewart) I will experiment with for refins, but I need to get her clean first.
...Dean
...Dean
Never, ever drool on your surf shirt. It wrecks the solo.
660/12FG, 350V63/6FG, 620/6JG, 360WB/6DBG, Dingwall C1 #001, Prestige Heritage Elite FM
Never, ever drool on your surf shirt. It wrecks the solo.
660/12FG, 350V63/6FG, 620/6JG, 360WB/6DBG, Dingwall C1 #001, Prestige Heritage Elite FM
-
jingle_jangle
- RRF Moderator
- Posts: 22679
- Joined: Wed Dec 22, 2004 6:00 am
- Contact:
On this one, I used JASCO. I often use a citrus-based stripper on easier jobs, but RIC's conversion varnish makes more drastic measures necessary. On Fenders, I need aircraft and marine stripper. I once tried to strip a MIM Duo-Sonic, and NOTHING would take the paint off, so I sanded it off. Took forever, but cleaned up nicely.
Keep the stripper away from the bindings!
Mask (double or even triple layer of quality tape, 3M if possible) and cover to within about 3/8" or 10 mm of the binding. The balance can easily be sanded off.
Keep the stripper away from the bindings!
Mask (double or even triple layer of quality tape, 3M if possible) and cover to within about 3/8" or 10 mm of the binding. The balance can easily be sanded off.
“I say in speeches that a plausible mission of artists is to make people appreciate being alive at least a little bit. I am then asked if I know of any artists who pulled that off. I reply, 'The Beatles did.”
― Kurt Vonnegut
― Kurt Vonnegut

-
jingle_jangle
- RRF Moderator
- Posts: 22679
- Joined: Wed Dec 22, 2004 6:00 am
- Contact:
Did I say, "personable, raconteur, impatient Rick Forum type of guy"...?
More in-progress pics tonight.
More in-progress pics tonight.
“I say in speeches that a plausible mission of artists is to make people appreciate being alive at least a little bit. I am then asked if I know of any artists who pulled that off. I reply, 'The Beatles did.”
― Kurt Vonnegut
― Kurt Vonnegut
-
jingle_jangle
- RRF Moderator
- Posts: 22679
- Joined: Wed Dec 22, 2004 6:00 am
- Contact:
-
jingle_jangle
- RRF Moderator
- Posts: 22679
- Joined: Wed Dec 22, 2004 6:00 am
- Contact: