
...has finally drawn to a close!
Those who were at RIC75 saw it in my booth at the Show 'n' Tell.
I've gotten a number (OK, TWO) requests for pictures, so I've uploaded a few to Photobucket.
I've taken some very large format shots, to print up some posters and you can bet that it'll also make its way onto my 2007 Restored Rickenbackers Calendar, along with some other shots of Forumites' Ricks that I've restored over the last year and a half.
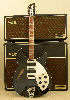
For the benefit of the substantial number of newbies who weren't even aware that I had this project in the works, here are some shots of the 365 Capri, serial number 2V089, which I purchased from my good and faithful Rickenfriend and fellow Forumite, John Williams, last New Years or so:
http://img.photobucket.com/albums/v693/jingle_jangle/1960%20365%20CAPRI/trc1.jpg
http://img.photobucket.com/albums/v693/jingle_jangle/1960%20365%20CAPRI/badboard.jpg
http://img.photobucket.com/albums/v693/jingle_jangle/1960%20365%20CAPRI/clamped.jpg
http://img.photobucket.com/albums/v693/jingle_jangle/1960%20365%20CAPRI/DSC01423.jpg
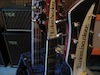
I have some shots of the whole guitar somewhere, but can't put my hands on them at the moment. This is a pretty well-documented project, with something like 150 photos in all...
I probably would never have touched this guitar, had it been in original, unmolested condition. But my request to John Williams was for a playable Capri that was also suitable for restoration, and, as he said, he had just the one for me. This guitar was structurally very sound, and as an original MG guitar, one of only 15 MG 365s produced that year. However, a previous owner had done a quickie attempt at a refinish long, long ago, and as a result the guitar had suffered. The back had been sanded through the veneer in two places, and the binding was paper-thin in a few areas and rounded off due to too-eager efforts with coarse sandpaper and no block.
First order of business was to replace the back. Doing this exposed to the light of day, some very interesting construction details:
http://img.photobucket.com/albums/v693/jingle_jangle/1960%20365%20CAPRI/clamped.jpg
http://img.photobucket.com/albums/v693/jingle_jangle/1960%20365%20CAPRI/ohno1.jpg
http://img.photobucket.com/albums/v693/jingle_jangle/1960%20365%20CAPRI/inside.jpg
http://img.photobucket.com/albums/v693/jingle_jangle/1960%20365%20CAPRI/structure.jpg
It was also necessary to restore the fretboard; the frets were quite worn and the board was in terrible shape. Old and oft-played Capris often exhibit chunks missing from the pickup end of the boards. right under the strings; the area between the highest fret and the end of the board being vulnerable to knocks and even string vibration. The padauk 'board, naturally a beautiful red-orange color, had oxidized badly into a dull brown and there were lost of fingernail gouges around the first five frets. So it was a complete de-fretting, resurfacing, re-radiusing, and refret before I proceeded to replace the back:
http://img.photobucket.com/albums/v693/jingle_jangle/1960%20365%20CAPRI/oldboard.jpg
http://img.photobucket.com/albums/v693/jingle_jangle/1960%20365%20CAPRI/tapefill.jpg
http://img.photobucket.com/albums/v693/jingle_jangle/1960%20365%20CAPRI/boardend.jpg
http://img.photobucket.com/albums/v693/jingle_jangle/1960%20365%20CAPRI/board1.jpg
http://img.photobucket.com/albums/v693/jingle_jangle/1960%20365%20CAPRI/padauk.jpg
http://img.photobucket.com/albums/v693/jingle_jangle/1960%20365%20CAPRI/finfret.jpg
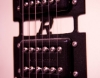
The back was replaced with new plywood, and the decision was made to rebind both sides in checkerboard with white outer binding. This necessitated routing a new channel around the edges of both sides, to accommodate the checkerboard. This is fairly easily done at the factory, but in this case, the neck gets in the way of the router when cutting the last three inches or so on either side of the top at the cutaways. So these areas were done the old way--by hand, with my very sharp Marples chisels.
http://img.photobucket.com/albums/v693/jingle_jangle/1960%20365%20CAPRI/det2.jpg
http://img.photobucket.com/albums/v693/jingle_jangle/1960%20365%20CAPRI/edges.jpg
http://img.photobucket.com/albums/v693/jingle_jangle/1960%20365%20CAPRI/backdone.jpg
Bind, scrape, yadda,yadda.
THE '60 CAPRI SAGA...
Moderators: rickenbrother, ajish4
-
jingle_jangle

- RRF Moderator
- Posts: 22679
- Joined: Wed Dec 22, 2004 6:00 am
- Contact:
THE '60 CAPRI SAGA...
“I say in speeches that a plausible mission of artists is to make people appreciate being alive at least a little bit. I am then asked if I know of any artists who pulled that off. I reply, 'The Beatles did.”
― Kurt Vonnegut
― Kurt Vonnegut
-
jingle_jangle
- RRF Moderator
- Posts: 22679
- Joined: Wed Dec 22, 2004 6:00 am
- Contact:
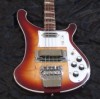
Whoops--forgot! Both front and back were veneered with bookmatched birdseye maple before the routing was done.
At the point of the birdseye veneering, things kinda got out of hand. This is when I made the decision to bind the neck in striped celluloid (in tribute to Roger Rossmeisl's love of applied detail ornamentation!) and to refinish the Capri in a very vintage-looking chocolate brown-to light mahogany burst .
Most burst finishes I do involve translucent dyes which change color depending upon how many coats are applied. Nearly all, including my FG, AG, Aquaglo, and Melibee's Purpleburst, are done with one color of dye.
Paul Boyer's Mink '72 4001 required two colors and an ambered varnish coat.
This Capri took four colors of dye and an amber varnish coat, for a total of five colors plus conversion varnish topcoats. Paintwork alone took over a month, with new varnish coats every three or four days and lots of flatting between. Two days were required to buff the finished paintwork.
While the varnish was curing, I made up no less than four different sets of pickguards to a special pattern: B/W/B top and bottom, tortoise shell top and bottom, pearl white top and bottom, and gold top and bottom. Final decision after trying all of these was a quite predictable gold top and tortoise bottom. The bottom was hand-scraped to bevel the edge and reveal the stripes, and the top was hand-scraped along the outer edge only and polished for a nice radiused finished effect.
The finishing touch was something I've always admired on very special older Ricks--a checkerboard bound headstock, but with the edge exposed this time, instead of white outer binding.
A new Kauffman and roller bridge were sourced (all for looks; the Kauffman was pinned) and installed, which necessitated filling the old tailpiece holes in the bottom. Oven knobs, of course, were reinstalled, and new butterbean Grovers replaced the incorrect double-line Klusons that were fitted when I got the Capri.
I had a fair amount of rewiring to do; the volume pots had been replaced at some time in the distant past and were badly wired, not to mention backward-wired. By this I mean that the normally backward-wired pots were wired right-way-round, resulting in the proper backward-wired tone pots being partnered with forward-wired volume pots...does this make sense? I kind of liked this quirkiness, so I kept it, although I cleaned it up a bit.
So, after all this descriptive nonsense, and without further palaver, here are the de rigeur back deck photos:
http://img.photobucket.com/albums/v693/jingle_jangle/1960%20365%20CAPRI/DSC00001aw.jpg
http://img.photobucket.com/albums/v693/jingle_jangle/1960%20365%20CAPRI/DSC00005aw.jpg
http://img.photobucket.com/albums/v693/jingle_jangle/1960%20365%20CAPRI/DSC00011aw.jpg
http://img.photobucket.com/albums/v693/jingle_jangle/1960%20365%20CAPRI/DSC00007aw.jpg
http://img.photobucket.com/albums/v693/jingle_jangle/1960%20365%20CAPRI/DSC00003aw.jpg
http://img.photobucket.com/albums/v693/jingle_jangle/1960%20365%20CAPRI/DSC00017aw.jpg
http://img.photobucket.com/albums/v693/jingle_jangle/1960%20365%20CAPRI/DSC00008aw.jpg
http://img.photobucket.com/albums/v693/jingle_jangle/1960%20365%20CAPRI/DSC00013aw.jpg
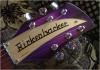
In tribute to this guitar, the number plate on my car reads "60 CAPRI". Now what do I do? My next project is gonna be either a Light Show or a Jazzbo, and both are taken at the DMV...
At the point of the birdseye veneering, things kinda got out of hand. This is when I made the decision to bind the neck in striped celluloid (in tribute to Roger Rossmeisl's love of applied detail ornamentation!) and to refinish the Capri in a very vintage-looking chocolate brown-to light mahogany burst .
Most burst finishes I do involve translucent dyes which change color depending upon how many coats are applied. Nearly all, including my FG, AG, Aquaglo, and Melibee's Purpleburst, are done with one color of dye.
Paul Boyer's Mink '72 4001 required two colors and an ambered varnish coat.
This Capri took four colors of dye and an amber varnish coat, for a total of five colors plus conversion varnish topcoats. Paintwork alone took over a month, with new varnish coats every three or four days and lots of flatting between. Two days were required to buff the finished paintwork.
While the varnish was curing, I made up no less than four different sets of pickguards to a special pattern: B/W/B top and bottom, tortoise shell top and bottom, pearl white top and bottom, and gold top and bottom. Final decision after trying all of these was a quite predictable gold top and tortoise bottom. The bottom was hand-scraped to bevel the edge and reveal the stripes, and the top was hand-scraped along the outer edge only and polished for a nice radiused finished effect.
The finishing touch was something I've always admired on very special older Ricks--a checkerboard bound headstock, but with the edge exposed this time, instead of white outer binding.
A new Kauffman and roller bridge were sourced (all for looks; the Kauffman was pinned) and installed, which necessitated filling the old tailpiece holes in the bottom. Oven knobs, of course, were reinstalled, and new butterbean Grovers replaced the incorrect double-line Klusons that were fitted when I got the Capri.
I had a fair amount of rewiring to do; the volume pots had been replaced at some time in the distant past and were badly wired, not to mention backward-wired. By this I mean that the normally backward-wired pots were wired right-way-round, resulting in the proper backward-wired tone pots being partnered with forward-wired volume pots...does this make sense? I kind of liked this quirkiness, so I kept it, although I cleaned it up a bit.
So, after all this descriptive nonsense, and without further palaver, here are the de rigeur back deck photos:
http://img.photobucket.com/albums/v693/jingle_jangle/1960%20365%20CAPRI/DSC00001aw.jpg
http://img.photobucket.com/albums/v693/jingle_jangle/1960%20365%20CAPRI/DSC00005aw.jpg
http://img.photobucket.com/albums/v693/jingle_jangle/1960%20365%20CAPRI/DSC00011aw.jpg
http://img.photobucket.com/albums/v693/jingle_jangle/1960%20365%20CAPRI/DSC00007aw.jpg
http://img.photobucket.com/albums/v693/jingle_jangle/1960%20365%20CAPRI/DSC00003aw.jpg
http://img.photobucket.com/albums/v693/jingle_jangle/1960%20365%20CAPRI/DSC00017aw.jpg
http://img.photobucket.com/albums/v693/jingle_jangle/1960%20365%20CAPRI/DSC00008aw.jpg
http://img.photobucket.com/albums/v693/jingle_jangle/1960%20365%20CAPRI/DSC00013aw.jpg
In tribute to this guitar, the number plate on my car reads "60 CAPRI". Now what do I do? My next project is gonna be either a Light Show or a Jazzbo, and both are taken at the DMV...
“I say in speeches that a plausible mission of artists is to make people appreciate being alive at least a little bit. I am then asked if I know of any artists who pulled that off. I reply, 'The Beatles did.”
― Kurt Vonnegut
― Kurt Vonnegut


-
sloop_john_b
- Rick-a-holic
- Posts: 13843
- Joined: Tue Jan 25, 2005 6:00 am


-
sloop_john_b
- Rick-a-holic
- Posts: 13843
- Joined: Tue Jan 25, 2005 6:00 am
-
jingle_jangle
- RRF Moderator
- Posts: 22679
- Joined: Wed Dec 22, 2004 6:00 am
- Contact:
-
will_nesbitt
- Member
- Posts: 204
- Joined: Mon Mar 27, 2006 11:49 am
- Contact:
-
melibreits
- Senior Member
- Posts: 4081
- Joined: Wed Mar 12, 2003 6:00 am
- Contact:
-
karl_teten
- Intermediate Member
- Posts: 552
- Joined: Sun Apr 10, 2005 4:09 pm
