
Finally got around to repairing my 4003s5 with the bent rods. Some of you may remember the Before pics:
http://img.photobucket.com/albums/v87/shakey_slim/trussrods1.jpg
http://img.photobucket.com/albums/v87/shakey_slim/trussrods.jpg
Here are some After pics. The first link shows how much the metal plate was bent.
http://img.photobucket.com/albums/v87/shakey_slim/ric_truss.jpg
And this pic shows the new plate and how much work I'm in for.
http://img.photobucket.com/albums/v87/shakey_slim/ric_truss1.jpg
Should be fun!
4003s5 truss rod update
Moderator: jingle_jangle
-
shakey_slim
- Veteran RRF member
- Posts: 89
- Joined: Wed Apr 11, 2001 5:05 am
-
beatlefreak

- Senior Member
- Posts: 6160
- Joined: Wed Jun 14, 2006 5:45 am
- Contact:
-
shakey_slim
- Veteran RRF member
- Posts: 89
- Joined: Wed Apr 11, 2001 5:05 am
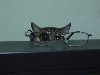
Truss rods are installed! Instead of building up the damaged area with wood and glue, I decided it would be stronger if I just cleaned out the damaged wood, straightened the old truss rod block, and use it as a spacer. I think it works pretty well.
[img]http://img.photobucket.com/albums/v87/shakey_slim/DSCN1541.jpg[/img]
[img]http://img.photobucket.com/albums/v87/shakey_slim/DSCN1542.jpg[/img]
The gaps that show up between the new block and the old block are because I haven't tightened the nuts down yet. I went through great pains to make sure that everything was flush and tight before I got to this point!
-
dale_fortune
- Intermediate Member
- Posts: 1241
- Joined: Sat Oct 30, 2004 6:00 am
