
Fingerboard project
Moderators: rickenbrother, ajish4

No pickup in the mute cavity. I have the mute bars chrome plated and then use a skinny piece of foam from the pickup mounting foam pads for a mute pad. It looks better that way and the mute pad is about the same size as on vintage Ricks. The original headstock wings were cut off first and then part of the headstock was cut off at an angle starting just in front of the truss rod cavity and ending a couple inches from the end of the headstock. Then an extension to the center section was grafted on to make it longer. This was followed by new wings made of jarra as well as a matching 21 fret board. The headstock design is a stylized version of the potato headstock that was redesigned taking into account truss rod cover clearance, string to tuner post interference and just plain asthetics. Okay, time to go to sleep.....
OK, the rest of the story.
The last dot is in place so the radius can be cut. I use an 18" long sanding beam that cuts a 10" radius. Here is the flat board along side the sanding beam.

The sandpaper cuts the bubinga away pretty quickly.

I sand until I can't see the pencil lines from the inlays anymore. That means I have cut down far enough to not leave a flat spot on the center of the fingerboard. Here is the board fully radiused and wiped down with a little naptha to show off the grain.

Now I press in the frets. I did not take any pictures of how I do that. I keep my fret wire in naptha so that it is clean when I am ready to use it. The wire gets curled a straightened 10 times to work-harden it. It is a simple thing that helps the frets last a lot longer. I use a fret press because it seats the frets quickly and fimly. Here is the board after the fret wire was pressed in.

The file in the picture is used to clean up the jagged ends of the freshly installed frets and to put a starting bevel on the ends afterwards.
The last dot is in place so the radius can be cut. I use an 18" long sanding beam that cuts a 10" radius. Here is the flat board along side the sanding beam.
The sandpaper cuts the bubinga away pretty quickly.
I sand until I can't see the pencil lines from the inlays anymore. That means I have cut down far enough to not leave a flat spot on the center of the fingerboard. Here is the board fully radiused and wiped down with a little naptha to show off the grain.
Now I press in the frets. I did not take any pictures of how I do that. I keep my fret wire in naptha so that it is clean when I am ready to use it. The wire gets curled a straightened 10 times to work-harden it. It is a simple thing that helps the frets last a lot longer. I use a fret press because it seats the frets quickly and fimly. Here is the board after the fret wire was pressed in.
The file in the picture is used to clean up the jagged ends of the freshly installed frets and to put a starting bevel on the ends afterwards.
The frets must be leveled after installation. I use the sanding beam to take the high spots off of the tops.

A few quick passes and the tops are very level but squared off. To restore the proper round shape to the fret wire, I use a crowning file. This one uses diamond dust as an abrasive. The diamond dust cuts faster than steel files and leaves a smoother surface to polish later. There are two different grits on this particular file.

Here are the leveled and crowned frets.

A few quick passes and the tops are very level but squared off. To restore the proper round shape to the fret wire, I use a crowning file. This one uses diamond dust as an abrasive. The diamond dust cuts faster than steel files and leaves a smoother surface to polish later. There are two different grits on this particular file.
Here are the leveled and crowned frets.
Time to polish the frets. It is a good idea to tape up the fingerboard before polishing the frets. The polish and metal oxides can stain the wood and make for a difficult cleanup.

Here are the frets after the first abrasive was applied. You can see the shine starting to emerge. Polished frets are smoother to play on and look really nice under stage lights.

After the tape is removed the side dots are installed.

The side dot material is nipped off near the wood and then scraped and sanded down later.
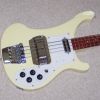
Here is the finished product.

Here are the frets after the first abrasive was applied. You can see the shine starting to emerge. Polished frets are smoother to play on and look really nice under stage lights.
After the tape is removed the side dots are installed.
The side dot material is nipped off near the wood and then scraped and sanded down later.
Here is the finished product.


Yes, it is pretty standard. RIC uses a much more precise way of cutting fret slots than I do, so their slot depths are pretty much right on. Every now and then you see one that is deeper than it needs to be. They are always filled. I have never seen one with open space at the bottom. I have seen other builders do the same thing. When it is done right it is hardly noticeable.