
How to handle cracks in the neck-headstock-joint?
Moderators: rickenbrother, ajish4
-
beatlefreak

- Senior Member
- Posts: 6160
- Joined: Wed Jun 14, 2006 5:45 am
- Contact:
-
jingle_jangle

- RRF Moderator
- Posts: 22679
- Joined: Wed Dec 22, 2004 6:00 am
- Contact:
Nope. In fact, for best bonding with cyanoacrylates, keeping the glue in the fridge overnight helps the bond.
“I say in speeches that a plausible mission of artists is to make people appreciate being alive at least a little bit. I am then asked if I know of any artists who pulled that off. I reply, 'The Beatles did.”
― Kurt Vonnegut
― Kurt Vonnegut

THANK YOU ALL! Dear Forumites! Your response is was a tremendous help, I think not only for me.
These are excellent hints and advice! We don't have Rick-experienced luthiers over here and so most problems stay with the Rick owner, usually. I already met some frustrated players and it is a pity that the reputation of Rick over here is not as high as it could be. But this forum definitely makes the difference: I've never got such expert and quick help like here!!!
Now I'm quite confident, that this bass will be put back in excellent playable and durable condition. I will place some pics of the final result then.
LOVE YOU GUYS!!! YOU KEEP THE WORLD ON RICKIN'!!!
"The youth of today should start thinking about the state in which they want to leave this planet to Keith Richards..."! Quote by an unknown musician
-
jingle_jangle
- RRF Moderator
- Posts: 22679
- Joined: Wed Dec 22, 2004 6:00 am
- Contact:
If the leg is broken in two or split in two, I wood (sic) use "Gorilla Glue". Follow the directions and be sure to clamp tight. It's unbeatable for furniture.
“I say in speeches that a plausible mission of artists is to make people appreciate being alive at least a little bit. I am then asked if I know of any artists who pulled that off. I reply, 'The Beatles did.”
― Kurt Vonnegut
― Kurt Vonnegut
Thanks Paul! 
Yes, there's a thin sliver off the leg near the screw channels. The screw channels are still firmly in the major part of the leg.
I've got plenty of foam and rags to protect the legs, and several bar clamps. I was figuring that I'd mess with the clamps first to figure out the best way to use them.
Yes, there's a thin sliver off the leg near the screw channels. The screw channels are still firmly in the major part of the leg.
I've got plenty of foam and rags to protect the legs, and several bar clamps. I was figuring that I'd mess with the clamps first to figure out the best way to use them.
Above e-mail is inactive. try ed_ardzinski@**** where **** is Hotmail.com or Yahoo.com. I tend to see things inthe hotmail box quicker...
-
jingle_jangle
- RRF Moderator
- Posts: 22679
- Joined: Wed Dec 22, 2004 6:00 am
- Contact:
If you use Gorilla according to directions, do keep the foam and/or rags away from the joint. The glue will wick into them and cause you grief. A few layers of masking tape on the vise jaws should suffice.
“I say in speeches that a plausible mission of artists is to make people appreciate being alive at least a little bit. I am then asked if I know of any artists who pulled that off. I reply, 'The Beatles did.”
― Kurt Vonnegut
― Kurt Vonnegut
Just a second small question: Where from do I remove the truss rods, from the headstock opening (that is my guess) or the body side, any tricks?
Ah, from the top!!! It's easy, I already got it!
Ah, from the top!!! It's easy, I already got it!
"The youth of today should start thinking about the state in which they want to leave this planet to Keith Richards..."! Quote by an unknown musician
-
jingle_jangle
- RRF Moderator
- Posts: 22679
- Joined: Wed Dec 22, 2004 6:00 am
- Contact:
So now my '74 4001FG is in the clamps overnight and day. After removing the truss rods, I selected a medium viscosity cyanoacrylate glue, carefully opened the cracks with my thumb's pressure(see initial pics) and fixed this open position with a tooth pic at each side. Then let the glue run in the cracks, also the skunk stripe was cracked. After applying the clamps, the excess glue was wiped off the finish(amazingly it did not affect the finish by dissolving it), but still some smear, which I can buffer of I guess, as it is acrylate anyway.
Will tell mor about it and send some more pics as well!
Will tell mor about it and send some more pics as well!
"The youth of today should start thinking about the state in which they want to leave this planet to Keith Richards..."! Quote by an unknown musician
-
jingle_jangle
- RRF Moderator
- Posts: 22679
- Joined: Wed Dec 22, 2004 6:00 am
- Contact:
Excellent. The glue smear will buff off. If you still can see the smear after buffing, take a scrap of #1000 wet or dry sandpaper, and using Windex or soap solution, sand until flattened. Then re-buff.
“I say in speeches that a plausible mission of artists is to make people appreciate being alive at least a little bit. I am then asked if I know of any artists who pulled that off. I reply, 'The Beatles did.”
― Kurt Vonnegut
― Kurt Vonnegut
So, continuing the crack repair: Everything is now nicely glued. The excess glue I could easily remove with my fingernails, because initially I polished the area with Johnson car polish wax. Then again some polishing prior to the next step of colouring. The former "repair man" painted the cracks with some unidentifiable paint, that was soaked up deep into the wood. I did not want to sand down to the uncoloured wood so I had to leave it as it was. As I do not have any spray job tools or material, I simply use glass colour (translucent laquer on cellulose basis), which does not attack the original finish nor soaks into the wood, for touch up the areas. I mix two tones (burgundy and orange) differently to obtain the various shades of the fireglow finish. That glass colour can also be buffed or polished with Johnson car polish wax. I will post some pics of the touch up later, when finally polished (hopefully I do not offend the profs here!?).
Then I reinserted the truss rods after the respective cleaning procedure (see Rick12DR: standard article in the RickResource) and after all hardware was back on the bass, bridgePU bridge ground and sockets reconnected, strings on, I followed the truss rod adjustment procedure of Michael Novak (standard article in RickResources). However to lift the body by only grabbing the neck at the head stock, I needed a big portion of confidence in the freshly glued repair and of course quite some exercise in the gym before.
The truss rods worked amazingly, I could put on a 45-100 set of round wounds (not quite low tension), the neck is still straight! After some bridge adjustment, no buzz, easy playing, very comfortable neck!!!
The electronics were already decapped, but other than that, everything original (pots dated 1974 also).
The sound is just amazing!!! Definitely more rickish than that of my 1997 4003FG.
But now the BIG SURPRISE: The electronics also of the bass work like I always described: In the middle position of the PU switch either tone po(Bass or Treble)is effective on both PUs simultaneaously and hence the total tone sound. The influence initially is most strong on the individual PU of the used tone pot, but if you close one of them totally ALL TREBLE IS GONE!!!
THAT MUST BE A REGULAR FEATURE OF THE 4001 CIRCUIT!!! Does anybody check with his bass??? Please!!!
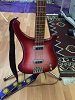
So finally I have some interesting pic here,

linked to a question: Who is Paul Ugar and what do the numbers (except 4001, which I know) mean?
Then I reinserted the truss rods after the respective cleaning procedure (see Rick12DR: standard article in the RickResource) and after all hardware was back on the bass, bridgePU bridge ground and sockets reconnected, strings on, I followed the truss rod adjustment procedure of Michael Novak (standard article in RickResources). However to lift the body by only grabbing the neck at the head stock, I needed a big portion of confidence in the freshly glued repair and of course quite some exercise in the gym before.
The truss rods worked amazingly, I could put on a 45-100 set of round wounds (not quite low tension), the neck is still straight! After some bridge adjustment, no buzz, easy playing, very comfortable neck!!!
The electronics were already decapped, but other than that, everything original (pots dated 1974 also).
The sound is just amazing!!! Definitely more rickish than that of my 1997 4003FG.
But now the BIG SURPRISE: The electronics also of the bass work like I always described: In the middle position of the PU switch either tone po(Bass or Treble)is effective on both PUs simultaneaously and hence the total tone sound. The influence initially is most strong on the individual PU of the used tone pot, but if you close one of them totally ALL TREBLE IS GONE!!!
THAT MUST BE A REGULAR FEATURE OF THE 4001 CIRCUIT!!! Does anybody check with his bass??? Please!!!
So finally I have some interesting pic here,
linked to a question: Who is Paul Ugar and what do the numbers (except 4001, which I know) mean?
"The youth of today should start thinking about the state in which they want to leave this planet to Keith Richards..."! Quote by an unknown musician
Ah, the mysteries of cavity graffiti. The names and initials we see in pretty much every Rick are seemingly part of the QC process and/or shop floor accounting. Typically there are names, initials, model numbers, finish names both official and simplified, and on occasion, dates. Even more rarely are there messages - sometimes complete sentences. My 2030 says something in spanish under the TRC.
Dale Fortune used to pencil a number into the truss cavity of the instrument he worked on. The first instrument of the day would get a "1" and so on. Paul Boyer's '72 has such a number.
Dale Fortune used to pencil a number into the truss cavity of the instrument he worked on. The first instrument of the day would get a "1" and so on. Paul Boyer's '72 has such a number.