
Hi,
I'm a newbie to Rickenbacker basses - Just got my brand new 4003 anout a month and a half ago - and am starting to familliarise myself with the bridge and tailpiece setup...
Anyway to make a long story short, I completely removed the big screws (height adjustment?) from my tailpiece - and I can't put them back in! They won't tighten.. no matter how much I try they just stay loose. I can't seem to find the hole in the bottom that I need to thread through.
I'm starting to panic here. Any advice?
-Mike
Tailpiece help please
Moderators: rickenbrother, ajish4

Mike: Welcome to The Rickenbacker Forum.
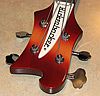
Just to be sure, use the following reference to describe what screws you removed.
Just to be sure, use the following reference to describe what screws you removed.
Life, as with music, often requires one to let go of the melody and listen to the rhythm
Please join the Official RickResource Forum Facebook Page https://www.facebook.com/groups/379271585440277
Please join the Official RickResource Forum Facebook Page https://www.facebook.com/groups/379271585440277
Hi, Michael, and welcome to the Rickenbacker Forum.
Don't panic. By removing those two thumb screws, you've caused the string mute to come loose. The only way to solve the problem is to remove the bridge/tailpiece assembly from the bass, whereby you'll gain access to the mute pad. Also, you'll find two small springs floating around in there. These are to be fitted around the thumb screws between the mute baseplate and the bridge/tailpiece unit.
After screwing the thumb screws back onto the mute baseplate and prior to re-installing the bridge/tailpiece unit on the bass, you could fit a stop nut onto the bottom ends the thumb screws to prevent these from coming off the mute baseplate again.
Enjoy your new 4003 and the Forum!
A Rickenbacker bass is much like the Jaguar E car - perennially ultra-fashionable.

Welcome Michael,
To remove the bridge is quite easy. Loosen and remove the strings from the tuning keys being careful not to scratch the finish on the bass. Setting the strings to one side of the bridge (you do not need to take the strings off the bridge), you will see that the saddle assembly will be able to be removed; watch which way this is oriented for putting back in place later. When you do all this you will see the five screws that hold the bridge in place. Carefully remove them and the bridge can now be taken off the bass.
The mute pad assembly will have a wire coming off it going to the control cavity, this is the ground wire, do not detach it. Where the mute pad is you will see a cavity that probably has the two springs that you will place over the turn screws for adjusting the mute height. With these screws hanging through their holes in the bridge place the springs over them and then reattach the mute plate; you will see that there are threaded holes on the ends of this plate, that is what the turn screws are to go into.
Once done, just reverse the procedure for removing the bridge to reattach it to the bass. Carefully place the bridge assembly on the bass with the mounting holes lining up with those on the body; be careful that the ground wire does not get pinched between the bridge and body.screw down the bridge nice and tight but don't overtighten the screws and strip the threads. Place the saddle assembly back the same way it was originally and put the strings back on the tuning keys. Voila!
Remove the strings, then remove the 4-saddle block from the bridge/tailpiece unit. This will uncover three crosshead screws, which are to be removed along with the two screws located in front of the G and E string holes on the tailpiece. That's all.
A Rickenbacker bass is much like the Jaguar E car - perennially ultra-fashionable.
-
jwr2
Come on Jeff, we know you really like them, you just want us all to send them to you. (Along with our Ric-o-sound jacks)
And Micheal, I've done that before also and it is easy to fix, just like they said and it is pretty hard to over tighten those tail piece screws, I always really crank them down and haven't stripped one yet.
And Micheal, I've done that before also and it is easy to fix, just like they said and it is pretty hard to over tighten those tail piece screws, I always really crank them down and haven't stripped one yet.

Welcome aboard, Michael.
The mute pad functions as a string damper when you want to shorten the sustain of each note and make your baby sound like an upright acoustic bass. Raise the pad to be in touch with the strings and see/hear if you like it. I personally think it's a nice little fearure even though I don't use it 99.99% of the time.
The mute pad functions as a string damper when you want to shorten the sustain of each note and make your baby sound like an upright acoustic bass. Raise the pad to be in touch with the strings and see/hear if you like it. I personally think it's a nice little fearure even though I don't use it 99.99% of the time.
