
First, Greetings from a longtime lurker/First time poster!
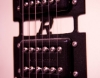
While experiencing the joy of discovering the use of the mechanical mute for the first time on my '03 4003 JetGlo,
I over-turned the mute screws, causing them to come out and the mute pad to drop. Is there any way to re-install
the mute screws without removing the tailpiece? Many Thanks!
Mute Screws
Moderators: rickenbrother, ajish4
Re: Mute Screws
if the springs are still mounted on the screws, you could 'fish' for the mute bar w a pair on needle-nose pliers through the gaps in the tailpiece and hope you can line things up.
but - removing the tailpiece is very simple and would be the easiest option i would think.
just loosen off the strings, remove the bridge, then the 5 screws.
be careful with the mute bar as it had a ground wire attached to it's backside.
hope that helps.
but - removing the tailpiece is very simple and would be the easiest option i would think.
just loosen off the strings, remove the bridge, then the 5 screws.
be careful with the mute bar as it had a ground wire attached to it's backside.
hope that helps.
-
incubus2432

- Senior Member
- Posts: 4174
- Joined: Sat Jul 17, 2004 11:26 am
Re: Mute Screws
You may be able to hook the mute pad assembly with a bent piece of stiff wire and raise it enough to get the adjustment screws started. Pulling the tailpiece isn't a big deal though and would give you a good excuse for a thorough cleaning/polish. 
Welcome BTW!
Welcome BTW!
-
RICKENPUNKER
- New member
- Posts: 2
- Joined: Sun Dec 23, 2007 12:56 am
Re: Mute Screws
Holy smokes! Thanks for the quick replies! I figured it would be best to remove the tailpiece, I just feared I may start
imagining the dreaded "tail lift" afterwards. Thanks for the encouragement!
imagining the dreaded "tail lift" afterwards. Thanks for the encouragement!
-
sloop_john_b
- Rick-a-holic
- Posts: 13843
- Joined: Tue Jan 25, 2005 6:00 am
-
gray
Re: Mute Screws
This happened to me once, and I just reached in with a pair of plyers (MacGyver style with a Swiss Army knife) and pulled it up until the screws would thread. If you choose this method, just be sure you don't pull hard enough to tear the foam.

Re: Mute Screws
I just picked up a 4001c64 with missing mute screws. I got a pair from POTR, but am now encountering a similar problem: I put em on and they thread onto...nothing. But before I go reaching around with pliers or removing the tailpiece, what other parts do I need, and where do I get em, and in what order do they go on? Is it
screw->washer->hole->spring->mute assembly?
And, again, where can I find said washers and (assuming it's not bopping around under the tailpiece) springs?
screw->washer->hole->spring->mute assembly?
And, again, where can I find said washers and (assuming it's not bopping around under the tailpiece) springs?
'18 4003S VP JG • '65 365 MG
-
rickenbrother

- RRF Moderator
- Posts: 13218
- Joined: Sun May 26, 2002 5:00 am
Re: Mute Screws
Welcome to the forum, Matthew!
Michael: Check out the exploded view of the tailpiece in this PDF from the RIC website for how to put the mute assembly back together, here.
Michael: Check out the exploded view of the tailpiece in this PDF from the RIC website for how to put the mute assembly back together, here.
JETGLO should officially be renamed JETGLO ROCKS! 

Re: Mute Screws
Methinks that Matthew went back to lurking immediately after joining more than two years ago ... 


IIRC, Michael, I was able to re-install the mute screws once without taking the tailpiece off, but I think I had to loosen the strings to keep them from getting in the way. IIRC also, there is also a bit of a trick involved, in that there is a slight curvature to the mute bar, so you will need to thread the first screw in only part of the way, otherwise the other screw won't line up with the threads on the other side of the bar. With the tailpiece off, this isn't so difficult to do.
IIRC, Michael, I was able to re-install the mute screws once without taking the tailpiece off, but I think I had to loosen the strings to keep them from getting in the way. IIRC also, there is also a bit of a trick involved, in that there is a slight curvature to the mute bar, so you will need to thread the first screw in only part of the way, otherwise the other screw won't line up with the threads on the other side of the bar. With the tailpiece off, this isn't so difficult to do.
It is better, of course, to know useless things than to know nothing. - Seneca

Re: Mute Screws
Welcome back, Matthew.
When installing the tailpiece back to the body, don't over-tighten the 3 screws under the bridge, just turn them snug. This will avoid compressing that part of the tailpiece and hence introducing tai lift.
When installing the tailpiece back to the body, don't over-tighten the 3 screws under the bridge, just turn them snug. This will avoid compressing that part of the tailpiece and hence introducing tai lift.
Re: Mute Screws
I took it to Nick at Norman's (for you Valley dwellers) and he's going to take off the tail assembly. I warned him about overtightening the screws and exacerbating the already-present tail lift, so we'll see
'18 4003S VP JG • '65 365 MG
Re: Mute Screws
Let us know how that works out, Michael.
It is better, of course, to know useless things than to know nothing. - Seneca
Re: Mute Screws
I got it back and...so far, so good. I don't see any washers on there, but for as rarely as I'll use the mute screws, they work. It goes up....and it goes down.
Nick also put a couple washers under the bridge to deal with a tail lift issue. It helped, but didn't put the tail smack against the body, so I'm not sure what was accomplished other than aesthetically.
Anyway, I now have a working mute assembly...which I'll likely never use.
Nick also put a couple washers under the bridge to deal with a tail lift issue. It helped, but didn't put the tail smack against the body, so I'm not sure what was accomplished other than aesthetically.
Anyway, I now have a working mute assembly...which I'll likely never use.
'18 4003S VP JG • '65 365 MG
Re: Mute Screws
That's good to hear, Michael!
If your tail lift ever gets this far, let me know ...
If your tail lift ever gets this far, let me know ...
It is better, of course, to know useless things than to know nothing. - Seneca

Re: Mute Screws
I have NO idea what to do with those skinny stringed things... I'm just a bass player...