

Well, after purchasing this guitar, found on this thread:
viewtopic.php?f=68&t=392034
and showing some pictures of it on this thread:
viewtopic.php?f=13&t=392579
I figured this project would be a good one for it's own thread. I'll post some pictures here and there over the next couple months as I restore the guitar.
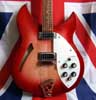
It's going to be Jetglo with a replacement Gold anodized pickguard. All other parts are original (for now at least..).
As purchased:
Obviously---cut down to a teardrop shape by cutting the horns/sides down. They added a contour around the back edge, and cut an arm contour across the front. yuck!
Ugly brown varnish finish
Yellow latex house paint over the cut & reshaped pickguard.
Surprisingly, it played and sounded great. Action needed a little bit of work, but nothing major. Frets were decent for their age (and original), but if I'm going to refinish, a fret job makes good sense. I want this thing to play like butter when it's finished.
1960 450 "Teardrop" restoration
Moderator: jingle_jangle
Re: 1960 450 "Teardrop" restoration
First step----strip it down and check out the parts.
Action a little high (very slight bow, needing truss rod adjustment):
Mostly complete:
Toasters are the correct late 50's style with the small "dimples" on the bobbins. All parts correct and original"
Original single-like Klusons with hex bushings:
Action a little high (very slight bow, needing truss rod adjustment):
Mostly complete:
Toasters are the correct late 50's style with the small "dimples" on the bobbins. All parts correct and original"
Original single-like Klusons with hex bushings:
Re: 1960 450 "Teardrop" restoration
Next step: strip it down/strip the finish off
Original Fireglo finish visible in the cavities with the guard off
Same with the truss rod cavity (this shot's for Kira )
)
Stripping the old varnish off with Jasco paint stripper. This stuff is highly toxic....a bit on your skin and you'll never forget gloves again.
I had to be extra careful to keep the paint stripper off the two plastic "plugs" on the back of the body, as well as fret dots/markers....it has been known to corrode them away.
Original Fireglo finish visible in the cavities with the guard off
Same with the truss rod cavity (this shot's for Kira
Stripping the old varnish off with Jasco paint stripper. This stuff is highly toxic....a bit on your skin and you'll never forget gloves again.
I had to be extra careful to keep the paint stripper off the two plastic "plugs" on the back of the body, as well as fret dots/markers....it has been known to corrode them away.
Re: 1960 450 "Teardrop" restoration
Next step-----undoing some minor "wrongs" committed to this poor guitar:
Plugging extra strap button holes. The original style strap buttons were missing, and replaced with cheap Teisco type buttons, one screwed into the main body, south of the heel, and the other above the old strap button hole. Toothpick + wood glue + small tap from a hammer. Let it dry in place, cut flush, and sand to level.
I decided on a refret because it could use it and the fretboard had some corroding old finish left on it, and cleaning it off would make the color of the old Paduak hardwood change where I had cleaned it (Paduak turns bright red/orange when it's exposed, and darkens if left untreated).
Removing the frets----heat up fret crown with a soldering iron until the old finish (and sometimes glue) melts and loosens, then grab the frets with a pair of flush-grounded end nippers, gently rocking back until the fret starts moving out. You don't want the fret tang to pull up chunks of the fretboard wood with it.
Re: 1960 450 "Teardrop" restoration
Here is the fretboard looking all cleaned up
I had only a few "flakes" of Paduak come up with the frets (hey...I'm a beginner), but nothing major, it should clean up nicely. Luckily it still had it's original frets, and should accept stock frets again easily. The slots are nice and clean, not enlarged at all. If anybody knows the correct size fret wire, and where to buy from---let me know! It'd save me a lot of measuring time/guessing.
I started cleaning up the body, sanding off the last of the old finish, with 400 grit sandpaper.
Here I have laid out where I need to make straight cuts to remove the wood far enough back to escape the "contours" that have been carved into the back of the guitar.
Yes, I could remove the wings entirely and go straight back to the center block, but I wanted to not only keep what original wood I could, but leave the cavity routing alone. Besides....with a guitar like this....there is nowhere to go but up.
Short of setting it on fire, there is little I could do worse to it that what it has already suffered.
Straight cuts will make clamping the new maple easier, with no gaps.
This is where I'm at for today. I definitely consider myself a novice with this stuff (certainly compared to PW and other greats on the forum), but I figured this was a good guitar as any to hone some skills. I'm also sure I might be approaching things with unorthodox techniques----if so, anybody please shoot me tips/advice/warnings. Muchos Gracias.

Re: 1960 450 "Teardrop" restoration
looking good there Collin-can't wait to see the final results!
-
electrofaro

- Senior Member
- Posts: 3611
- Joined: Sun Apr 26, 2009 3:25 pm
Re: 1960 450 "Teardrop" restoration
Very interesting - how you will proceed from here will be even more interesting, as it'll be challeging (at least to me, whose only woodworks is using dental sticks)
'67 Fender Coronado II CAB * '17 1963 ES-335 PB * currently rickless

Re: 1960 450 "Teardrop" restoration
collin wrote: Short of setting it on fire, there is little I could do worse to it that what it has already suffered.
This is a great thread! It will be interesting to watch the progress and see the final result materialize out of this mess!
I have NO idea what to do with those skinny stringed things... I'm just a bass player...
-
Ontario_RIC_fan

- Advanced Member
- Posts: 2797
- Joined: Sat Dec 20, 2008 8:39 pm
Re: 1960 450 "Teardrop" restoration
Congrats Collin:
It all looks kosher to me so far... I look forward to seeing it come back to life again..
Did you add the Serial number to the register??
It all looks kosher to me so far... I look forward to seeing it come back to life again..
Did you add the Serial number to the register??
Brian Morton
A Rickenbacker Fan
in Hamilton, Ontario, Canada
=========================
67 FG 625
74 JG 4000
76 JG 430
77 JG 620
77 JG 320
79 MG 450
79 JG 4001
80 FG 620/12
81 BG 480
91 JG 610
02 BG 620
78 TR7
83 TR25
A Rickenbacker Fan
in Hamilton, Ontario, Canada
=========================
67 FG 625
74 JG 4000
76 JG 430
77 JG 620
77 JG 320
79 MG 450
79 JG 4001
80 FG 620/12
81 BG 480
91 JG 610
02 BG 620
78 TR7
83 TR25
-
jingle_jangle

- RRF Moderator
- Posts: 22679
- Joined: Wed Dec 22, 2004 6:00 am
- Contact:
Re: 1960 450 "Teardrop" restoration
Very cool, Collin. I've only skimmed the thread leading up till now. I'm concluding that you're going to be adding the horns back on before the JG refinish--is that correct?
If so, I've got a method that will make the glue seam absolutely invisible...so, when the time comes that you've got the horns glued back on and sanded, and you're ready to begin finishing, shoot me a PM and I'll explain. It'll add a few days onto your resto, but the glue seams will be absolutely invisible--even under JG!
One pointer--with the maple that Ricks are constructed of, there is little need, if hand-sanding, to go any finer than #220 in your sandpaper selection, until you are sanding the varnish prior to buffing, that is. I do most of my restos with the following sandpaper grits: Dry--#100 (for rough shaping and finish stripping), #220 (general surfacing of bodies and fretboards) and #320 (final surfacing of fretboards and inlays prior to sealing, sanding between coats of sealer and varnish); Wet: #1000 (final "flatting" of last varnish coat prior to machine buffing). You can do a great resto, literally, with only 4 grades of sandpaper, although I do keep most other grades around in small quantities for odd uses and special applications!
Great work so far, and I looks forward to the next installment in this detailed and quite literate photo essay!
-
paologregorio

- Senior Member
- Posts: 6376
- Joined: Wed Aug 08, 2007 12:56 pm
- Contact:
Re: 1960 450 "Teardrop" restoration
Wow, this thread is really cool Collin! Call me if you'd like an extra pair of hands to help you out with anything; I'd love to learn some of these skills. 
Re: 1960 450 "Teardrop" restoration
Thanks Paul!jingle_jangle wrote:Very cool, Collin. I've only skimmed the thread leading up till now. I'm concluding that you're going to be adding the horns back on before the JG refinish--is that correct?
If so, I've got a method that will make the glue seam absolutely invisible...so, when the time comes that you've got the horns glued back on and sanded, and you're ready to begin finishing, shoot me a PM and I'll explain. It'll add a few days onto your resto, but the glue seams will be absolutely invisible--even under JG!
Yep, your conclusions are correct---I'm cutting the wood further to get straight lines, then adding maple blocks on both sides. I'll then use a tracing from a friend's '60 450, to get the horns cut again and then Jetglo.
I will certainly PM you to get the seam trick. I was concerned about that because I know even a well sanded/level seam can show through solid colors. That would be a great tip to know.
Thanks guys---with a project like this I don't even feel that i'm in "over my head," and it's been enjoyable so far.
Re: 1960 450 "Teardrop" restoration
Thanks Brian!Ontario_RIC_fan wrote:
Did you add the Serial number to the register??
I will add it to the register with before/after pics when I'm finished.
-
ricardo_vicente
- Member
- Posts: 352
- Joined: Sat May 28, 2005 11:20 am
Re: 1960 450 "Teardrop" restoration
Just hit the "subscribe" button on this thread. It's going to be fun watching this one progress. Good luck!

Re: 1960 450 "Teardrop" restoration
Cool, Collin! I'll be following this thread. Good work so far.
All I wanna do is rock!