Destroyed bass restoration

Vintage, Modern, V & C series, Fretless, Signature & Special Editions

Moderators: rickenbrother, ajish4

User avatar
jamesmaxn
New member
Posts: 17
Joined: Mon Dec 15, 2014 7:30 pm

Destroyed bass restoration

Post by jamesmaxn »

HI all, I posted a recent post asking for some history if known about my rick 4003.
After some time in storage I decided to start the nightmare task of rebuilding it.

I bought this bass on a whim of eBay about 2 years ago. I thought it would be a cheep way of getting my hands on a genuine if a bit abused Ricky bass.
To be honest knowing what I know now about Rick parts and there scarcity and price I would not of bought the bass. Needless to say over the last 2 years I have probably spent close to £600 on parts alone.
When I got the bass it had nothing. Just a butchered piece of wood.
Now I have everything. And it is almost done.
Seeing the odd feed on here about fellow bass projects I thought I would share mine.

I did ask a few repairers and most of them said it was beyond economical repair, and some just laughed.
So I decided to have a go!!
My background is electronics and basic DIY so this has been a big learning curve! But I have spent countless hours on the thing now! And it as of the 18th of December 2014 waiting for a couple of coats of clear then buffing, assembly and it’s done!!

Here are some snap shots of its progress over the last few months!

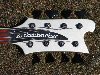
This is how it got it, i got the Rickenbacker Truss cover at the same time £££££ OMG...... :shock:

Image
Image

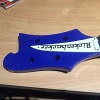
Another view of the bit of kitchen unit that was glued into the body,,,,,,, I got a jack plate at this point. I think the bass is a 90's model but could be wrong. I havn't dated th sN on the plate though,
Image

So the nightmare task starts! Instead of making a new body i decided to route out the rubbish and holes and fill with maple.

Image
Image
Image

So i got my hands on a piece of maple and this is how i bunged up the main hole in the body.

Image

Image

So the problem i had here was how to make the block fit flush into the body. My band saw is just a hobby saw and not capable of sawing over 4inches hi so once the block was glued into the body i made a jig over the body and routed away a layer at a time! took a while but it worked. Then i planed very slowely the rest flush.

Image

Some paint stripping ready for sanding and filling.

Image
Image

More Sanding, at this point i had to re glue some of the binding back on. Although the rest of the body had a hole on every edge, side the binding was in good condition!!
Image

So at this point i decided before i do anymore work to the bass i had better see if it can hold tension so after a week of drying i put on the tuners and bridge to see if it would play. And it did!!! Yes!!!!

Image

Will post up more when i get another hour!! Haha
teeder
Senior Member
Posts: 6396
Joined: Wed Apr 14, 2004 5:00 am

Re: Destroyed bass restoration

Post by teeder »

Awesome!
j.alderton
New member
Posts: 24
Joined: Tue Feb 05, 2013 8:45 am

Re: Destroyed bass restoration

Post by j.alderton »

This is really inspiring. Keep up the good work, and please continue to post updates as you're able to! I'll be eager to see the continued restoration of this bass.
User avatar
edski
Advanced Member
Posts: 1589
Joined: Sun Nov 28, 2004 8:27 am

Re: Destroyed bass restoration

Post by edski »

Wow, what a major project. But it looks like you got past the hardest part. :)
Gilmourisgod
Member
Posts: 327
Joined: Wed Feb 12, 2014 9:26 am

Re: Destroyed bass restoration

Post by Gilmourisgod »

I would have said that was hopeless, particularly as most of the neck-through beam was gone in the body, but it looks like you pulled it off. Amazing job so far, I assume you will be going solid color? No way to hide the previous owners butchery. I can't even begin to construct a rational thought process behind the original destruction. Did the neck bow at all due to lack of support in the body? Looking forward to seeing more photos.
User avatar
jamesmaxn
New member
Posts: 17
Joined: Mon Dec 15, 2014 7:30 pm

Re: Destroyed bass restoration

Post by jamesmaxn »

Cheers Guys, yes it has been a learning curve to say the least!! it will never be show room quality but I just want it to look nice! it deserves that!
It is a solid colour! I went for Blue. I like how they look in blue! especially with the black hardware but that would be a nightmare to source in Black.
I Didn't get an exact match for the Blue that Rick use so used some Blue left over from spraying the front bumper of my Transit Van!! haha
To be honest it looks nice!! British Gas Blue apparently!! When you see the Picks of it in Blue you will see it's no bad at all! Well i think so anyway! haha

You can see a The headstock as it is at the mo in my Profile Pik.
User avatar
woodyng
Senior Member
Posts: 4478
Joined: Thu Jan 11, 2007 11:11 am

Re: Destroyed bass restoration

Post by woodyng »

Congratulations,the pictures you showed of its original condition gave me the willies,i would have just walked away!
The new blue color shown on your avatar pic looks great!
User avatar
Ashgray
Intermediate Member
Posts: 545
Joined: Fri Mar 15, 2013 6:14 am

Re: Destroyed bass restoration

Post by Ashgray »

James - you're a brave man indeed for taking on a project like this! What on earth was the previous owner thinking, with all those routes, mods, and general butchery? I too would have ran a mile, on seeing the state of this sadly mistreated Rick when you bought it, but to your eternal credit, you seem to be succeeding in pulling off one hell of a restoration. As Ed has said above, I think you're over the worst of the work, and once it's finished, you'll hopefully have an instrument that you know intimately, like it's part of you, that will serve you well musically, and that you can justifiably be proud of for the rest of your life.

Kudos to you sir! :)

Did you say you had all the parts you need to get her finished? If not, I have a few bits and pieces in my Rick spares stash...

Ash
1976 4001 "Shadow" Fretless
1978 4002 Walnut
1986 4008 Silver
1999 4001 V63 White
2012 4004 Jetglo

_____________________

Button 6 String Fretfull
Button 6 String Fretless
NS CR5 Omni Bass Fretless
Ashbory Bass
User avatar
RickyBubba
Intermediate Member
Posts: 657
Joined: Mon Aug 29, 2011 11:58 am

Re: Destroyed bass restoration

Post by RickyBubba »

Keep at it. I would have been tempted to go non traditional and fill some of those smaller holes with resin pours.
Gilmourisgod
Member
Posts: 327
Joined: Wed Feb 12, 2014 9:26 am

Re: Destroyed bass restoration

Post by Gilmourisgod »

James,
Got any pics of the painting process? Always curious on process for rattlecan finishes. On this one I'd be worried about the patches telegraphing through eventually, but given where you started, it's all good, whatever happens.
User avatar
Bram
New member
Posts: 68
Joined: Sun Jun 23, 2013 12:01 pm

Re: Destroyed bass restoration

Post by Bram »

You. Hero! :shock:
This is stunning.
User avatar
iiipopes
Intermediate Member
Posts: 1479
Joined: Tue May 22, 2007 5:02 pm

Re: Destroyed bass restoration

Post by iiipopes »

Great job!

One item of transliteration between UK phrases and USA phrases: "bunged up."

In the USA, that is usually used as a substitute for a more perjorative phrase.

In the UK, the word "bung" is still used as a common noun in multiple contexts for stopper, cork, plug, wedge, etc., whereas it is only in common usage in America in relation to barrels, especially the hard wood stopper hammered into the hole in the side of a whiskey barrel after it has been filled with distillate for aging.

So, to "bung up" something in the UK is a positive phrase, meaning the action of inserting a stopper or bung into a hole to seal it, fix it, or repair it. In this case, replacing or restoring wood to the holes cut out of the body of the bass.
User avatar
Grey
Advanced Member
Posts: 1659
Joined: Thu Jun 24, 2010 4:10 pm

Re: Destroyed bass restoration

Post by Grey »

These pictures are disgusting, and I don't mean the rennovation. I can appretiate the "working mans bass", I can appretiate the "it's just a tool" mentality, but there is a limit. It's not the concept of the "modification" that bothers me, it's that it was done with such a complete lack of skill and foresight. I couldn't screw up a route that badly if I tried and the most complicated woodworking I ever did was build a birdhouse.

Anyway. You are doing one hell of a job saving this bass.
User avatar
loverickbass
Veteran RRF member
Posts: 1409
Joined: Mon Jul 29, 2002 5:00 am

Re: Destroyed bass restoration

Post by loverickbass »

Whomever did this to this bass is a psycho. No question.
User avatar
jdawe
Member
Posts: 391
Joined: Tue Dec 08, 2009 3:55 pm

Re: Destroyed bass restoration

Post by jdawe »

It's not the concept of the "modification" that bothers me, it's that it was done with such a complete lack of skill and foresight. I couldn't screw up a route that badly if I tried and the most complicated woodworking I ever did was build a birdhouse.
The original mods really are astonishingly inept. I've never seen anything like it. It looks like it was worked over by particularly incompetent beavers. Or maybe squirrels.

You've done a remarkable thing bringing it back from the wretched state in which you found it, James. Kudos to you.
Post Reply

Return to “Rickenbacker Basses: by Joey Vasco & Tony Cabibe”