
Destroyed bass restoration
Moderators: rickenbrother, ajish4
-
loverickbass

- Veteran RRF member
- Posts: 1409
- Joined: Mon Jul 29, 2002 5:00 am
Re: Destroyed bass restoration
It would probably go in the hall of shame on the first try.

Re: Destroyed bass restoration
Sorry; OK, back to the restoration!iiipopes wrote: bung into a hole
Rickenbacker 4003 - Epiphone Viola - Fender Jazz - G & L SB-1

Re: Destroyed bass restoration
As for differences is the English language, here in NZ they'd say, "Wow, that bass is really munted!"iiipopes wrote:Great job!
One item of transliteration between UK phrases and USA phrases: "bunged up."
In the USA, that is usually used as a substitute for a more perjorative phrase.
In the UK, the word "bung" is still used as a common noun in multiple contexts for stopper, cork, plug, wedge, etc., whereas it is only in common usage in America in relation to barrels, especially the hard wood stopper hammered into the hole in the side of a whiskey barrel after it has been filled with distillate for aging.
So, to "bung up" something in the UK is a positive phrase, meaning the action of inserting a stopper or bung into a hole to seal it, fix it, or repair it. In this case, replacing or restoring wood to the holes cut out of the body of the bass.
Quite a job "de-munting" it...
I have NO idea what to do with those skinny stringed things... I'm just a bass player...

Re: Destroyed bass restoration
Every time I think I've seen the extent to blasted stupid DIY 'improvements' somebody thinks they should do to their perfectly good guitar - along comes some evidence that the depths of depravity haven't been fully plumbed yet.
Kudos to you for taking on the resto. That poor bass is in much better hands now.
Kudos to you for taking on the resto. That poor bass is in much better hands now.
-
Gilmourisgod
- Member
- Posts: 327
- Joined: Wed Feb 12, 2014 9:26 am
Re: Destroyed bass restoration
One question:
It looks like the big block you installed in the body comes close , but not quite tight, to the neck. is that to allow access to truss rod ends? Given the inherent weakness of that area anyway due to neck pickup route, I'd think you might want to use the 1" neck pickup spacing and fill that solid right tight to the fingerboard.
It looks like the big block you installed in the body comes close , but not quite tight, to the neck. is that to allow access to truss rod ends? Given the inherent weakness of that area anyway due to neck pickup route, I'd think you might want to use the 1" neck pickup spacing and fill that solid right tight to the fingerboard.
Re: Destroyed bass restoration
Ahh, good Question! Yes the block dose go very tight into the body, not to the point i had to hammer it in! It was a gentle push and it was in fit?Gilmourisgod wrote:One question:
It looks like the big block you installed in the body comes close , but not quite tight, to the neck. is that to allow access to truss rod ends? Given the inherent weakness of that area anyway due to neck pickup route, I'd think you might want to use the 1" neck pickup spacing and fill that solid right tight to the fingerboard.
Yeah the base of the neck meets the block, you just can't see it in any of the picks. Also despite the previous owners destruction there was about 7mm of thickness of the neck through the body portion.
I also used \epoxy resin for the block only on the bit where it meets the base of the neck to make extra sure there would be a solid joint. Only time will tell I guess!
Re: Destroyed bass restoration
Hi, I have some on the way once i get them into photo bucket... I used a small comressor and a medium gravity feed gun. I have used rattle cans in the past but have found with various vhiecles in the past that spray guns get the best results!Gilmourisgod wrote:James,
Got any pics of the painting process? Always curious on process for rattlecan finishes. On this one I'd be worried about the patches telegraphing through eventually, but given where you started, it's all good, whatever happens.
Re: Destroyed bass restoration
Haha indeed in Wales "Bunged up" means allot of things!! Maybe I should of used another phrase...iiipopes wrote:Great job!
One item of transliteration between UK phrases and USA phrases: "bunged up."
In the USA, that is usually used as a substitute for a more perjorative phrase.
In the UK, the word "bung" is still used as a common noun in multiple contexts for stopper, cork, plug, wedge, etc., whereas it is only in common usage in America in relation to barrels, especially the hard wood stopper hammered into the hole in the side of a whiskey barrel after it has been filled with distillate for aging.
So, to "bung up" something in the UK is a positive phrase, meaning the action of inserting a stopper or bung into a hole to seal it, fix it, or repair it. In this case, replacing or restoring wood to the holes cut out of the body of the bass.
Re: Destroyed bass restoration
Allot is a cricketer, "should of" really should be "should have"... 
Ash
Ash
1976 4001 "Shadow" Fretless
1978 4002 Walnut
1986 4008 Silver
1999 4001 V63 White
2012 4004 Jetglo
_____________________
Button 6 String Fretfull
Button 6 String Fretless
NS CR5 Omni Bass Fretless
Ashbory Bass
1978 4002 Walnut
1986 4008 Silver
1999 4001 V63 White
2012 4004 Jetglo
_____________________
Button 6 String Fretfull
Button 6 String Fretless
NS CR5 Omni Bass Fretless
Ashbory Bass
Re: Destroyed bass restoration
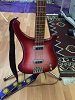
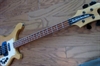
Thank you all so much for your encouragement and kind comments!
It has been a lot of work and determination!
Here are a few more picks!
Electrics, i used the current wiring with the Switch to bypass the treble pickup cap. I used the best components i could CTS pots, except the push pull pot, and quality caps. Hope it all makes the difference!!
Allparts Plate with some shielding. I will shield the cavity too near finishing. Got the shielding material so might as well use it!!

As i had no pland i planned to route the pickup cavities by eye... I know !!! But it looks ok....

Now the route for the treble pickup was not done for over 3 weeks!! I basically thought i had all the bits i needed!! I didn't have the bezel for the treble pickup. Ebay units were just too expensive so i got one through a Rickenbacker dealer in the UK for £40 not bad I suppose!!

Ah, forgot to mention i masked off the binding on the sides not the top lip. Later on once the final coats of paint were done i scraped the edge with a sharp blade. Took aaaaaaaaaages!!!

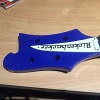
After a few coats of primer and rubbing down between coats and fine filling i eventualy got the surfaces where i wanted them and went for the first coat of Blue!


Some Flattening down between coats


After 4 coats of paint i got it the way i was after! This is where i am now. I will take some picks of the binding and neck as it is before i do some clear coats. Hopefully that will be tomorrow!


When i have another hour i will post more up!! It takes ages to upload all this stuff and re-size it on the computer to fit on here!! Still i hope you enjoy it so far!! J
It has been a lot of work and determination!
Here are a few more picks!
Electrics, i used the current wiring with the Switch to bypass the treble pickup cap. I used the best components i could CTS pots, except the push pull pot, and quality caps. Hope it all makes the difference!!
Allparts Plate with some shielding. I will shield the cavity too near finishing. Got the shielding material so might as well use it!!

As i had no pland i planned to route the pickup cavities by eye... I know !!! But it looks ok....

Now the route for the treble pickup was not done for over 3 weeks!! I basically thought i had all the bits i needed!! I didn't have the bezel for the treble pickup. Ebay units were just too expensive so i got one through a Rickenbacker dealer in the UK for £40 not bad I suppose!!

Ah, forgot to mention i masked off the binding on the sides not the top lip. Later on once the final coats of paint were done i scraped the edge with a sharp blade. Took aaaaaaaaaages!!!

After a few coats of primer and rubbing down between coats and fine filling i eventualy got the surfaces where i wanted them and went for the first coat of Blue!


Some Flattening down between coats


After 4 coats of paint i got it the way i was after! This is where i am now. I will take some picks of the binding and neck as it is before i do some clear coats. Hopefully that will be tomorrow!


When i have another hour i will post more up!! It takes ages to upload all this stuff and re-size it on the computer to fit on here!! Still i hope you enjoy it so far!! J
Re: Destroyed bass restoration
You will have to forgive me my grammar has never been the best!!Ashgray wrote:Allot is a cricketer, "should of" really should be "should have"...
Ash
Re: Destroyed bass restoration
From what I understand, there's probably a town is Wales named "Bunged Up"!jamesmaxn wrote:Haha indeed in Wales "Bunged up" means allot of things!! Maybe I should of used another phrase...
-
Badanovski
- Member
- Posts: 246
- Joined: Sat Oct 01, 2011 7:19 pm
Re: Destroyed bass restoration
I would not have thought it possible to make it look that good!!!!!!! The true silk purse from the sow's ear!!!
-
8mileshigher

- Senior Member
- Posts: 4886
- Joined: Tue May 23, 2006 12:34 pm
Destroyed bass restoration
James, congratulations on your dedicated efforts here, in restoring this bass from its butchered state.
The blue color is sweet !
The blue color is sweet !
-
Gilmourisgod
- Member
- Posts: 327
- Joined: Wed Feb 12, 2014 9:26 am
Re: Destroyed bass restoration
I really like the color, it has more purple in it than the stock midnight blue. That looks too cool.