And so it begins...

Vintage, Modern, V & C series, Fretless, Signature & Special Editions

Moderators: rickenbrother, ajish4

Maccaguy
New member
Posts: 52
Joined: Fri Feb 06, 2015 9:37 pm

Re: And so it begins...

Post by Maccaguy »

Color, beautiful color! With the amber sprayed, Larry has sprayed the transition part of the Fireglo. It's really starting to look nice now!

Image
Image
Image
Image
Image
Image
Image
Image
All lefty: 1982 4003S 1996 330/12 1993 4003S
User avatar
woodyng
Senior Member
Posts: 4478
Joined: Thu Jan 11, 2007 11:11 am

Re: And so it begins...

Post by woodyng »

Oooh,i like it like that!!!
kiwi
New member
Posts: 24
Joined: Wed Mar 16, 2011 11:30 am

Re: And so it begins...

Post by kiwi »

Hey - that's a cool project!

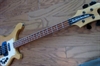
I'm particularly impressed by the headstock job. Since I have a '77 4001 badly in need of some major repair work, including headstock restoration, that's a great source of inspiration!

But if this was my bass, I would have probably gone all the way and had the fat horns reshaped according to 60s specs... basically because I always felt they made the otherwise graceful outline of a 4000 series bass look plump.
After all the great efforts of getting the headstock shape and fireglo shading right, that would not only seem logical, but would also deliver the period-correct look and feel, IMHO.

On the other hand, I'm sure you must have discussed that as well, and yet decided to keep the existing body outline as it is... so is there a particular reason for that?
I'm just being curious, because although I don't personally like the fat horns, there's quite a few people out there who actually do...


Btw: I've just finished my "4003/4003s conversion" project this summer, where I actually did resize the horns to get a little rm1999 vibe in there. I'm attaching a few pics... if I'm not too stupid, that is ;-)


Cheers,
kiwi
Attachments
before...
before...
after (body closeup)
after (full instrument)
thisismusicinc
Member
Posts: 310
Joined: Fri Jan 19, 2007 5:52 am
Contact:

Re: And so it begins...

Post by thisismusicinc »

Nice! I like the MG / gold combo!
kiwi
New member
Posts: 24
Joined: Wed Mar 16, 2011 11:30 am

Re: And so it begins...

Post by kiwi »

thisismusicinc wrote:Nice! I like the MG / gold combo!
Thanks, Jon! :-)

I must admit that I "stole" the MG/gold idea from a photo I've stumbled across on the internet, literally only days before I finished the bass!
When I started this project, the colour scheme was to be JG/gold, which looks fantastic. But by the time I had all the original FG stripped off, exposing a rather nice piece of timber, I reluctantly started thinking about a change of plans... and when I saw that particular photo, it tipped the scale immediately, and it was perfectly clear that I wasn't about to hide this beautiful maple under a big blob of black paint! ;-)

But it wasn't only all about "aesthetics". To me, it's in a way THE classic colour pattern for Rickenbacker electric instruments, as the very first 4000 series basses made back in the late 50s were also gold/MG, as was John Lennon's 325 model... the FG/white scheme which we now consider "classic" came later. This was my way of paying tribute to that.

So in a last minute decision, I decided to save the JG finish for next year's project, the '77 4001 I mentioned earlier...

Kind regards,
Karsten
Last edited by kiwi on Mon Sep 21, 2015 12:54 pm, edited 2 times in total.
Gilmourisgod
Member
Posts: 327
Joined: Wed Feb 12, 2014 9:26 am

Re: And so it begins...

Post by Gilmourisgod »

That's looking great, not a fireglo gut myself, but that is truly an artform. I've tried my hand at rattle-can sunburst, and made a complete mess of it. Getting that subtle gradation just right is HARD!
Maccaguy
New member
Posts: 52
Joined: Fri Feb 06, 2015 9:37 pm

Re: And so it begins...

Post by Maccaguy »

To be honest, I've never noticed the difference in horn sizes as much as I have the headstock sizes and Fireglo finish differences. I guess everyone has things they focus their attention on. :D

And for the Fireglo gradation: no kidding on it being an art! Larry blows me away every time he sends new photos, and I'm running out of ways to tell him he's doing an awesome job!
Last edited by Maccaguy on Mon Sep 21, 2015 3:05 pm, edited 1 time in total.
All lefty: 1982 4003S 1996 330/12 1993 4003S
kiwi
New member
Posts: 24
Joined: Wed Mar 16, 2011 11:30 am

Re: And so it begins...

Post by kiwi »

Gilmourisgod wrote:...Getting that subtle gradation just right is HARD!

Absolutely!

There are a few interesting tutorial vids on YouTube, and the guys producing them really make it look easy... in theory.
But actually doing it is another story. As with everything, it takes some practical experience to get it right, and perfectly nailing it from the start is probably impossible.
It's truly an art form, and the craftsmen at Rickenbacker or any other manufacturer are also artists in their own right.

Thank God I don't like FG or any other "burst" finishes... that saves me from the ordeal of having to strip a screwed-up finish down to the bare wood and start all over again! ;-)

But even a comparatively "simple" opaque finish (like JG) will still be a challenge, as I've only done natural finishes until now. The darker the colour, the more work goes into both the preparation stage (grain filler etc.) and buffing/polishing stage. And JG is about as dark a colour can get, mercilessly exposing the slightest traces of sloppiness.
Knowing me, it's really gonna be hard... ;-)

Cheers,
Karsten
kiwi
New member
Posts: 24
Joined: Wed Mar 16, 2011 11:30 am

Re: And so it begins...

Post by kiwi »

Maccaguy wrote:I guess everyone has things they focus their attention on.

Yep... so I'm the horn type! :-)
User avatar
Badanovski
Member
Posts: 246
Joined: Sat Oct 01, 2011 7:19 pm

Re: And so it begins...

Post by Badanovski »

I have a 93' 4003S with large horns. I never thought much about it. Then I got a 4004cii. Now the large horns annoy me. :mrgreen:
Maccaguy
New member
Posts: 52
Joined: Fri Feb 06, 2015 9:37 pm

Re: And so it begins...

Post by Maccaguy »

AHHHHHHHhhhhh! Sweet, sweet 1964 Fireglo finish! I'm amazed by it, and a little saddened that Rickenbacker din't put a finish like this on the 4001c64 basses. That's another discussion, though. Anyway, here's the finished Fireglo. Now there's layer upon layer of clear with sanding and polishing.
Image
Image
Image
Image
Image
Image
Image
Image
Image
Image
Image
Image
Image
Image
And a test fitting of the pick guard and treble pickup
Image
All lefty: 1982 4003S 1996 330/12 1993 4003S
User avatar
aceonbass
Veteran RRF member
Posts: 6651
Joined: Tue Jul 09, 2002 5:00 am
Contact:

Re: And so it begins...

Post by aceonbass »

The control section of that guard is nothing like that of any pre-97 4001, and has become known as the "double hump" guard. Around April of this year RIC finally reverted to the smoother countours of the pre-97 guard shape. Larry should use one of his patterns to smooth out the lumps in this guard so that the curves follow that of the lower part of the bass.
User avatar
jps
RRF Consultant
Posts: 37497
Joined: Wed Feb 12, 2003 6:00 am

Re: And so it begins...

Post by jps »

And, not only that..............The area of the pickguard at the mount screw near the E string at the neck heel is the modern shape, too, not vintage correct for the year you are representing.
User avatar
aceonbass
Veteran RRF member
Posts: 6651
Joined: Tue Jul 09, 2002 5:00 am
Contact:

Re: And so it begins...

Post by aceonbass »

This bass already has the route going all the way to the fretboard. Looking at the guard, I see that material is going to be removed to accomodate the 1/2" neck pickup spacing. Since this was probably the plan from the beginning, the route should have been completely filled with a maple block, then routed just big enough for the new pickup placement. Removing wood from this already weak area is never a good idea.
kiwi
New member
Posts: 24
Joined: Wed Mar 16, 2011 11:30 am

Re: And so it begins...

Post by kiwi »

aceonbass wrote:Removing wood from this already weak area is never a good idea.

Yeah - one should probably glue a tight-fitting wood block in there, just to be on the safe side.

Then again, if it's done properly and only just enough wood is being removed for the PU's "rim" to fit in, you should be alright. I've done it before on both a 4001 and a 4003, and never had any problems so far... but maybe that was sheer luck! ;-)
Post Reply

Return to “Rickenbacker Basses: by Joey Vasco & Tony Cabibe”