Rickenbacker 4003 Rebuild

Vintage, Modern, V & C series, Fretless, Signature & Special Editions

Moderators: rickenbrother, ajish4

40014002
New member
Posts: 92
Joined: Sat Feb 15, 2003 6:00 am
Contact:

Rickenbacker 4003 Rebuild

Post by 40014002 »

Rickenbacker 4003 Serial Number (C3 **** MARCH 1990) Rebuild 2004

INTRO

This Rickenbacker 4003 has led an extremely hard life, and is not your typical Rickenbacker. There are so many things wrong with it, I hardly know where to begin… so this is the story of how and why I fell in love with a 4003 see (pic001/2/3).
Image
Keep Music Live
40014002
New member
Posts: 92
Joined: Sat Feb 15, 2003 6:00 am
Contact:

Post by 40014002 »

The previous owner Steve Dixon bought it second hand from a guy in Leeds Yorkshire in 1996. It was a rare colour scheme: burgundy with black hardware & black edge bindings. I really wanted a fireglo type one he said to me the one with the chrome hardware, but the price was good on this one £550.00 so he bought it, and decided, a la Paul Simonon of the Clash, to repaint it.

Not just the body but he stripped the coatings from the hardware down to the metal, and painted it like Paul McCartney's 'Sgt Pepper'-era psychedelic Rick…

And if that wasn't sacrilege enough, during a moment of over-excitement at a gig, he smashed the bass into the floor, breaking the top 'Horn' off the body completely.

It sat in a cupboard for about 5 years, until he decided to see if he could put it back together, and with the aid of a soldering iron, some ultra strong wood glue, some Polyfilla, some new tuning heads (Genuine Rickenbacker ones as he wanted to keep it original) a new pickguard and a can of orange fluorescent paint he put it back together.
He sanded the bound body edges down (which had all melted due the paint stripper) with an electric sander a la Chris Squire/Paul McCartney’s 4001s V63 but with triangle inlays on the neck.

THE FIRST DATE

The only GOOD thing is Steve has had mega amounts of remorse over the years since all the abuse took place and decided to try and find someone who would or could put the bass back together and play it, that is were I come in after repairing several Rickenbacker basses in the past and with a bit of time on my hands browsing on eBay there she was and a couple of emails later I had travelled the 150 miles to see him and what a nice guy he turned out to be a true bass player who’s only concern was that who ever buys the bass had better see it first as there was so much wrong with it if was delivered to your door via eBay you might just have heart failure, and he loved the idea that I was going to repair it, and best of all it still plays well, and SOUNDS exactly like a Rickenbacker 4003 should sound - that clanky, wirey, almost-chorused sound is intact, in fact the next night I was in the rehearsal room with the band and the bass held its own and at times shone through as only Rickenbacker can do and after the rehearsal I called into the Unicorn for a few beers were the bass turned a few heads with its vivid orange colour and John Mayhew the singer in our band “Jason and the Argonoughts” said “so what is exactly wrong with it” at that moment I made up my mind to document the whole rebuild so the first thing is to try and list the bad points and there are many but here we go:

The wiring is a total hack job.

The paint is about as good as you'd expect from a rattle-can job.

And I honestly couldn't say how effective the glued-together body mend will be over time (though it's held well so far Steve said).

The scratch plate does not fit properly.

The Rickenbacker nameplate has been painted from the original black one to look like the white type with black writing.

The fretboard is coming away at the headstock but only for about 1”.

The rear of the body has a whole the size of a golf ball.

The edge binding has been removed via paint striper and has been sanded down using an electrical sander.

The nut is loose and will come away as soon as the strings are removed.

The fretboard has had its fare share of paint stripper and also requires repainting.

Most of the chrome hardware has been stripped to bare metal and will require re-chroming.

The trussrods rattle when playing an open E and adjustment is almost impossible because of the excess paint on the adjusting nuts and thread.

The control knobs have been much paint over spray and will require cleaning before refitting.

As you can see from the pictures, this bass is, by anyone's standards In a bit of a mess, the brand new chrome, genuine Rickenbacker tuning pegs (cost £60) and the Rickenbacker logo'd truss rod cover are probably more valuable now than the rest of the bass.

But it is a genuine Rickenbacker and it sounds great, and is undoubtedly going to make a great repair project but it will never be as collectable as a mint 4003 as the damage is so great and it can never be put back to original so as a collectors piece it will never be but as a working bass it will be spot on so here we go.
Keep Music Live
40014002
New member
Posts: 92
Joined: Sat Feb 15, 2003 6:00 am
Contact:

Post by 40014002 »

STRIPPING THE BASS
see (pic004/5/6/7)
Image
The first thing on the way to rebuilding the bass is to strip away all the parts starting with the strings and the bridge and instantly I have uncovered the crack were the bass was smashed on stage I have drawn an arrow on the bass pointing to the crack in fact one of the screws holding the bridge in position was missing as it was right in the crack and would have had no grip at all on removing the scratch plate you can see the crack running the full length of the bass and the terrible soldering and wiring notice that the stereo jack and wiring is missing, on removing the treble pickup you can see the whole through the bass and the dull looking steel of the pickup, the head stock is the most unspoilt part of the bass and has a brand new set of Rickenbacker tuners on it.
With all the hardware removed I can now send the metal work pickup surround bridge ECT to be re-chromed but first I must strip all the paint from these parts this was done using cellulose
Keep Music Live
40014002
New member
Posts: 92
Joined: Sat Feb 15, 2003 6:00 am
Contact:

Post by 40014002 »

PREPARATION
see (pic008/9/10)
Image
First job in preparing the bass for refinishing is to strip away the old paint work (fluorescent orange) and sand the body down this was done with the help of a mate of mine (Peter the painter) you can see the damage to the back of the bass this is were it got a bit tricky as the body was flexing a bit so it was decided that the glue and pollyfiller that was used to repair the bass last time had to be removed and replaced with more modern adhesives shows peter applying adhesive forcing it in the crack then the body was clamped for several days to let it cure, the final task was to smooth the damaged area with super high grade car body filler and stopper the trussrods have to removed in order to check and clean them, you can see that the adjusting nuts have been badly painted over and proved to be a bit tricky to remove. (Pic011) Shows the removal and cleaning of the two trussrods being removed from the body end of the bass this proves this is a 4003 bass and not a 4001 as the trussrods on a 4001 are a different type and are removed from the headstock end of the bass, (pic012/13) shows the two trussrods that have been removed from the bass and shows the trussrods being cleaned with cellulose thinner to remove the excess paint over spray so that they can be adjusted correctly.
Image
Keep Music Live
rickfan60
Senior Member
Posts: 5395
Joined: Sun Apr 11, 2004 5:00 am

Post by rickfan60 »

I considered bidding on that one but I had another on the hook at the time. It is nice that someone is finally going to show it some love. Keep us posted on the restoration progress!
40014002
New member
Posts: 92
Joined: Sat Feb 15, 2003 6:00 am
Contact:

Post by 40014002 »

REFINISHING THE BASS
see (pic016/17)
Image
First job in preparing the bass for refinishing in a new colour is to apply primer to all areas that are to be painted in this case everything but the fret board which is to be repaired and lacquered only, two coats of super high build 2 pack primer are applied and allowed to dry overnight then dry and wet flatted to give the perfect base for the colour.
Image
At this stage it was now possible to repair the fretboard and as you can see in (pic014/15) the fretboard had lifted on the last fret and to affect the repair the board was lifted slightly so that wood glue could be applied in between the board and the neck and then clamped overnight to cure the bass was then further wet flatted see.
Then the colour is applied two coats 5 to 10 minutes between coats followed by two coats of clear and baked at low temperature for 30 minutes and then allowed to cool to room temperature for a couple of hours before wet flatting and repainting with a further two coats of colour and two coats of clear and left to cure for two days before de-nibing compounding / polishing.
The products used in refinishing this bass are as follows
Dupont super high build 2 pack primer grey in colour.

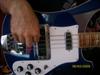
Dupont Cromax waterbase basecoat colour (special formula to replicate the Rickenbacker colour Sea Green) see (pic018/19).
Image
Dupont 3800s super high solid clear lacquer.

Another small job was to refinish the Rickenbacker badge see (pic020/21) from the headstock first the old badge was wet flatted to remove the old paint and to help the new paint to key to it then the colour was applied this was done with an acrylic brilliant white aerosol.
Image
RE-MAKING THE PICK GUARD
see (pic022/23)
Using the old pickguard as a template see the new pickguard is cut out of a piece of single ply white plastic which was purchased from a local sign making company the tools used were a hacksaw and an electrical sander see then the whole for the pickup was cut out using a drill and some small/fine files you can see that the new pickguard was made slightly larger so that it would fit the bass correctly.
Keep Music Live
40014002
New member
Posts: 92
Joined: Sat Feb 15, 2003 6:00 am
Contact:

Post by 40014002 »

RE-BUILDING THE BASS
see (pic024)
The first thing on the way to rebuilding the bass is to replace all the parts in the same order they were removed from the bass see (pic025/26/27).
Image
Starting with the trussrods which are inserted from the body end (as this is a 4003 bass) notice the masking tape that is placed around the rods to stop them vibrating and corroding in the neck once the rods are in place the adjusting nuts are refitted but are only finger tight as adjustment can only be done with the bass rebuilt and tuned to pitch, next the tuning pegs are refitted followed by all the other hardware bridge jack plate ect.
Image
Then comes the problem of sorting all the electrics out see (pic028/29) and the first question is do I rewire it as a 4003 or an early 4001 the later 4001 has more of the Rickenbacker growl (that I like) and slightly less bass than the 4003 but this would involve some adjustments to the pickups so a compromise was reached and I decided to include a vintage Rickenbacker horseshoe pickup* that I have had for a few years after buying it for £150 from Rickenbacker but never found the bass to fit it to until now.

First I have to strip all the electrics out and rewire as a 4003 in the process I fitted new jack sockets both mono and stereo new wire and capacitors this was made easy as I had downloaded an up to date wiring diagram that was free of charge from the Rickenbacker website.
With the new pickguard and electrics fitted it is time to fit the nut this was done with the help of some good old super glue and a little finger pressure see(pic030/31).
Keep Music Live
jwr2

Post by jwr2 »

what a great story ...
40014002
New member
Posts: 92
Joined: Sat Feb 15, 2003 6:00 am
Contact:

Post by 40014002 »

THE FINISHED BASS

see (pic032)
Image

ROAD TESTING THE BASS

The first road test come at our weekly band rehearsal the amp that I used was a vintage Rickenbacker TR50 bass combo see the bass was used both in mono and stereo, all the electrics worked fine and in stereo mode the bass just come alive with extra clarity and punch via the two pre-amp channels on the Rickenbacker combo, it worked so well the rest of the band wanted a go on it see (pic033/34) in fact the bass worked so well it was decided to gig it the same week the amp used for the live gig was the SWR SM220 and 1x15” Trace Elliot cab see (pic035/36).
Image

THE LAST WORD

Dave that is fantastic! I read this article with a big beam on my face and the beam got bigger when I saw the end result and the fact that you’ve gigged it. I'm absolutely delighted there's a happy ending to its story.

Cheers,

Steve Dixon

COST OF THE PROJECT

The cost of the bass £100.00

Fuel costs to collect the bass £25.00

Cost of materials to prepare bass for refinish £25.00

Cost of paint materials £100

Cost of plastic for scratch plate £8.00

Cost of electrical jack sockets ECT £12.75

Horseshoe pickup £150.00 (optional)* as I have the original pickup

Total cost £160.75

All the best
Dave Carr
Keep Music Live
User avatar
henny
Advanced Member
Posts: 1556
Joined: Tue Mar 09, 2004 1:35 pm

Post by henny »

Congrats. Brilliant success story. Image
rickcrazy
RRF Consultant
Posts: 3578
Joined: Thu May 30, 2002 4:11 am

Post by rickcrazy »

Amazing! Sincere congratulations on a job expertly done, David. I remember that particular 4003. When I saw it I said to myself 'That's one instrument no one can possibly salvage'. Well, I've been proved wrong! You're the man!
A Rickenbacker bass is much like the Jaguar E car - perennially ultra-fashionable.
User avatar
jaymi
Advanced Member
Posts: 2332
Joined: Wed May 26, 2004 5:00 am
Contact:

Post by jaymi »

once again, another hack job down and a smashing bass taking its place....LOVELY JUBBLY.....
78 Purple 4001
88 BLACKSTAR
89 BLACKSTAR
89 Mid Blue
91 Mid Blue
User avatar
henry5
Advanced Member
Posts: 2787
Joined: Thu Mar 11, 2004 6:00 am

Post by henry5 »

Phew! I'm mightily impressed!! There IS a guy in the UK who can fix Ricks!
"Be kind, for everyone you meet is fighting a hard battle."
40014002
New member
Posts: 92
Joined: Sat Feb 15, 2003 6:00 am
Contact:

Post by 40014002 »

Many thanks to all who have Emailed me and thanks to all the Rickenbacker fans from the uk who have asked if i can help fix there ill or broken basses i will contact you as soon as possible.

all the best Dave Carr
Keep Music Live
learning_curve
Member
Posts: 246
Joined: Sun May 23, 2004 9:39 am

Post by learning_curve »

Hey that was fun! Nice post! Love a story with a good ending. Nice to see a great old Ric come back to life. Never liked that color very much but somehow it has grown on me after seeing this one? Randy
Post Reply

Return to “Rickenbacker Basses: by Joey Vasco & Tony Cabibe”