

That is quite a reasoned and intelligent discourse, Paul, and the kid in me lusts after the grade of tools with which you are fortunate enough to work daily. A granite workspace, for flatness, a super-industrial table saw with a rugged-looking Biesemeyer fence, and is that one of the table saws with the explosive blade-stop device?
366/12 IN NEED OF CARE
Moderator: jingle_jangle
Re: 366/12 IN NEED OF CARE
Howdy Doody and Ding Dong School for me...
That is quite a reasoned and intelligent discourse, Paul, and the kid in me lusts after the grade of tools with which you are fortunate enough to work daily. A granite workspace, for flatness, a super-industrial table saw with a rugged-looking Biesemeyer fence, and is that one of the table saws with the explosive blade-stop device?
That is quite a reasoned and intelligent discourse, Paul, and the kid in me lusts after the grade of tools with which you are fortunate enough to work daily. A granite workspace, for flatness, a super-industrial table saw with a rugged-looking Biesemeyer fence, and is that one of the table saws with the explosive blade-stop device?
-
jingle_jangle

- RRF Moderator
- Posts: 22679
- Joined: Wed Dec 22, 2004 6:00 am
- Contact:
Re: 366/12 IN NEED OF CARE
Granite surface plate. My workspace is plaster, concrete, rebar.
We have four Saw-Stop safety table saws that retract the blade beneath the table and stop it instantaneously, to minimize injuries. I had the two first ones sent to a college on the West Coast, and promptly ordered two more.
For some unusual entertainment, watch their hot dog video at:
http://www.sawstop.com/how-it-works-videos.htm
-
jingle_jangle
- RRF Moderator
- Posts: 22679
- Joined: Wed Dec 22, 2004 6:00 am
- Contact:
Re: 366/12 IN NEED OF CARE
The glue was given 24 hours to dry. The splice was carefully planed down level with the surrounding wood, and the front and sides of the guitar were sanded one more time. The area was checked for flatness and level; we don't want any high or low spots to disturb the highlights once the guitar is clearcoated (varnished) and buffed.

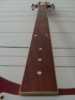
You can see in this photograph the proximity of the splice to the neck/body joint. This area of the splice had to be very carefully levelled and blended. This photo also shows the fretboard beginning to be sanded. I sand the varnish off fretboards following de-fretting, as chemical strippers make the boards bleed orange into the surrounding maple, and tend to dissolve the fret markers.

The photo below shows a factory fretboard fill. It probably was a good match when the guitar was new, but the wood has darkened over time and this small patch stayed fresh and reddish-brown.

The fretboard de-fretted but not yet completely relieved of all its varnish:

Finally, a picture of the fretboard ready for rebinding, fresh markers, and finally new frets.

And, don't you just love the proportions of the 1960s 12-string headstock?

Ahhhh, Nirvana!
You can see in this photograph the proximity of the splice to the neck/body joint. This area of the splice had to be very carefully levelled and blended. This photo also shows the fretboard beginning to be sanded. I sand the varnish off fretboards following de-fretting, as chemical strippers make the boards bleed orange into the surrounding maple, and tend to dissolve the fret markers.
The photo below shows a factory fretboard fill. It probably was a good match when the guitar was new, but the wood has darkened over time and this small patch stayed fresh and reddish-brown.
The fretboard de-fretted but not yet completely relieved of all its varnish:
Finally, a picture of the fretboard ready for rebinding, fresh markers, and finally new frets.
And, don't you just love the proportions of the 1960s 12-string headstock?
Ahhhh, Nirvana!

Re: 366/12 IN NEED OF CARE
I am constantly amazed at the patience that you demonstrate in your approach to making a repair and also in the care that you take in the setup prior to making a cut. You have developed a great skill Mr. Curmudgeon. Thanks for sharing your "how to do it" knowledge with us.
“We can't solve problems by using the same kind of thinking we used when we created them.” - Albert Einstein
"You do not really understand something unless you can explain it to your grandmother" - Albert Einstein
"You do not really understand something unless you can explain it to your grandmother" - Albert Einstein
Re: 366/12 IN NEED OF CARE
That's why I think Paul is the quintessence of an Extreme Artisan, the ultimate blend of art and luthier, concept and execution.winston wrote:I am constantly amazed at the patience that you demonstrate in your approach to making a repair and also in the care that you take in the setup prior to making a cut. You have developed a great skill Mr. Curmudgeon. Thanks for sharing your "how to do it" knowledge with us.

Re: 366/12 IN NEED OF CARE
Dude got patience! And/or a lot of extra time in a day (what, 27, 26 hours in a day?). Thanks for the new pictures. Will you have to do any filling along the joint or did the maple slat fit really tight?
Interesting closeup on the old MOP inlay; you can see all the pieces on the bottom of the inlay. Also a question on the fingerboard. Since the wood has open grain, and I see it on my basses also, do you strive to get the sawdust out of the cracks and let the CV fill in or do you leave the dust in and have the tan color show in the finished product? Just curious, as it looks lije RIC does it the latter way, and I've always wondered why.
Interesting closeup on the old MOP inlay; you can see all the pieces on the bottom of the inlay. Also a question on the fingerboard. Since the wood has open grain, and I see it on my basses also, do you strive to get the sawdust out of the cracks and let the CV fill in or do you leave the dust in and have the tan color show in the finished product? Just curious, as it looks lije RIC does it the latter way, and I've always wondered why.
-
jingle_jangle
- RRF Moderator
- Posts: 22679
- Joined: Wed Dec 22, 2004 6:00 am
- Contact:
Re: 366/12 IN NEED OF CARE
John, the wood spline was thickness-sanded to be a light press fit into the body. Then a nice film of Titebond was applied, and the spline was pushed into place and excess wiped off. If there is any gap at all between the body and the spline, the Titebond will show a thick line under the final finish everytime there is a climatic change. So there was no gap to speak of--just enough space so the glue acted virtually as a lubricant to help the spline to be pressed in. Were I to measure the body gap and the spline, they would measure virtually the same; maybe .0005" gap.
RIC fills the pores in the rosewood/bubinga with a special filler material. Merely allowing the dust to remain in the grain, doesn't act as a filler, as it traps air which causes the CV to pit.
I use several different grain fillers, depending upon the color and vintage of the fretboard. These early ones get a light straw-colored filler; you'll see it in the next set of photos.
-
jingle_jangle
- RRF Moderator
- Posts: 22679
- Joined: Wed Dec 22, 2004 6:00 am
- Contact:
Re: 366/12 IN NEED OF CARE
A few shots of the filled fretboard BEFORE sanding...here you can see the whitish grain filler in the pores of the fretboard. This is typical of vintage Ricks. This will be sanded so the filmy look goes away, and the filler on either side of each fret is also removed until there is just a knife edge of filler remaining. In the last photo you can also see the darker brown filler along the edge of the fretboard between the binding and neck proper. This is to take up any grain or gap between the three materials.
Note at this point the neck has been refretted, the frets flattened, and the fretboard rebound. I had lots of pictures of this part of the process, too, but apparently my camera malfunctioned, because they are not on the chip.


Note at this point the neck has been refretted, the frets flattened, and the fretboard rebound. I had lots of pictures of this part of the process, too, but apparently my camera malfunctioned, because they are not on the chip.

Re: 366/12 IN NEED OF CARE
I love watching these threads, they're the most fun I can have without, er, a guitar in my hands (my, that was a close one). More! More!
Re: 366/12 IN NEED OF CARE
Yes, very interesting work to view, as ever Paul.
The HL serial number puts it on about 50 units away from my '68 bass.
This should be one sweet guitar when finished.
The HL serial number puts it on about 50 units away from my '68 bass.
This should be one sweet guitar when finished.
-
beatlefreak

- Senior Member
- Posts: 6160
- Joined: Wed Jun 14, 2006 5:45 am
- Contact:
Re: 366/12 IN NEED OF CARE
Great work as always, Paul. Love the pictures!
Re: 366/12 IN NEED OF CARE
Paul, is there a reason why, for a finished fretboard, that it is better to finish the fretboard wood (at least on the top surface of the fretboard only) after the frets go in, instead of before they go in? Just curious, since when the guitar is refretted later, despite how well you do with the razor blade along the edge of the fret before removing it, it seems that there will always be a break in the finish along the fret edges from that point on that will allow oil to get in under the fret edge and delaminate the finish over time.
-
jingle_jangle
- RRF Moderator
- Posts: 22679
- Joined: Wed Dec 22, 2004 6:00 am
- Contact:
Re: 366/12 IN NEED OF CARE
Reason:
It's a Rickenbacker, and that how Ricks are done. Assumption is that, in future, should a refret be needed, a fretboard refinish will be once again be done. I know that some folks can do that razor blade thing (I can too, of course...) but it just does not look right and, yes, grunge can get in there.
A guitar or bass that has enough wear on the frets to require refretting usually has a dingy or worn fretboard, too, so this is not too tough a decision. The downside is that most luthiers could care less about the extra work required to do a Rick properly, and will turn the job down as too much trouble, or do it badly.
Next pictures will be of the guitar ready for sealer and after sealer has been applied.
-
jingle_jangle
- RRF Moderator
- Posts: 22679
- Joined: Wed Dec 22, 2004 6:00 am
- Contact:
Re: 366/12 IN NEED OF CARE
Three more pictures showing the 366/12 after sealing the body, neck, and fretboard. At this point the frets have been preliminarily levelled and polished.
Next: Masking and spraying the color! (Azureglo with amber tint...)


Next: Masking and spraying the color! (Azureglo with amber tint...)
-
melibreits

- Senior Member
- Posts: 4081
- Joined: Wed Mar 12, 2003 6:00 am
- Contact:
Re: 366/12 IN NEED OF CARE
Paul, this is an amazing thread! I love your step-by-step photo essays.... Your attention to fine details is unsurpassed.
....And I appreciate that every time I look at or play one my PW masterpieces!
....And I appreciate that every time I look at or play one my PW masterpieces!